A common problem with the Windows operating system of any edition is the loading of computer resources by "internal" processes. One of these processes is a system interrupt, which can seriously burden computer resources, which will be displayed in the Task Manager. The most common situation is when a system interrupt loads the processor, which causes the computer to seriously lose performance. In this article, we will look at why this happens, as well as whether it is possible to disable system interrupts in Windows.
System interrupts: what is this process
By default, the System Interrupts process in the Windows operating system is constantly running, but during normal operation it should not load system components by more than 5%. If a this process more seriously affects the resources of the computer, this indicates the presence of a hardware problem, namely, a malfunction in the operation of one of the computer components.

When "System interrupts" load the processor, this may indicate a malfunction in the video card, motherboard, RAM or other element system block. The central processor tries to supplement the missing power that has arisen due to not correct operation component, using its own resources, as evidenced by the "Traps" process. Most often, the problem of improper operation of computer components is associated with complete or partial incompatibility running program(or games) with computer component drivers.
How to disable system interrupts
As noted above, system interrupts are nothing more than an indicator that Windows is additionally accessing CPU resources. Disabling system interrupts to improve computer performance will not work, and you need to look for a problem in the operation of PC components. To do this, it is convenient to use the DPC Latency Checker application, which can be downloaded for free on the Internet from the developers' website. The program allows you to identify faulty computer components.
To diagnose the system with the DPC Latency Checker application, run it and wait. It will take some time to check the computer, after which the user will see on the graph if there are problems in the operation of the system components. The app will also point to possible mistakes and advises you to look for them, turning off the devices.

To do this, go to the "Device Manager" by right-clicking on "Start" and selecting the appropriate item, and start turning off the devices one by one. After each shutdown, check in the "Task Manager" and the DPC Latency Checker application to see if the problems with processor loading by system interrupts have been resolved. If the problem persists, turn the device back on and move on to the next one.

Important: In the process of disabling components in the "Device Manager", do not disable "Computer", "Processor" and "System Devices", otherwise this will lead to an emergency restart of the computer.
When a device is found that, when disconnected, will reduce the load on the processor to normal, update the drivers for this component from the official website of the developers.

Note: If attempts have been made to disable all system components, but the System Interrupts process continues to load the system, try updating the processor drivers.
In a situation where the tips above do not help to deal with the problem of processor loading with system interrupts, you can also try the following ways to fix the situation:

It is worth noting that you should not disable system interrupts through the "Task Manager", this will crash the system, but will not solve the problem.
System processes, which ordinary computer users often have no idea about, can very often cause increased loads on the computer's computing resources. These, in particular, include the so-called system interrupts. What it is, most do not know and often try to shut down this service directly in the "Task Manager", where the CPU and RAM load is displayed. Looking ahead a little, it should be said that it is not worth doing such things in any case. But how then to bring the system to life? It is proposed to talk about this in more detail, especially since when considering the main issue, other problems related to the incorrect functioning of the “iron” components, the Windows operating systems themselves and the software installed in their environment may be found along the way. But first things first.
what it is?
Before you take any troubleshooting steps, you should find out what this system component is. In the Task Manager, the System Interrupts process, which runs constantly, is responsible for its functioning.
But what is it? Without going into technical details and saying what it is, system interruptions can be compared to a kind of litmus test or an indicator that indicates that the system is experiencing malfunctions in some equipment. In addition, an increase in the load on resources may also be due to the incompatibility of the software and hardware of the computer. In its normal state, the load on the processor from this process usually does not exceed five percent or a little more, which is quite enough to diagnose all the currently used "hardware" devices for correct functioning. If the load increases above the specified limit, it is urgent to Troubleshoot and fix equipment problems.
How it works: the simplest explanation
But let's take a look at what system interrupts are in Windows 7 or other modifications on simple example. It should be immediately noted that, regarding software, the operation of this component is associated with non-executable program elements that can be loaded, for example, into RAM (dynamic libraries, device drivers, etc.).
Suppose you have some modern game installed on your computer, but the video card meets only its minimum requirements. system requirements, or the configuration is below this threshold. If the graphics chip cannot handle the processing of software components, which leads to an increase in the load on it, system interrupts are included in the case. At their expense, command processing is redirected to the central processor, which tries to help the video card cope with the increased number of requests. Accordingly, from the side of the described process in the "Task Manager" there is an increase in the load. And often the occurrence of such situations leads not only to the freezing of the entire system, but even to the appearance of blue screens. The same is true when equipment starts to fail. Unfortunately, in case of breakdowns of the "iron" components of the system, all this can equally apply to any of them (for example, HDD, glitches RAM, etc.).
System interrupts load the processor: what to do first?
Based on the above theoretical information, let's move on to practical measures that allow us to eliminate emerging problems and correct such situations. What to do first? Oddly enough, it sounds, but sometimes it is enough to perform the most common reboot, which allows you to deactivate all third-party software components. But after all, when you restart some application, the situation may repeat itself. In this case, you should immediately check the status of the drivers using the "Device Manager" for this. It is quite possible that the conflict between software and hardware was just provoked by them.

If possible, install control software for problematic devices, which in the "Dispatcher" can be marked with a yellow triangle with exclamation mark, and update drivers for all other hardware using automated utilities like Driver Booster.
Tracking loads with a special utility
If the actions with installing and updating drivers do not give the desired result, you will have to use other methods. Alas, there are no such tools in the toolkit of Windows systems.

Therefore, if it is noticed that system interrupts are loading resources, most experts recommend using a small program called DPC Latency Checker, which is presented in a portable form and does not require installation on a PC. In it, the first step is to enable scanning, after which recommendations for troubleshooting will be given in the scan results. However, most often they are associated only with the completion of some processes that correspond to both programs and the equipment currently used, or a recommendation will be issued to refer to the "Device Manager". But we need to use it, leaving the diagnostic utility active as a kind of means of changing load tracking. Do not confuse the loads shown in this program with those seen in the Task Manager.
Disabling components in the "Device Manager"
As for this section of equipment management, the essence of troubleshooting comes down to sequentially turning off the devices installed in the system, followed by checking the loads with the aforementioned utility.

Please note that it is strictly forbidden to turn off the equipment presented in the "Computer", "Processors" and "System Devices" sections, as such actions may lead to an unauthorized shutdown and reboot of the computer. What good, and the entire operating system will fail.

For the remaining components, having previously enabled the display of hidden devices in the view menu, each component should be disabled via the RMB menu, and then re-activated diagnostics in the load tracking program. When, in the test results, after the deactivation of a device, the load drops to normal, and it will be clear that this particular component is faulty. If reinstalling the driver does not help, the device will have to be replaced.
What should I do if the load problem persists?
But what is it? System interrupts still give an increased load on the processor. What else could have contributed to this situation? For some reason (and this is true), in most cases, the root cause of this behavior of the system is a problem with outdated or built-in sound equipment on the motherboard, for which improved sound effects are involved.

As an option - in the sound settings Windows tools, disable this item, which will automatically deactivate all installed effects. Note that they refer specifically to the software, and not to hardware type, so turning off the main device may not work.
Problems with primary input/output systems
Finally, many experts do not exclude the appearance of problems in the operation of the primary BIOS / UEFI systems, which may be associated with obsolescence original firmware. In this case, new and more modern equipment may not be detected correctly. As it is already clear, the way out will be to download and install the firmware update. But, if you can run such processes for UEFI directly in a running operating system, you should be extremely careful with experiments in the BIOS. Incorrect firmware or incorrect installation can also cause the entire computer system to stop working.
Brief summary
That's it in a nutshell and that's all there is to the interrupt system calls. Based on the foregoing, it is recommended to eliminate the problems that arise by using the specified diagnostic program with sequential shutdown of the equipment. If necessary, faulty components will have to be replaced. As an additional tool that can be used to identify problems with RAM sticks, it is advisable to use the Memtest86+ utility, but without necessary knowledge it won't make any sense.
It’s good when, after assembly or a planned upgrade, the computer starts up the first time and works stably and without glitches. It is much worse if unexpected problems arise - spontaneous reboots and freezes, program crashes, inoperability or "invisibility" of devices, etc. The first reason that usually comes to mind in this case is an interrupt conflict. But do we know the nature of this phenomenon well, are we sufficiently prepared to combat it?What is IRQ
Interrupts are the basic mechanism for the system to respond to events that occur. Hardware interrupts, commonly called IRQ (Interrupt ReQuest) are physical signals, with which the device controller informs the processor about the need to process some request. Conventionally, the interrupt handling scheme looks like this:
1) the processor receives an interrupt signal and its number;
2) using a special table, the address of the program responsible for handling the interrupt with the given number is found - the interrupt handler;
3) the processor suspends the current work and switches to the execution of the handler (in the general case, this is some kind of driver);
4) the driver gets access to the device and checks the cause of the interrupt;
5) the requested actions are launched - initialization, device configuration, data exchange, etc.
6) the driver exits and the processor returns to the interrupted task.
Obviously, for the interrupt mechanism to work correctly, two conditions must be met: firstly, the request signal must reach the processor and, secondly, the handler driver must correctly respond to this signal. In the event of a conflict, the second condition is not met: the interrupt signal arrives, but the response to it turns out to be incorrect, as a result of which we have (at best) an inoperative device.
Conflict
We can say that a conflict is a situation in which several objects simultaneously try to access a resource that is intended for only one of them. An interrupt conflict occurs when multiple devices use the same interrupt line to send a request signal and there is no mechanism to handle competing requests. If the driver, when receiving control, works with a different device that sent the request, then either a failure occurs, or one of the devices simply does not work.
The question arises: can several devices use the same interrupt line, or is it impossible in principle? After all, if the driver can determine who exactly the request came from, then it will only respond to signals from "its" device, ignoring all the others. But this must be agreed in advance in some way, otherwise conflict is inevitable.
The local PCI bus was designed with sharing interrupts. Each PCI device must work correctly on the same interrupt line as other PCI devices. This is done as follows: the presence of a signal on the interrupt line is determined not by the front, i.e. change in the voltage level, but by the very fact of the presence of a certain voltage. Several devices can change the voltage in the line at once, becoming, as it were, in a queue for service.
Thus, sharing the same IRQ by multiple PCI devices is not, by definition, a conflict. However, sometimes problems do arise. First, not all PCI devices work correctly on the same interrupt line as others. Secondly, sometimes drivers have bugs that prevent them from correctly identifying the signal source, interfering with other drivers. Thirdly, not all devices work on the PCI bus; for example, ISA devices, which include, for example, COM / LPT port controllers, cannot share interrupts with others. To have a clear idea of how conflicts can be avoided or eliminated, you need to understand the mechanism of IRQ management.
Organization of hardware interrupts in a personal computer
As you know, personal computers started with the IBM PC. Its architecture provided eight lines of hardware interrupts (IRQ), which were controlled by a special controller. Each of them was assigned a number that determined the interrupt priority and the address of its handler (the so-called interrupt vector). The new architecture, IBM PC AT, provided for eight more interrupt lines, for which a second controller was used, connected to one of the interrupt lines of the first controller. Unfortunately, this architecture was the last one after IBM lost the ability to manage the development of the platform it created, so all modern computers still have only sixteen interrupts, one of which is used by the second controller.
The IBM PC AT computer had only one bus, through which devices could communicate with the processor and memory - ISA. Most of the interrupt lines were assigned to standard ISA devices, the rest were reserved for the future. When this future arrived, it turned out that the new universal PCI bus had only four free interrupts. Therefore, a tricky mechanism for sharing interrupts (IRQ Sharing) and dynamic number redefinition (IRQ Steering or Mapping) was invented.
The essence of the interrupt control mechanism for PCI devices is as follows. In general, there are four physical PCI interrupt lines, called PIRQ0, PIRQ1, PIRQ2, and PIRQ3. They are connected to the interrupt controller. Each PCI device, for its part, has four connectors, called INT A, INT B, INT C, and INT D. You can connect lines to the connectors in any order. For example, for the first PCI slot, you can make the following wiring: PIRQ0 - INT A, PIRQ1 - INT B, PIRQ2 - INT C, PIRQ3 - INT D. And for the second - in a different way: PIRQ0 - INT B, PIRQ1 - INT C, PIRQ2 - INT D, PIRQ3 - INT A. Usually the device requires only one interrupt line connected to INT A. When installed in the first slot, the device uses the PIRQ0 line, and in the second slot, the PIRQ1 line will be on the same pin. Thus, devices in different slots will use different physical interrupt lines. Hardware conflict between them will be excluded.
The AGP bus, being in fact a specialized modification of PCI, also uses one of the PIRQ lines - usually PIRQ0.
Four lines are not enough for modern systems, so new chipsets often use eight PIRQ lines, which are connected in the same way in different combinations to PCI slots and devices built into the board.
The PIRQ lines are connected to the interrupt controller. They, like other lines, are assigned logical IRQ numbers. If there are several devices on the same physical line (and this is allowed), then they will all have the same IRQ number. If the devices are on different physical lines, they can still receive the same IRQ numbers. Normal drivers will allow them to run freely without performance loss, since the PCI bus can only be captured by one device anyway. The main thing is to recognize from which device the signal came.
Numbers for PIRQ lines are assigned automatically thanks to the notorious Plug&Play mechanism. But there are also ISA devices that support Plug&Play. They too have the option to automatically receive an IRQ number. But their interrupt line belongs to them exclusively, and if one of the PIRQ lines gets the same number, an unresolvable conflict will arise.
So, we found out that PCI devices should be free of IRQ conflict problems. If they, of course, work correctly, and this is not always the case. In addition, drivers must support the mechanism for sharing interrupts. ISA devices do not share interrupt lines and are therefore conflict instigators. Consequently, the problem of conflict resolution is reduced to the correct distribution of numbers (the source of problems is ISA devices and "crooked" drivers) or to breeding along different physical lines ("crooked" PCI controllers).
Let's look at how numbers are distributed in the system and how we can influence this process.
Interrupt map
As I said, most IRQ numbers are already occupied by standard devices, or rather, assigned to their interrupt lines. Let's go in order:
0 - system timer (number is always busy);
1 - keyboard (the number is always busy);
2 - second interrupt controller (always busy);
3 - COM port 2 (may be disabled and the number released);
4 - port COM1 (can be disabled, and the number - freed);
5 - port LPT2 (usually the number is free);
6 - floppy disk controller (may be disabled, and the number - released);
7 - port LPT1 (if not in EPP or ECP mode, then the number is free);
8 - real time clock (always busy);
9 - free;
10 - free;
11 - free;
12 - PS / 2 mouse (may be free if there is no such mouse);
13 - coprocessor (always busy);
14 and 15 - hard disk controller (can be disabled, and the number is freed).
In a typical system, numbers 5, 7, 9-11 are free, that is, five out of fifteen. In addition, you can safely disable COM2 and LPT1 ports by increasing the number of free numbers to seven. Free - does not mean that they are not busy, just free shuffling is possible between them.
In any system, there are three standard PCI devices - ACPI, USB controllers and a video card, each of which will occupy one number. A complex device (for example, a sound card) may require several lines - INT A, INT B, etc. for their components, which will not conflict with each other (after all, different physical lines), but with other devices - easily.
There are several ways to find out how interrupt numbers are currently allocated. At the very beginning of the computer boot, a text configuration table appears. Immediately after it comes a list of PCI devices with an indication of the IRQ number assigned to them (see screenshot). The other way works on Windows 9x. In the control panel there is an icon "System", in the called applet - the "Devices" tab. We select the properties of the device "Computer", and all devices will be listed there with their IRQ (see screenshot).
In Windows 2000, we do not have access to interrupt management, so to view the list of IRQs, we need to use the standard information utility (Control Panel/Administrative Tools/Computer Management/System Information/Hardware Resources).
Assigning IRQ Numbers Using the BIOS
In the system, IRQ numbers are allocated twice between physical lines. The first time the system BIOS does this is when the system boots. Each Plug&Play device (all PCI, modern ISA, integrated devices), or rather its interrupt line, is assigned one number out of ten possible. If there are not enough numbers, several lines get one common. If these are PIRQ lines, then it's okay - if you have normal drivers and support from the operating system (see below), everything will work. And if several ISA devices or PCI and ISA devices receive the same number, then a conflict is simply inevitable, and then you need to intervene in the distribution process.
First of all, you need to disable all unused ISA devices (in systems without ISA slots, they are also present) - ports COM1, COM2 and the drive. You can also disable the EPP and ECP modes of the LPT port, then the IRQ7 interrupt will become available.
In BIOS Setup, we need the "PCI / PNP Configuration" section. There are two basic way affect IRQ number allocations: block a specific number and assign a PIRQ line number directly.
The first method is available for all BIOSes: find the list of items "IRQ x used by:" (in newer BIOSes it is hidden in the "IRQ Resources" submenu). Those interrupts that should be assigned exclusively to ISA devices should be set to "Legacy ISA". Thus, when distributing numbers to PCI devices, these interrupts will be skipped. You should do this if any ISA device stubbornly gets on the same interrupt with the PCI device, because of which both do not work. Then we find the number of this IRQ and disable it in the BIOS Setup. The PCI device moves to the new IRQ number, but the ISA device remains. The conflict is resolved.
The second, more convenient way to manage IRQ numbers is direct assignment. In the same BIOS Setup submenu, there may be items like "Slot X use IRQ" (other names: "PIRQx use IRQ", "PCI Slot x priority", "INT Pin x IRQ").
With their help, each of the four PIRQ lines can be assigned a specific number. By the way, in the new AwardBIOS 6.00 you can see which devices (including built-in ones) use a particular line. Just look at the right side of the BIOS Setup screen: the photo shows me hovering over "Slot 1/5 use IRQ no." and "Display Contr." appeared on the right. That is, the first PIRQ line is used by the video card. If I now put any specific number instead of "Auto", the video card will be put on this interrupt.
Windows IRQ Allocation
The second time the interrupt numbers are allocated by the operating system. As my experiments have shown, Windows "98 begins to interfere with the actions performed by the BIOS" only in extreme cases. If you have a normal BIOS, the techniques described here will not be needed.
Note that for the IRQ sharing and dynamic allocation mechanisms to work properly, Windows must recognize the motherboard chipset and load the IRQ Miniport. The more recent version of Windows, the more chipsets supported by its own miniport (PCIIMP.PCI). However, it's always better to play it safe and install the latest chipset drivers.
In Windows 98, the IRQ distribution system is managed using the standard device manager. In the list of system devices, you need to find the PCI bus. There is a special tab in its properties (see screenshot). If everything is set up correctly, the miniport will be mentioned there ("successfully loaded") and PCI bus management (Steering) will be enabled. Thus, Windows "98 has the means to control the distribution of interrupt numbers between physical lines. But since the BIOS most often does a good job with this, this mechanism is not involved.
But sometimes it's just necessary. As I said before, PCI devices should not conflict if they use the same logic interrupt. Another thing is ISA devices, which also include COM and LPT ports. If the device is non-Plug&Play, the BIOS may not notice it, giving the interrupt it occupies to the PCI device. Then you need to reserve the interrupt. This is done in the Windows Device Manager "98: select the "Computer" device, call its properties, switch to the second tab. Then everything is clear.
In addition to redundancy, you can directly set the interrupt number for the device. To do this, you need to find the "Resources" tab in its properties, disable automatic tuning and try to change the assigned interrupt number.
Unfortunately, this doesn't always work.
Windows 2000 is a special system. If you have modern computer, then it probably supports the ACPI configuration interface. Windows 2000 in this case will generally ignore the actions of the BIOS and "hang" all PCI devices on one logical interrupt. In general, this will work fine (when there is no ISA), but sometimes there are problems. To be able to change interrupt numbers, you must either change the HAL kernel or reinstall Windows 2000 with ACPI disabled in the BIOS. The kernel is replaced as follows: in the device manager, select "Computer" / "Computer with ACPI", change the driver to " standard computer", reboot. If this does not help, you will have to reinstall Windows 2000 again.
I hope the above information will help you in the fight against hardware glitches. And remember: most of the problems that arise are due to the low level of computer literacy of the computer owner. Therefore, one should always strive for self-education, then there will be fewer problems, and those that nevertheless arise will not seem insoluble.
Processor overloaded? System interrupts are to blame.
The reason for the fact that the processor is overloaded for almost the entire session may be the so-called system interrupts, and this, in turn, means that the problem lies in the area of \u200b\u200bthe equipment installed on the computer or the drivers for these devices. But I warn you right away: even the volume of this entire article is not enough to isolate all the reasons (and even more so the options for their solutions) why system interrupts simply kill Windows. For the approach to finding problems is complicated by the use of a much more complex tool than the one described here.
What are system interrupts and how to try to deal with processor overload?
System interrupts appear in the Task Manager as system process, but in fact they are not. This “ ” is only representative, showing the processor load when working with interrupts at a low level. It is an integral part of Windows, you cannot kill the process. Despite the ominous name, system interrupts are a mandatory and normal part of the process of interaction between the CPU and the rest of the equipment.
The cause of interruptions (more precisely, too slow from time to time) can be devices inside your computer, installed programs, and sometimes the processor itself. After all, system interrupts are some form of interaction between the program / hardware and the processor itself. Whenever a new process needs to appear on the system, the processor drops everything and performs the task. It doesn't matter if the user has clicked the mouse or the process is running on schedule, the task is immediately added to the execution queue. Upon its execution, the processor returns to the previous state.
As you understand, system interrupts may well signal to the system and the user that at the moment some calculations are going with an error, which is expressed in serious consumption of processor resources by this “process”. In a healthy system, system interrupts "consume" NO MORE THAN 2% of the total amount of processor work. Although I have also seen processors with an interrupt rate from 3 to 10%% - it all depends on the configuration. But if you notice that the processor spends at least 5 - 10%% of its processing power on interrupts from session to session, this is a signal that the computer has problems.
System interrupts. How to deal with high readings?
Each of the following steps will require a system restart. Not because it is customary, but because problems with interrupts are often solved by a simple re Windows startup.
DRIVERS AND MORE DRIVERS
The very first tool that will help determine whether broken drivers are to blame for the fact that system interrupts load the processor is a German utility. DPC Latency Checker. Download it from this link:
Installation is not required. The essence of the utility is simple. We start and start working in Windows until system interrupts begin to interfere with us. Here is the window of a normally running assembly:
And here they are starting to show up:

The utility in the comment field in English advises you to go to the Device Manager and proceed with the phased shutdown of network devices, sound cards, USB controllers, devices Bluetooth. I advise you to listen. After each shutdown, peer into the Task Manager and the utility window, see how the system reacts to a temporary shutdown of equipment. Continue disabling all external devices: modems, external drives, flash drives. And if at some point there are changes for the better, decide to update the driver for the device. But so that there are no problems with starting Windows, it’s better not to turn off these devices (these drivers are vital, but they are also drivers, and it’s quite possible that you will have to reinstall the firewood on the motherboard with the whole package as with Windows installation clean):

The program works in the same manner. LatencyMon
http://www.resplendence.com/downloadsIt requires installation, but is also free. Its job is to look for driver files with a high amount of computation spent on a delayed procedure call (a process that is called by an interrupt routine in response to the interrupt itself, but not necessarily immediately executed). This tricky name hides the process of searching for drivers, in the files of which information is stored that the driver requires too much from the processor to service its device, assigned specifically to it. Here is the publishers page:
http://www.resplendence.com/latencymonon which, however, I did not find the download link with my blind eyes, and therefore I will present you with the opportunity to download the program from my website
DOWNLOAD FREE PROGRAM
Starting up, she immediately informed me about possible problems With DVD drive– driver atapi.sys is responsible for it (and by the way, the drive has not been working for almost 3 months ...). Warns that you may need to flash the BIOS:

Go to tab Drivers and sort them according to the most vulnerable indications by clicking on the column DPC count:
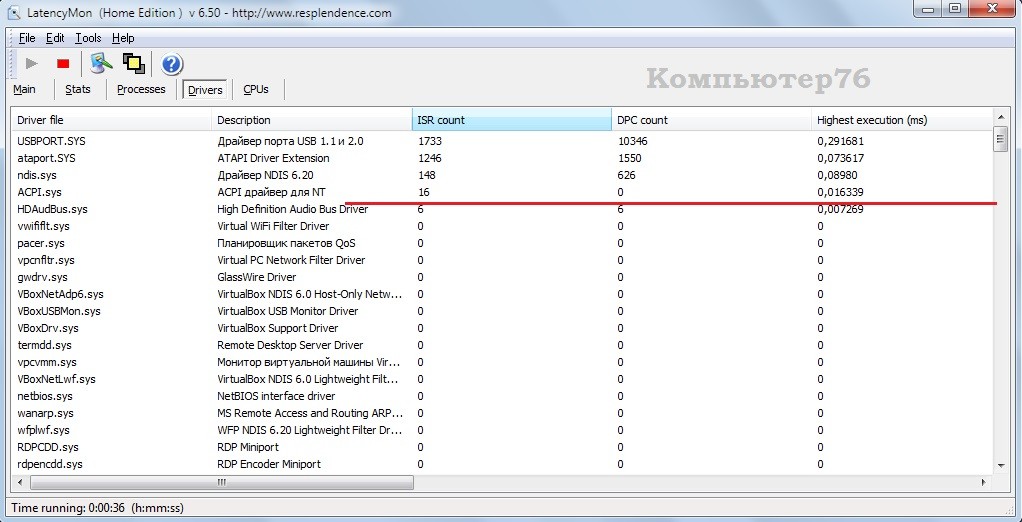
Take a closer look at the first ones in the line: they and can be cause of your problems.
EVERYTHING HAPPENED SOMETHING SUDDENLY, AFTER REBOOT
There was one moment when well, no way could not isolate the cause of the brakes. The case helped: the user “grabbed” a virus that completely destroyed DirectX, and acted extremely selectively, killing exactly the system Windows files, leaving DirectX gaming . I had to repair the system with an update, and - lo and behold! - along with the rubbish, system interrupts also disappeared. I did not spare a little time, but the result was unexpected. The culprits were not viruses or drivers, but service packs. Here are their names:
- KB3199986
- KB4013418
- KB3211320
I insist that it was AFTER INSTALLING EXACTLY THESE UPDATES that a particular user began to suffer from overload with system interrupts. Something like this ... you have food for thought.
EXCLUDING DEFECTIVE EQUIPMENT
It can also cause system interrupts to load the processor utterly. Start checking if the previous search for broken drivers did not bring success. And Windows itself and the built-in self-diagnostic utilities will help you in finding problems with the hardware. I wrote about them already in the article. Run your eyes, the information will be useful, do not hesitate. Be aware - those who have departed from the cable connector can also be the culprits of misadventures. I personally encountered problems with both processor overheating and “forgetfulness” about upgrading the BIOS for a brand new Windows 10 (more on that below) - everywhere the result was noticeable system interruptions.
NOTE. If system interrupts get the better of your laptop, you'll have to make sure you don't have a dying battery problem. Read the article on your own.
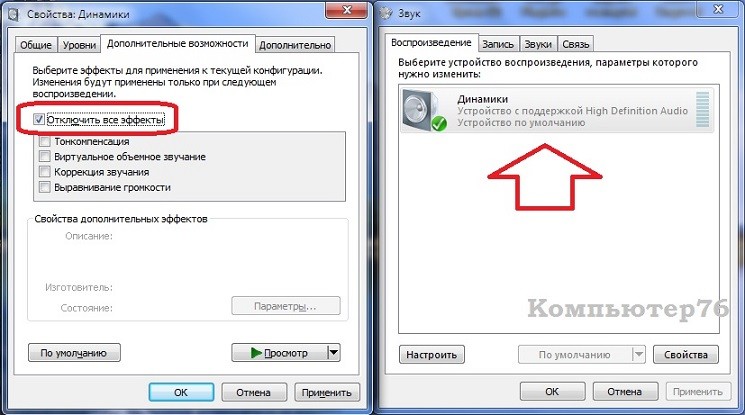
CHECK WINDOWS SOUND SCHEME
Actually, we are talking about resetting the sound effects in Windows to the default ones. Right click on the sound icon and click on Playback devices:

In the Playback tab, double-click on the default devices item (I have Speakers), go to the tab Additional features and check the box next to Disable all effects. Apply - OK. Reboot and check:
- IS THE BIOS FAIL?
Not excluded. BIOS is the first program that starts after pressing the power button on the computer. So it's time to check for updates for your BIOS. And so that the search for the desired version is not delayed in time, check the version of your BIOS right now. In command console cmd type two commands in sequence:
system info | findstr /I /c:bios wmic bios get manufacturer, smbiosbiosversion
I in the first team is a big latin i.

Cause of the hard drive?
"Quite and even very." The easiest way is to check the disk for errors using built-in tools like chkdsk. If after the “run” the system interrupts have subsided, the cause has been found. However, in the case when the problem appears again and again, for all that chkdsk invariably detects errors, you have problems (with a hard, power supply or motherboard) - prepare for the worst.
P.S. Well, judging by the reviews, the problem is pulling people. I promise to develop the topic in future articles.
I wish you success.
Read: 1 275
It is rare that a computer, especially a home computer, will live its entire life without ever undergoing either an upgrade or the addition of new devices. In most cases, of course, subject to the most elementary rules, such an operation is painless, without causing any special problems. But about every tenth (or even twentieth - it doesn’t matter) computer is brought to a non-working state: it often starts to freeze, refuses to perform any functions, or even just falls out into the so beloved by all of us blue screen of death. As a rule, the most likely cause of such problems lies in hardware conflicts (new and old) that did not share any hardware resources. Well, if your qualifications allow you to solve the problems that have arisen, or is there someone nearby who can help you, but if there is nothing like that? However, it’s not the gods, as you know, the pots are burned, let’s sit, think - you look, and break through, because everything is not so difficult, although the problem of compatibility of the most diverse equipment, since its inception in the mid-80s, is still not much did not decrease. The proposed article will help the user deal with one of the types of hardware resources required for equipment, and most often the root cause of all kinds of conflicts - with hardware interrupts (IRQ).
System hardware resources
Components can require three main types of different hardware resources to operate. Almost every device uses one or more I/O ports. AT this case this is not a serial or parallel port, but just a special address, something like an address in RAM. These ports work special teams the central processor, with the help of which any information is either written to the port or read from it. Often, the exchange of information between the processor and the device goes only through ports, and some devices take on a dozen or even more port addresses, each of which serves to perform a specific function.
Direct Memory Access (DMA) channels are used much less frequently. This type of interaction is intended for devices that exchange large blocks of data with RAM, for example, disk drives or printers. The entire exchange bypasses the central processor, which only initiates the exchange operation and immediately proceeds to perform other work. This approach can significantly increase the performance of the entire system.
And the third type of resource is hardware interrupts, which are the basic mechanism for the system's response to external events. Hardware interrupts, commonly called IRQs (Interrupt ReQuests), are physical signals that the device controller uses to inform the processor to process a request. Conventionally, the interrupt handling scheme may look like this:
- the processor receives the interrupt signal and its number;
- using a special table, the address of the program responsible for handling the interrupt with the given number is found - the interrupt handler;
- the processor suspends the execution of the current task, saves intermediate results and switches to the execution of the interrupt handler;
- the processor accesses the device and checks the cause of the interrupt;
- the requested actions are launched - initialization, device configuration, data exchange, etc.;
- when all necessary operations are completed, the processor returns to the interrupted task.
Unlike software interrupts triggered by an executing application program, hardware interrupts can occur at the most unexpected times, and moreover, multiple interrupts can occur at the same time. In order for the system not to "think too much" about which interrupt to service in the first place, there is a special priority scheme. Each interrupt is assigned its own unique priority. If several interrupts arrive at the same time, then the system gives preference to the highest priority, postponing the processing of other, less important, interrupts for a while.
Interrupt distribution
Consider how interrupts are usually distributed in a standard computer. Some of the numbers are strictly tied to certain devices, some can be released and used for your needs. Let's start in order:
- IRQ 0- interrupt the system timer. Generated 18.2 times per second. Used in this capacity since the creation of the first IBM PC (this number is not available for other uses);
- IRQ 1- keyboard interrupt. Generated by the keyboard controller each time a key is pressed (the number is not available for other uses);
- IRQ2 in XT-class computers, which used only 8 interrupt lines, was reserved for further system expansion and, starting with AT-class computers, was used to connect a second controller. Today IRQ 2 is used by the system for compatibility with the old software, the number is not available for other use;
- IRQ 3- interruption of the asynchronous port COM 2. The same interrupt is also used by devices operating through the COM 4 port. If desired, they can be disabled, but no one else will be able to assign IRQ 3 anyway;
- IRQ4 by analogy with the previous one, this interrupt is used by devices occupying COM 1 / COM 3 ports;
- IRQ 5 originally intended for use by the second parallel port LPT2, but then, when the second parallel port was abandoned, IRQ 5 became free. Later it was actively used by most ISA sound cards. modern PCI sound cards use this interrupt solely for compatibility with older games, the vast majority of which support SB Pro. IRQ 5 can be used for other purposes and tied to a PCI slot;
- IRQ6, starting from the first PCs, is used by the floppy controller (the number is not available for other uses);
- IRQ7- by default, interruption of the first parallel port LPT 1. If the port is disabled (if the printer is not available or is designed for USB), it can be used various devices. IRQ 7 can be tied to a PCI slot;
- IRQ8- real-time clock interruption, first introduced in IBM AT. No other use is possible;
- IRQ 9 and IRQ 10 are free;
- IRQ 11 usually reserved for the USB bus, but can be used for other purposes (to do this, disable USB support in the BIOS);
- IRQ 12 used for a PS/2 mouse, but can be used for other purposes (if a PS/2 mouse is not available or disabled);
- IRQ 13 was originally used by the arithmetic coprocessor and is now reserved for compatibility with older software (the number is not available for other uses);
- IRQ 14 and IRQ 15 applied by the primary and secondary IDE controllers, respectively.
There are several ways to find out how interrupt numbers are currently distributed in your particular case. When you start your computer, even before Windows starts loading, a configuration text table appears. Immediately after it is a list of PCI devices with an indication of the IRQ number assigned to them.
Or, if you're still running Windows 9x, then there's a System icon in the Control Panel, click on it - and select the "Devices" tab. In the properties of the "Computer" device, you can find a list of all devices with their IRQs. In Windows 2000/XP, we do not have direct access to interrupt management, so to view the list of IRQs, we need to use the standard information utility (Control Panel/Administrative Tools/Computer Management/System Information/Hardware Resources). And, finally, no one has canceled the use of utilities that test the hardware and software capabilities of a computer.

Among them, without a doubt, the most popular is SANDRA, which is able to provide the user with comprehensive information, including interruptions.
Device conflicts
Without going into too much detail, we can say that a conflict is a situation in which several objects simultaneously try to access the same system resource. An interrupt conflict occurs when multiple devices use the same interrupt line to send a request signal and there is no mechanism to rank these requests, causing either a failure or one of the devices to simply stop working. To have a clear idea of how conflicts can be avoided or eliminated, you need to understand the mechanism of IRQ management.
As you know, personal computers started with the IBM PC XT. Its architecture provided for only eight lines of hardware interrupts, which were controlled by a special controller. Each of them was assigned its own unique number, which determined the interrupt priority and the address of its handler (the so-called interrupt vector). The next version of the architecture, IBM PC AT, supplemented the existing lines with eight more, which were controlled by a second controller connected to one of the interrupt lines of the first controller. Unfortunately, this architecture stopped its development at this point, so all modern computers, despite the significantly increased number of additional devices used in them, still have only sixteen interrupt lines, one of which is reserved for emulating a second controller.
Initially, the IBM PC AT computer had only one bus, through which devices could communicate with the processor and memory - ISA. Most interrupt lines were assigned to standard ISA devices, so when the new universal PCI bus appeared, it turned out that there were only four free interrupts left on its share, denoted as INT A, INT B, INT C, INT D, so only four PCI devices can receive independent interrupts in the system. But at the same time, it must be borne in mind that the IDE controller is in a special position, which is not among those four devices only because, although it is a PCI device in terms of the data transfer method, its own interrupts IRQ 14 and IRQ are rigidly assigned to it. 15, as for older ISA devices. For the AGP bus, which is a kind of PCI bus, INT A is "sacrificed", and the USB bus, as one of the system components, is connected to PCI using INT D, which reduces the number of "honest" PCI devices to only two. We should not forget about the Power Management / System Management power management subsystem, which also requires its own interruption. Thus, in real life, if there are multiple PCI devices using interrupts, it is impossible to provide them with unique hardware IRQs, and in such cases, a hardware-software method based on Plug & Play technology is used, which theoretically avoids conflicts. Although anything can happen in real life, and the remaining ISA devices still cannot share interrupt lines, therefore they are the main provocateurs of conflicts. Thus, the problem of conflict resolution is reduced to the correct distribution of interrupt numbers in case of problems with ISA devices or "buggy" drivers.
In the system, IRQ numbers are allocated twice between physical lines. The first time the system BIOS does this is when the system boots. Each Plug & Play device (and this includes all PCI, modern ISA, and all devices integrated on the motherboard) is assigned one number from among the available ones. If there are not enough numbers, several lines get one common. For PCI devices, this is not a problem - if you have normal drivers and support from the operating system, everything should work fine. But if several ISA devices or a no less "explosive" mixture of PCI and ISA devices receive the same number, then a conflict is simply inevitable, and then you will have to intervene in the process of automatic interrupt distribution. In this case, you must disable all unused ISA devices (in systems without ISA slots, they are nonetheless present: these are the COM1, COM2 ports and the drive). You can also disable the EPP and ECP modes of the LPT port, while releasing the IRQ7 interrupt. All operations for changing interrupts in BIOS Setup are carried out in the "PCI / PNP Configuration" section. There are two ways to influence IRQ number allocations: block a specific number and assign a line number directly. The first method is available for all BIOSes, the "IRQ x used by:" menu items are adjusted (in new BIOSes it is hidden in the "IRQ Resources" submenu). Those interrupts that should be assigned exclusively to ISA devices should be set to "Legacy ISA". Thus, when distributing numbers for PCI devices, these interrupts will be skipped. You should do this if any ISA device stubbornly gets on the same interrupt with the PCI device, which causes both of them to stop working. In this case, you need to find the number of this IRQ and block it. The PCI device moves to the new IRQ number, while the ISA device stays the same. The second way to manage IRQ numbers is direct assignment, although somewhat more complicated than the first, it is much more efficient. It is unfortunate that not all modern motherboards allow this operation. In the same BIOS Setup submenu, there may be items like "Slot X use IRQ" (other names: "PIRQx use IRQ", "PCI Slot x priority", "INT Pin x IRQ"). This option allows you to set interrupts individually for each device on the PCI and AGP bus. In this case, the following rules must be observed:
- Each PCI slot can activate up to four interrupts - INT A, INT B, INT C and INT D;
- The AGP slot can activate two interrupts - INT A and INT B;
- It is normal for each slot to be assigned as INT A. The rest of the interrupts are reserved if the PCI/AGP device requires more than one interrupt or if the requested interrupt is busy;
- AGP slot and PCI slot 1 allocate the same interrupts;
- PCI slots 4 and 5 also distribute the same interrupts;
- USB uses PIRQ_4.
Below is a table showing the relationship between PIRQ (Programmable Interrupt Request) and INT (Interrupt):
| Signal |
AGP Slot PCI Slot 1 |
PCI Slot 2 | PCI Slot 3 |
PCI slot 4 PCI Slot 5 |
| PIRQ_0 | INT A | INT D | INT C | INT B |
| PIRQ_1 | INT B | INT A | INT D | INT C |
| PIRQ_2 | INT C | INT B | INT A | INT D |
| PIRQ_3 | INT D | INT C | INT B | INT A |
Normally, you should leave the option in the AUTO position. But, if it becomes necessary to set an individual IRQ for a device on the AGP or PCI bus, first of all, it is necessary to determine in which slot the device is installed. Then, referring to the table, you can set the main PIRQ. For example, if Network Card is set to slot 3, then the main PIRQ will be PIRQ_2, because all slots are assigned to INT A, if possible. After that, the desired IRQ is selected, assigning it the appropriate PIRQ value. Just remember that the BIOS will try to assign a PIRQ to INT A for each slot. So, for AGP and PCI 1 slots the main PIRQ is PIRQ_0, while for PCI slot 2 the main PIRQ is PIRQ_1 and so on. The second time the interrupt numbers are distributed by the operating system, although Windows 9x begins to interfere with the actions performed by the BIOS only in extreme cases. In Windows 98, the IRQ distribution system is managed using the standard device manager. In the list of system devices, you need to find the PCI bus.

There is a special tab in its properties. If everything is set up correctly, the miniport will be mentioned there ("successfully loaded") and PCI bus management (Steering) will be enabled. Thus, Windows "98 has the means to control the distribution of interrupt numbers between physical lines. But since the BIOS most often does a good job with this, this mechanism is not involved. But sometimes it is simply necessary. When using outdated ISA devices that do not support Plug technology & Play, the BIOS may not notice it, giving the interrupt occupied by it to the PCI device - again a conflict. To resolve it, you need to reserve the necessary interrupt in the Windows Device Manager "98.
In addition to redundancy, you can directly set the interrupt number for the device. To do this, you need to find the "Resources" tab in its properties, disable automatic tuning and try to change the assigned interrupt number. Be careful, such an operation does not always work and can sometimes lead to completely unpredictable results.
But about Windows 2000 (as well as XP) - a separate conversation. If you have a fairly modern computer, then it probably supports the ACPI configuration interface. Windows 2000 in this case will generally ignore the actions of the BIOS and "hang" all PCI devices on one logical interrupt. In general, this will work fine (when there are no ISA devices), but sometimes problems can arise. To be able to change interrupt numbers, you must either change the HAL kernel or reinstall Windows 2000 with ACPI disabled in the BIOS. The kernel is replaced as follows: in the device manager, select "Computer / Computer with ACPI", after that you need to change the driver to "Standard computer" and reboot. If this does not help, you will have to reinstall Windows 2000 again.
Final Tips
By installing a new operating system with all device drivers and, after making sure that it works without problems, it is worth writing down all computer settings, especially if any changes have been made to the default settings. It is most reliable to write down such information on a regular piece of paper. Such information can be very useful when making any changes to the configured system, as well as help to solve problems that may arise if all the settings "move out" when installing new equipment (this sometimes happens too). And, most importantly, remember: most of the problems that arise are due to the low level of computer literacy of the computer owner. Therefore, one should always strive for self-education, then there will be fewer problems, and those that nevertheless arise will not seem insoluble.