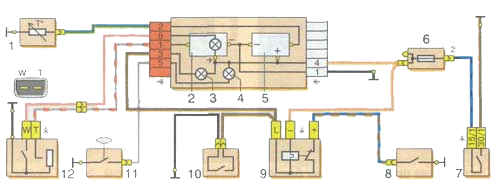
Headlight switching scheme: 1 - headlights; 2 - fuse block; 3 - relay for switching on the dipped headlights; 4 - ignition switch; 5 - fog light switch; 6 - rear fog light; 7 - control lamp for switching on the high beam; 8 - outdoor lighting switch; 9 - fuse for the fog light circuit; 10- headlight switch; 11 - high beam headlight relay. The car has two headlights, combined with marker (parking) lights. Headlight bulbs - two-filament, H4 standard. Voltage is supplied to the lamp filaments through relays of type 113.3747, located under the instrument panel on the left side. Relay characteristics: turn-on voltage at a temperature of (20±5)°C - no more than 8 V, winding resistance - (85±8.5) Ohm. Voltage is applied to the relay windings if the button for the outdoor lighting switch is fully pressed (then the choice between dipped and main beam - depending on the position of the headlight stalk switch) or - regardless of the position of the switch - if the driver pulls the stalk switch towards himself (then the main beam turns on headlights).

Scheme for switching on direction indicators and alarms: 1 - front direction indicators; 2 - ignition switch; 3 - alarm switch; 4 - turn signal switch; 5 - side direction indicators; 6 - turn signal lamps in the rear lights; 7 - control lamp of direction indicators (in the instrument cluster); 8 - relay-breaker for direction indicators and alarm; 9 - fuse box. The direction indicators are switched on by the left steering column switch. The alarm mode (all direction indicators flash) is activated by pressing the alarm switch button. The flashing of the lamps in this mode is provided by a relay-breaker type 231.3747, located under the instrument panel on the left side. If one of them burns out, the blinking frequency of the remaining lamps and the control lamp doubles. In normal mode, the flashing frequency should be 90 ± 30 cycles per minute at a rated load of 92 W, an ambient temperature of -40 to +55 ° C and a supply voltage of 10.8 to 15 V.

Outdoor lighting, brake and reversing lights, interior lighting: 1 - side light lamps in headlights; 2 - fuse box; 3 - outdoor lighting switch; 4 - control lamp of side light; 5 - lamp for lighting the instrument cluster; 6 - license plate lights; 7 - side light lamps in the rear lights. The position light is on when the exterior light switch is pressed, regardless of the key position in the ignition switch. The license plate lamps and instrument illumination are switched on simultaneously with the exterior lighting. Voltage is also supplied to the ceiling lamp switch regardless of the position of the ignition switch. The reversing lamps come on when the ignition is on and the reverse gear switch located on the transmission is closed.

Scheme for switching on the sound signal: 1 - sound signal; 2 - socket for a portable lamp; 3 - rear wiring harness block; 4 - fuse box; 5 - sound signal switch. The C-304 or C-305 sound signal is fixed in the engine compartment on a bracket to the radiator frame panel. It is activated by the central button of the steering wheel. If the signal sound becomes weak and hoarse, adjust it by turning the screw on the case in one direction or another. If the adjustment did not help, disassemble the signal and clean the contacts of its breaker. When assembling, install the old gasket between the body and the diaphragm so as not to disturb the gap between the core and the armature.

Scheme of switching on the cleaner and washer of the windshield: 1 - electric motor of the windshield washer; 2 - windshield wiper motor; 3 - ignition switch; 4 - fuse block; 5 - windshield wiper and washer switch; 6 - conditional numbering of plugs in the switch block; 7 - windshield wiper relay; 8 - conditional numbering of plugs in the blocks of the relay and the windshield wiper motor. The windshield wiper consists of a gearmotor, a lever and a brush. Cleaner motor - two-brush, direct current, excited by permanent magnets. To protect against overloads, a thermal bimetallic fuse is installed in it. Specifications gearmotor: Shaft rotation frequency at a supply voltage of 14 V, a load of 0.15 kgf-m and an ambient temperature of (25 + 10) ° C, min-1, not less than 50 Current consumed in these conditions, A, not more than 3.5 The cleaner has two modes of operation - continuous and intermittent, they are switched on by the right under-steering switch. The intermittent mode is provided by a relay type RS-514 installed under the instrument panel on the left side. The relay must ensure the inclusion of the electric motor with a frequency of 9-17 cycles per minute at temperatures from -20 to +50 ° C and a supply voltage of 10 V. At the beginning of operation in intermittent mode, up to four continuous double strokes of the brush are allowed. It is recommended to replace a faulty gearmotor (cleaning of the collector and limit switch contacts is possible). The windshield washer consists of a polyethylene tank with an electric pump installed in the engine compartment, a washer nozzle located on the hood, and flexible connecting hoses. The pump motor is turned on by pulling the right stalk switch towards you. The defective pump is replaced. Clogged nozzles can be blown in the opposite direction or cleaned with a fishing line.

Scheme of switching on the cleaner, washer and rear door glass heating element: 1 - fuse block; 2 - switch for the wiper and washer of the glass of the tailgate; 3 - electric motor for the tailgate glass washer; 4 - the electric motor of the tailgate glass cleaner; 5 - element for heating the glass of the tailgate; 6 - relay for turning on the heating of the glass of the tailgate; 7 - switch for heating the glass of the tailgate; 8 - ignition switch. The tailgate glass cleaner consists of a gearmotor type 471.3730, a lever and a brush. The lever with the brush stops at the bottom in an inclined position and is directed to the right in the direction of the car. The electric motor of the cleaner is two-brush, with excitation from permanent magnets. To protect against overloads, a thermal bimetallic fuse is installed in it. A faulty gearmotor is replaced with a new one (only cleaning of the collector and limit switch contacts is possible). Specifications of the gearmotor: Number of double strokes at a supply voltage of 14 V, a load of 0.05 kgf-m and an ambient temperature of (25+10)°C, min-1 (50+5) Current consumed under these conditions, A, not more than 2 The tailgate glass washer consists of a polyethylene reservoir with an electric pump installed in the passenger compartment on the left side in a niche near the rear door, a washer nozzle located on the rear door at the top left, and flexible connecting hoses. The tailgate glass cleaner and washer is switched on by a three-position switch located on the instrument panel on the left side. In the intermediate (fixed) position of the key, only the rear window cleaner is turned on; when the key is fully pressed (non-fixed position), the washer is additionally turned on.
Scheme of switching on control devices: 1 - coolant temperature indicator sensor; 2 - fuel level indicator with a reserve control lamp; 3 - control lamp for the level of brake fluid and parking brake system; 4 - oil pressure control lamp; 5 - coolant temperature gauge; 6 - fuse block; 7 - ignition switch; 8 - switch of the control lamp of the parking brake system; 9 - relay-breaker of the control lamp of the parking brake system; 10- brake fluid level sensor; 11 - oil pressure warning lamp sensor; 12 - sensor for level indicator and fuel reserve.

Wiring diagram of the instrument cluster (rear view): 1 - control lamp high beam headlights; 2 - coolant temperature gauge; 3 - control lamp of side light; 4 - control lamp of direction indicators; 5 - lamp for lighting the instrument cluster; 6 - control lamp of the battery discharge; 7 - oil pressure control lamp; 8 - level indicator and fuel reserve; 9 - a control lamp of a reserve of fuel; 10 - control lamp of the parking brake system and brake fluid level.
Passenger cars of an especially small class VAZ-1111 are equipped with a 12-volt electrician with a negative terminal connected to the car body. The cars were equipped with carburetor and injection power units, which had little effect on the location and purpose of the chains. The VAZ-1111 wiring diagram, basic for all versions of the Oka, can be used when repairing a car of any assembly year.
[ Hide ]
What is included in the Oka wiring diagram?
The vehicle electrical system includes the following components:
- non-contact type ignition system;
- ignition lock with contact group and auxiliary relays;
- alternator with built-in control unit;
- an electric DC motor used to start the power unit;
- external lighting and alarm system, together with wiring and controls;
- a sound signal warning other road users;
- front and rear window cleaners and washers;
- electric heating of the glass surface on the tailgate;
- control of the air supply system through the heater;
- a combination of devices with control indicator lamps;
- A fuse box that protects circuits from being driven with excessive current (caused by a short circuit or component failure).
The sources of voltage for electrical work are:
- The battery is located in the engine compartment. The device is used to start the power unit and provide consumers with electricity when the engine is not running.
- A generator driven by the crankshaft of the engine. The product is designed to replenish the battery charge and ensures the operation of electricians while the car is moving.
Wiring diagram VAZ-1111 with symbols
Electrical diagram VAZ-1111, part 1  Electrical diagram VAZ-1111, part 2
  Electrical diagram VAZ-1111, part 3
  Electrical diagram VAZ-1111, part 4
The list of elements indicated in the diagram:
- 1 - side turn signal repeater located on the front fender;
- 2 - front direction indicator;
- 3 - head lighting device;
- 4 - an electric motor that serves to drive the radiator cooling impeller;
- 5 - warning sound signal (klaxon);
- 6 - temperature sensor that turns on the impeller of the cooling system;
- 7 - motor for driving the front glass washer pump;
- 8 - distribution sensor of the ignition system;
- 9 - lead-acid battery;
- 10 - electric motor to start the engine;
- 11 - ignition system controller;
- 12 - candles installed in the cylinder head;
- 13 - coil of the ignition system;
- 14 - alternator;
- 15 - liquid temperature indicator in the cooling jacket;
- 16 - control sensor that determines the emergency oil pressure in the engine;
- 17 - connector for installing a portable lamp;
- 18 - wiper operation controller;
- 19 - indicator sensor of the fluid level in the hydraulic brake system;
- 20 - brake pedal position limit switch;
- 21 — motor drive trapezoid wipers on the front glass;
- 22 - an electromagnet located in the carburetor valve;
- 23 - limit switch responsible for the operation of reverse gear engaged signals;
- 24 - starter controller;
- 25 - headlight control relay (dipped beam);
- 26 - a similar node for high beam;
- 27 - controller for direction indicators and "emergency gang";
- 28 - cigarette lighter socket;
- 29 - speed switch for the motor of the heating system;
- 30 - an additional resistor that determines the speed of the heater fan impeller;
- 31 - switch modes of operation of external lighting;
- 32 - block of fusible inserts;
- 33 - additional protective element for fog lamps;
- 34 - rear window heating control controller;
- 35 - starting relay required for the operation of the cooling fan;
- 36 - control relay for the control indicator of the position of the parking brake lever;
- 37 - control of the operation of the rear window cleaning system (together with the washer);
- 38 - glass heating mode switch;
- 39 — key rear "fog";
- 40 - indicator of the open starting damper in the carburetor;
- 41 - alarm control button;
- 42 - ignition switch;
- 43 - distribution relay of the ignition system;
- 44 - motor of the impeller of the fan of the heating system;
- 45 - indicator of the amount of gasoline in the tank;
- 46 - interior lighting switch located on the central pillar;
- 47 - instrument cluster;
- 48 - front wiper control;
- 49 - turn on the windshield washer;
- 50 — horn control button;
- 51 - lever for changing the modes of operation of the head lighting;
- 52 - control lever direction indicators;
- 53 - limit switch responsible for indicating the position of the parking brake lever;
- 54 - ceiling interior lighting;
- 55 - trailer located behind the carburetor air damper control button;
- 56 - motor for driving the glass washer pump on the rear door;
- 57 — aft block lamp;
- 58 - fog signal located on the back of the car;
- 59 - registration plate illumination system;
- 60 - threads for heating the glass of the tailgate;
- 61 - aft wiper brush drive motor.
The specified colors of the connecting wires correspond to the factory documentation. Many owners during repairs replace sections of the bundles with cables with insulation of any color. Because of this, on some vehicles, it is difficult to identify the wiring.
Wiring diagram VAZ-11113 with symbols
The electrical circuit of the VAZ-11113 does not differ significantly from the VAZ-1111. The car was equipped with an upgraded version of the power unit and some components that have virtually no effect on the electrics.
Non-contact ignition scheme showing the main elements and connecting wires
Contactless ignition VAZ-11113
Item List:
- 1 - control relay;
- 2 - ignition lock with a contact group;
- 3 - protective fuse;
- 4 - controller;
- 5 - a sensor that determines the moment of spark supply;
- 6 - common ignition coil;
- 7 - candles.
Wiring diagram SeAZ-11116
On SeAZ-11116 cars with a europanel and a Chinese 3-cylinder engine, the electrics have undergone changes. The machines use an electronic instrument cluster, which has led to the emergence of a number of new sensors. The fuel supply system has changed, into which a fuel pump with a control relay has been introduced. Big innovations appeared in the engine compartment, where the fuel injection and ignition control system began to be installed. At the same time, the main part of the wiring, the fuse box and the relay passed unchanged from the old carburetor version.
Fuse designations on the cover
In case of installation on VAZ-1111 or 11113 fog lamp, it is protected by a separate insert (rated 8A) located on the wiring harness next to the control key.
List of fuses with a description of the protected circuits on machines with a carburetor engine:
| Number on the scheme | Denomination, A | Protected elements |
| 1 | 16 |
|
| 2 | 8 |
|
| 3 | 8 | High beam left side and indicator lamp in the instrument cluster. |
| 4 | 8 | Starboard high beam. |
| 5 | 8 | Dipped beam on the left side of the car. |
| 6 | 8 | Same on the right side |
| 7 | 8 | Parking lights on the left side (front and rear), registration plate illumination and "dimension" indicator (in the instrument cluster) |
| 8 | 8 | Starboard dimensions, lighting system for cigarette lighter socket and instrument cluster |
| 9 | 16 | Operation of repeaters in alarm mode, rear window heating filaments together with a control relay |
| 10 | 16 |
|
A frame with five relays for the following purposes is installed next to the fuse box:
- turning on and off the fan motor;
- low beam activation;
- selection of high beam operating modes;
- engine start systems;
- threads of electric heating of the tailgate.
The appearance of the relay unit on the car "Oka"
All relays used on VAZ / SEAZ 1111 and 11113 are of the same type, which simplifies car repair in the field.
Replacing the turn signal relay is shown in a video filmed by the author Sergey Neverov.
Common electrical faults
Common problems with electrical equipment on the VAZ-1111 and 1113:
- Failure of external lighting devices. A common cause of failure is the burnout of the lamp filament, the assembly must be replaced. If the light bulb is intact, then a defect in the wiring is possible, due to which a short circuit occurs and the fuse fails. fusible link changes to an identical rating, it is forbidden to use parts designed for higher current. It is also unacceptable to install homemade jumpers ("bugs"), as this can cause a fire. If a re-burnout occurs, then a circuit test is required and the wiring fault repaired.
- Wire breaks occur at points where the insulation is subject to bending or rubbing against moving surfaces. An example of such a point is the junction of a door and a body. Damaged areas must be replaced with products made of a similar material with an identical cross section.
- Oxidation of contact surfaces due to ingress of moisture or aggressive liquids (for example, electrolyte from a battery). It is required to clean the surfaces to metal, restoring the transmission of electric current.
- Relay failure associated with burning contacts or a broken coil. The unit cannot be repaired, it is replaced with a new one. In case of a quick repeated failure, it is necessary to check the electrics of the car in a car service.
- The sudden discharge of a battery is due to an internal short circuit or current leakage. In winter, a partially charged battery may lose capacity due to low air temperature. You need to charge the battery and check the condition of the wiring. If necessary, the power source must be replaced.
- Pulsating operation of external lighting lamps with an unusually bright glow indicates a breakdown of the relay-regulator on the generator. For repair, it is required to remove the assembly and replace the failed components.
- Insufficient battery charging (with the engine running, the control lamp does not go out). The cause may be wear of the brushes or commutator, insufficient tension of the drive belt. It is required to repair the generator, since the battery charge is enough for 150-200 km of travel in the daytime.
- Poor contact between the ends of the cylindrical fuses and the spring-loaded elements in the mounting block. Occurs due to design features node. Many owners, tired of dealing with a defect, install home-made blocks for knife inserts. Usually a short section from the GAZ-3110 is used, designed for 13 seats. There are self-assembled nodes designed for fuses and relays.
Photo gallery
The process of installing a new mounting block with knife elements. Wired unit
Preventive measures
The main measures to ensure the reliable operation of the electrics of Oka cars:
- At least once every six months, clean the outside of the battery case and check the electrolyte level (on serviced models). At the same time, it is required to recharge the battery using a special device. If the car is rarely used, it is recommended to disconnect the terminals.
- When carrying out repair work, you should monitor the position of the wires, avoiding damage to the insulating layer. Wires passing near moving parts must not come into contact with them under any circumstances.
- It is not recommended to turn on devices with high current consumption (audio system, high beam headlights, etc.) with the engine turned off. This will cause the battery to drain faster.
- Do not use self-made elements to repair electrical circuits. All used parts and assemblies must comply with the standards laid down by the designer when developing the car.
- It is recommended to carry spare fuses, relays and lamps. This will allow minor repairs to be made if necessary.
- When carrying out repairs that require the use of welding, it is necessary to disconnect the harnesses from the battery and generator. On machines equipped with an injection engine, it is recommended to disconnect the connector from the control unit.
Download Oka schemes
Download electrical circuits various modifications of the car "Oka".
Video
INCLUDING SCHEMES
Headlight switching circuit
Fig.1
Headlight switching pattern:
1
- headlights; 2
- fuse block; 3
- the relay of inclusion of a passing beam of headlights; 4
- ignition switch; 5
- fog light switch; 6
- rear fog light; 7
- a control lamp of inclusion of a high beam; 8
9
- Fog light circuit fuse; 10
- headlight switch; 11
- high beam relay.
The car has two headlights, combined with side (parking) lights. Headlight bulbs - two-filament, H4 standard. Voltage is supplied to the lamp filaments through relays of type 113.3747, located under the instrument panel on the left side. Relay characteristics: turn-on voltage at a temperature of (20±5)°C - no more than 8 V, winding resistance - (85±8.5) Ohm. Voltage is applied to the relay windings if the button for the outdoor lighting switch is fully pressed (then the choice between dipped and main beam - depending on the position of the headlight stalk switch) or - regardless of the position of the switch - if the driver pulls the stalk switch towards himself (then the main beam turns on headlights).
Scheme of switching on direction indicators and alarms
Fig.2

Scheme of switching on direction indicators and alarms:
1
- front direction indicators; 2
- ignition switch; 3
- alarm switch; 4
- turn signal switch; 5
- side direction indicators; 6
- lamps of indexes of turn in back lanterns; 7
- a control lamp of indexes of turn (in a combination of devices); 8
- relay-breaker of direction indicators and alarm; 9
- fuse box.
The direction indicators are switched on by the left steering column switch. The alarm mode (all direction indicators flash) is activated by pressing the alarm switch button. The flashing of the lamps in this mode is provided by a relay-breaker type 231.3747, located under the instrument panel on the left side. If one of them burns out, the blinking frequency of the remaining lamps and the control lamp doubles. In normal mode, the flashing frequency should be 90 ± 30 cycles per minute at a rated load of 92 W, an ambient temperature of -40 to +55 ° C and a supply voltage of 10.8 to 15 V.
Exterior lighting, brake and reversing lights, interior lighting
Fig.3

Exterior lighting, brake and reversing lights, interior lighting:
1
- side light lamps in the headlights; 2
- fuse block; 3
- outdoor lighting switch; 4
5
6
- license plate lights; 7
- side light bulbs in the rear lights.
The position light is on when the exterior light switch is pressed, regardless of the key position in the ignition switch. The license plate lamps and instrument illumination are switched on simultaneously with the exterior lighting. Voltage is also supplied to the ceiling lamp switch regardless of the position of the ignition switch. The reversing lamps come on when the ignition is on and the reverse gear switch located on the transmission is closed.
Sound signal
Fig.4

Sound signal switching circuit:
1
- sound signal; 2
- socket for portable lamp; 3
- a block of a back plait of wires; 4
- fuse block; 5
- horn switch.
The C-304 or C-305 sound signal is fixed in the engine compartment on a bracket to the radiator frame panel. It is activated by the central button of the steering wheel.
If the signal sound becomes weak and hoarse, adjust it by turning the screw on the case in one direction or another. If the adjustment did not help, disassemble the signal and clean the contacts of its breaker. When assembling, install the old gasket between the body and the diaphragm so as not to disturb the gap between the core and the armature.
Windshield wiper and washer
Fig.5

Windshield wiper and washer connection diagram:
1
-windshield washer motor; 2
- windshield wiper motor; 3
- ignition switch; 4
- fuse block; 5
- windshield wiper and washer switch; 6
- conditional numbering of plugs in the switch block; 7
- windshield wiper relay; 8
- conditional numbering of the plugs in the relay blocks and the windshield wiper motor.
The windshield wiper consists of a gearmotor, a lever and a brush. Cleaner electric motor - two-brush, direct current, with excitation from permanent magnets. To protect against overloads, a thermal bimetallic fuse is installed in it.
Technical characteristics of the motor reducer:
Shaft rotation frequency at a supply voltage of 14 V, a load of 0.15 kgf-m and an ambient temperature of (25+10)°C, min-1, not less than 50;
The current consumed under these conditions, A, is not more than 3.5.
The purifier has two modes of operation- continuous and intermittent, they are switched on by the right under-steering switch. The intermittent mode is provided by a relay type RS-514 installed under the instrument panel on the left side. The relay must ensure the inclusion of the electric motor with a frequency of 9-17 cycles per minute at temperatures from -20 to +50 ° C and a supply voltage of 10 V. At the beginning of operation in intermittent mode, up to four continuous double strokes of the brush are allowed.
The windshield washer consists of a polyethylene tank with an electric pump installed in the engine compartment, a washer nozzle located on the hood, and flexible connecting hoses. The pump motor is turned on by pulling the right stalk switch towards you.
Defective pump is replaced. Clogged nozzles can be blown in the opposite direction or cleaned with a fishing line.
Tailgate glass cleaner and washer
Fig.6

Scheme of switching on the cleaner, washer and rear door glass heating element:
1
- fuse block; 2
- the switch of a cleaner and a washer of glass of a door of a back; 3
- the electric motor of a washer of glass of a door of a back; 4
- the electric motor of a cleaner of glass of a door of a back; 5
- an element of heating of glass of a door of a back; 6
- the relay of inclusion of heating of glass of a door of a back; 7
- the switch of heating of glass of a door of a back; 8
- ignition switch.
The tailgate glass cleaner consists of a gearmotor type 471.3730, a lever and a brush. The lever with the brush stops at the bottom in an inclined position and is directed to the right in the direction of the car. The electric motor of the cleaner is two-brush, with excitation from permanent magnets. To protect against overloads, a thermal bimetallic fuse is installed in it. A faulty gearmotor is replaced with a new one (only cleaning of the collector and limit switch contacts is possible).
Technical characteristics of the motor reducer:
The number of double strokes at a supply voltage of 14 V, a load of 0.05 kgf-m and an ambient temperature of (25+10)°C, min-1 (50+5);
Current consumed under these conditions, A, not more than 2;
The tailgate glass washer consists of a polyethylene tank with an electric pump installed in the passenger compartment on the left side in a niche near the rear door, a washer nozzle located on the rear door at the top left, and flexible connecting hoses.
The tailgate glass cleaner and washer is switched on by a three-position switch located on the instrument panel on the left side. In the intermediate (fixed) position of the key, only the rear window cleaner is turned on; when the key is fully pressed (non-fixed position), the washer is additionally turned on.
Scheme of switching on control devices
Fig.7

Scheme of switching on control devices:
1
- coolant temperature indicator sensor; 2
- fuel level indicator with a reserve control lamp; 3
- a control lamp of level of a brake liquid and parking brake system; 4
5
6
- fuse block; 7
- ignition switch; 8
- the switch of a control lamp of parking brake system; 9
- the relay-interrupter of a control lamp of parking brake system; 10
- brake fluid level sensor; 11
- oil pressure warning light sensor; 12
- sensor for level indicator and fuel reserve.
Fig.8

Connection diagram of the instrument cluster (rear view):
1
- control lamp high beam headlights; 2
- coolant temperature gauge; 3
- a control lamp of dimensional light; 4
- a control lamp of indexes of turn; 5
- a lamp of illumination of a combination of devices; 6
- control lamp of the battery discharge; 7
- control lamp of pressure of oil; 8
- fuel level and reserve indicator; 9
- a control lamp of a reserve of fuel; 10
- control lamp of the parking brake system and brake fluid level.
Your attention is presented to the electrical circuits of the equipment on VAZ-1111, she is OKA 1988-2003 onwards 4-seater hatchback of a particularly small class with a transverse engine and front-wheel drive. The release of the Oka began in 1989 at the Volga Automobile Plant. The engine is a two-cylinder working volume of 650 cc, in 1997 it was increased to 750 cc. volume. Currently, the production of Oka cars has been transferred to the Kama Automobile Plant, as well as the Serpukhov Automobile Plant. In addition to the basic models KamAZ-11113 and SeAZ-11113, manual options are offered for the disabled. Due to the very low price, it is of interest for export. This small car was developed at the Volga Automobile Plant for "corporate" production at three plants - VAZ, KamAZ and SeAZ - in an invalid version, and has been produced since 1990.
Scheme of electrical equipment at OKA
1 - side turn signal repeater 31 - outdoor lighting switch
2 - front direction indicator 32 - fuse block
3 - headlight 33 - fog lamp circuit fuse
4 - electric motor of the fan of the cooling system 34 - relay for turning on the heated rear window
5 - sound signal 35 - relay for turning on the electric motor of the fan of the cooling system
6 - sensor for turning on the fan motor 36 - relay-breaker of the control lamp for turning on the parking brake
7 - windshield washer motor 37 - rear window wiper and washer switch
8 - spark moment sensor 38 - rear window heating switch
9 – accumulator battery 39 - rear fog light switch
10 - starter 40 - control lamp for covering the carburetor air damper
11 - switch 41 - alarm switch
12 - spark plugs 42 - ignition switch
13 - ignition coil 43 - ignition relay
14 - generator 44 - heater fan motor
15 - coolant temperature indicator sensor 45 - fuel level indicator sensor
16 - low oil pressure warning lamp sensor 46 - ceiling light switch in the door pillar
17 - socket for portable lamp 47 - instrument cluster
18 - wiper relay 48 - windshield wiper switch
19 - brake fluid level sensor 49 - windshield washer switch
20 - brake light switch 50 - horn switch
21 - windshield wiper motor 51 - headlight switch
22 - carburetor solenoid valve 52 - turn signal switch
23 - reversing light switch 53 - parking brake indicator switch
24 - starter enable relay 54 - dome light
25 - relay for switching on the low beam headlights 55 - switch for the control lamp for covering the carburetor air damper
26 - high beam headlight relay 56 - rear door glass washer motor
27 - relay-interrupter alarm and direction indicators 57 - rear light
28 - cigarette lighter 58 - rear fog lamp
29 - heater fan switch 59 - license plate light
30 - additional heater motor resistor 60 - rear door glass heating element
61 - rear door glass cleaner motor
A - the numbering order of the contacts in the connecting blocks