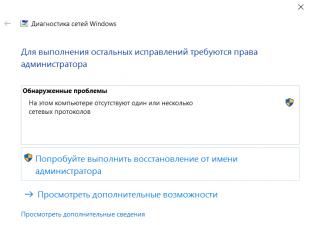
The PC must be constantly updated. And this applies not only to hardware, operating system and applications. But it is advisable to do this only if a serious need arises.
If the machine is working normally without glitches and errors, then update to latest version Bios is simply not required. Since this procedure is extremely unsafe.
Why update
The device in question requires a new firmware:
- new installed device is not supported;
- when there is a conflict with any application that needs to be installed on a personal computer;
- when you need to increase PC performance;
- if the outdated firmware is corrupted.
Most often, an update is required due to the installation of new hardware - a processor, hard drive. Much less often - video cards, random access memory. This need arises as a result of a conflict between hardware and firmware. Very often, old BIOSes simply do not see large hard drives. This situation is corrected in most cases with an update.
Some applications do not support certain BIOSes and their programs. In most cases, this situation can be resolved with a version upgrade. Sometimes this is required to run some professional applications.
Often, old firmware simply does not allow you to overclock the processor in various ways. If you need to change the CPU frequency up or apply more voltage to it, you need to update the BIOS. This usually provides ample opportunities for various kinds of manipulations with the parameters of the central processor and other devices.
Sometimes the PC starts to give errors just like that, for no apparent reason. Often the BIOS is the culprit. In many cases, it is precisely the installation that allows you to solve problems of this kind. new program in Bios.
Video: reflash BIOS
Current version
There are several ways to determine the BIOS version:
- before the OS starts loading;
- means of the operating system;
- using third party software.
In order not to waste time performing any unnecessary actions, the PC owner can simply look at the software marking of the device in question even before starting Windows.
To do this, follow the steps in strict order:
- turn on the PC;
- wait for the corresponding icon to appear (“American Megatrends”, “Energy” and more);
- click on the button called "Pause Break".

This key allows you to stop downloading personal computer at any stage. You should wait until the table or list of characteristics appears on the monitor. The user needs to find the inscription "Bios Revision" or "Bios Version". Next to one of these phrases must be a combination of numbers. It is these numbers that indicate the version of the Bios used.
You can also find out the software marking of the PC component in question simply by going to its settings.
To do this, do the following:
- turn on the computer;
- until the image appears, press the "Delete" key several times;
- in the section called "Main" find item "Information"-> "Version".

The easiest and safest way to find out the version is to use the item in the Start button called "Run".
It is necessary to carry out the following actions:
- open "Run";
- in the field that appears, enter "msinfo32";
- press "Enter" or just click on "OK".
As a result, a standard component of the Windows operating system will open. It contains all information about the system, including information about the BIOS firmware.

How to update Bios on a computer
Refresh software for the device in question in three ways:
- in MS-DOS mode;
- in Microsoft Windows directly;
- without logging into Windows and MS-DOS.
Each method has both its advantages and disadvantages.
Where to get the update
To update Bios, you must first find the right application for this PC component. It is best to download it from the official website of the motherboard manufacturer or Bios. The surest way to find out the model and name of the manufacturer of computer components is to visually inspect the motherboard itself, the chip of the device being updated located on it.
You can also use any specialized program in order to find out the marking of the firmware and the name of the manufacturer. Everest is the best for this. The most important advantage of this application over analogues is that it offers the user links to the official websites of the manufacturer, where you can find everything you need.

Another source of new firmware versions can be various unofficial sites on the Internet. But the probability of downloading counterfeit software with a virus or simply not working, capable of damaging the PC, is very high. Therefore, using applications from unreliable sources is highly discouraged.
Making a backup
Before carrying out any actions that make changes to the firmware, you must make a backup copy of it. This will avoid various kinds of problems when an error occurs that makes the hardware inoperable. The backup copy must be saved to external media (USB drive, flash drive, floppy disk) in order to avoid the need to extract it from the hard drive.
The easiest way to make a copy of the software to be updated is with an application called EZ Flash (used by ASUS).
The copying process consists of the following main steps:
- production of a bootable flash drive with the MS-DOS operating system;
- after inserting the USB flash drive into the port, you need to restart the PC;
- after pressing the "Delete" key during boot, you should find the "Tool" tab;
- select Asus EZ 2 Utility;
- press the F2 key and enter the name backup.
After performing all the above operations, all the data necessary for recovery will be saved on the selected media. If necessary, they can be easily used.

Installation
Most in a simple way is the installation of new software on the PC component in question directly in the Windows operating system.
To do this, you must perform the following steps:
- download a special update program for a specific motherboard model;
- run the executable.
Most manufacturers have their own update application. That is why it is necessary to use only files downloaded from official resources. For example, ASUS has an application for performing the action in question called ASUSUpdate. It is installed as the most common application, the menu is intuitive, even if it is in English.

Some manufacturers provide for updating their products without logging into the OS. In the ROM of the equipment, special tools are already sewn in to perform the update. For example, the ASRock Instant Flash utility can independently perform all the necessary actions in a matter of minutes. Just press "F6" - it will scan all available sources of information.
Reset system settings
There are two ways to reset the system settings:
- software;
- hardware.
To use the first method, you must:

To perform a hardware reset, you must use a special jumper or remove the battery from the special connector for at least 30 minutes. After performing the necessary actions, a reboot is performed.
Possible problems
When installing new firmware versions, various kinds of errors may occur:
- version mismatch;
- data write error.
The most common problem is the use of inappropriate files for the update. If this type of problem occurs, you must use a backup to restore the system to its original state. If a data recording error occurs, then you should do the same - reset the settings to standard.
Video: update the BIOS
When carrying out an operation of the type in question, it is necessary to make sure that the voltage supplied is stable. If electricity will be disabled suddenly, then there is a high probability of severe damage to the updated component. Which is unacceptable.
It is important to use firmware only from reliable sources. Since there is always the possibility of bookmarks or viruses in extraneous data. All of these can damage your computer. It is also worth checking the health of the tablet battery inside. system block.
Many users do not understand why update Bios. Needs to be done this operation only in extreme cases, when it is simply impossible to resolve any conflict in an alternative way. The procedure should be carried out as carefully as possible to avoid damage.
Hello friends! In today's article, we update the bios of asus motherboard. This is a serious matter and should be treated accordingly. The process of updating the BIOS of any motherboard, although very simple, but any mistake in it will cost you dearly - you will have to bring the motherboard back to life in a service center, since you probably don’t have a special programmer. At the beginning of the article, in a nutshell, I will remind you what BIOS is.
How to update BIOS on ASUS motherboard
BIOS is the most important element of a computer - a microprogram recorded on a microcircuit, which, in turn, is located on the motherboard.
BIOS - provides basic OS access to the computer's hardware capabilities. In simple terms, BIOS explains to the operating system how to use one or another computer component.
Immediately after turning on the system unit, the BIOSchecks all devices (POST procedure) and if any component is faulty, thena signal is heard through a special speaker, by which a faulty device can be identified. Eif everything is fine, The BIOS will start searching for the OS bootloader code on the connected drives and find it passes the baton to the operating system.
Now for the not so good. The BIOS update process itself takes a couple of minutes, but if at this time, there will be a power outage in your house, and your computer is not connected to an uninterruptible power supply(UPS), then the firmware will be broken and you simply do not turn on the computer. To restore, you will have to look for a special programmer (BIOS recovery is a topic for a separate article).
I must say that the manufacturers foresaw the seriousness of the issue even at the dawn of the production of motherboards completely excluded the possibility of updating or flashing the BIOS, only recently, the BIOS began to be equipped with a special program for its update. But still,updating the BIOS of any motherboard usually occurs once in its life, and sometimes not even once.
The most important rule if the work of a computer or laptop youquite satisfied, then you do not need to update anything, but eif you still decideupdate the BIOS, then there must be good reasons for this. Here are some of them.
There are no new features in your BIOS. For example, there is no technology AHCI, but there is only an outdated IDE, but you bought a new one HDD interface SATA III (6 Gb / s) or in general solid state drive SSD. Technology AHCI will allow your drive to use modern features and the operating system on the new hard drive will run faster than in IDE. Having visited the website of the manufacturer of your motherboard, you saw that a new BIOS update was released, you also learned that after the update your motherboard will supportAHCI! In this case, you can update the BIOS without hesitation.
A friend of mine lost sound on his computer, reinstalling Windows and the drivers did not help, he decided that the built-in sound card and bought a discrete one, so the system worked for 7 years, then the processor had to be replaced on this computer, this required a BIOS update, after the update the built-in sound card worked.
One more case. The client constantly rebooted the computer and reinstalling the operating system did not help, they replaced everything that was possible in the system unit, they did not change only the motherboard and processor. Finally decided to install new firmware on the BIOS and it helped!
In the System Information window that opens, we see the BIOS version - 2003
Now we go to the official website of the manufacturer of our motherboard ASUSP8Z77-V PRO and choose "Drivers and Utilities"
Select any operating system and open the "BIOS" item. We see that there is an update 2104 (more a new version than ours).
Click on the "Global" button and download the firmware.


Fresh BIOS firmware (P8Z77-V-PRO-ASUS-2104.CAP) downloaded in the archive. We extract it from the archive and copy it to USB-f Leshka. The firmware weighs 12 MB.

The USB flash drive must be formatted in the FAT32 file system and, apart from updating the BIOS, should not contain anything.

Reboot and enter BIOS.
In the initial BIOS window, we see the old firmware version 2003.
We press "Additionally" and we go to additional settings BIOS.
(Click on the screenshot with the left mouse to enlarge)

Enter the "Service" tab

Select the BIOS firmware utility - ASUS EZ Flash 2 or you may have an ASUS EZ Flash 3 .

In the ASUS EZ Flash 2 window we see our USB flash drive with firmware P8Z77-V-PRO-ASUS-2104.CAP.

We click on the file with the firmware with the left mouse button.

Click "OK"

Update BIOS?
BIOS is a firmware that is responsible for the initial Windows boot. It checks the performance of components and add-ons. The correct loading of the computer and its normal operation (hardware components) depend on it.
It is written on the motherboard, not on the hard drive like the OS. In new devices, the BIOS has been replaced by UEFI, which performs the same functions, but has been improved. Both programs sometimes need to be updated.

BIOS can be updated in several ways
DO YOU NEED TO UPDATE BIOS?
Manufacturers release updates for laptops on a regular basis. It is downloaded on the official website of the company that produced the laptop. It is more difficult for owners of a PC of their own assembly. To find the files to update, they will have to start from the data of the motherboard chip. Any update is also written to the chip, replacing the old version.
It is not difficult to update bios correctly, but only materials designed for a specific PC model or board should be used. Each motherboard has a strictly defined type of firmware, and installing the wrong version of it can lead to computer malfunctions or its complete inoperability.
BIOS is a thin program, and therefore it is better to update it only in extreme cases. On a normally functioning PC, it does not need to be updated. This is due to several factors:
- flash bios on motherboard asus motherboard or any other difficult, the process requires some skills, the process goes through DOS;
- Improvements will not be noticeable, since the differences between the versions are minimal and highly specialized;
- Malfunctions and malfunctions may occur, as old version tested more thoroughly than new;
- During work, the power must not be turned off, otherwise the device will stop loading.
But sometimes the BIOS needs to be updated. If you regularly encounter this or that error in your work, go to the website of the device manufacturer and check if such an error has been fixed in the new firmware version. More often on the websites of manufacturers there is such a list. If such a problem is really solved in the new version, it makes sense to update the bios on the laptop.

Another good reason to flash BIOS is the installation of new hardware. If you have purchased new processor, which appeared after the release of your motherboard, then it will not be supported by your BIOS. In new firmware versions, manufacturers add support for new types of processors, and therefore you will have to download such a file and flash the firmware.
You need to update the BIOS as a last resort. But even then, before updating, study the characteristics of the new version and find out if the problems are solved in it. Based on this, and conclude whether it is necessary to update the bios.
Find out the current version by holding Win + R on the keyboard. In the window that opens, you see msinfo32 for a 32-bit OS. Click the Run button. A window will open listing the hardware and OS characteristics of the device. Among them, find the one you need.
Sometimes a notification appears that the bios mode is outdated. This means that the BIOS mode is outdated, it still works in real mode, not protected mode. The firmware may not help solve the problem, but it is not serious and it is not necessary to fix it.

UPGRADE METHODS
The update method depends on the computer manufacturer, motherboard model, etc. Most often, each manufacturer has its own instructions for flashing. You can get acquainted with it on the official website of the company.

On all modern motherboards, or you can update the bios on your computer in any of the following ways. But it is better to choose the latter, as it guarantees a minimum number of errors.
UPDATE ALGORITHM
You can update the bios of an asus or any other modern laptop using any of the three methods described. They have their own nuances, but when carrying out the process using utilities, they are still not complicated.
FROM DOS
Difficult option with big risks. To update the bios on windows computer 7 do the following:
- Find out the model of your motherboard;
- On the official website of the manufacturer, download the required firmware version;
- There are sometimes several of them. In this case, choose the one that is designed for installation in DOS mode;
- Create a bootable flash drive with BIOS, DOS and an additional utility (it is downloaded from the manufacturer's website or included in the archive along with the firmware);
- Install the flash drive and restart the computer;
- Specify the media on which bios firmware motherboard;
- After flashing is finished, restart your PC.
There is no exact instruction, as it varies for different PCs and boards. Detailed instructions find it on the manufacturer's website. But this method is not recommended.

FROM WINDOWS
Flashing the bios on a laptop in this way is easy. Errors rarely occur. popular method.
- Download the firmware utility. It has its own for each manufacturer. Program for updating bios asus - Asus Update, MSI - Live Update, etc .;
- Install the program;
- Run;
- Find the online function - search for new firmware. IN different programs she is in different groups of teams;
- From the list of firmware, select the required one;
- Activate the download;
- After downloading, run the flashing and follow the instructions of the program.
Flashing bios asus, MSI and others in this way is also safe because the program itself selects the appropriate firmware version. In addition, an intuitive interface will help even a non-advanced user to flash the firmware.
FROM BIOS
It is possible to reflash the bios on a laptop from the firmware using pre-installed utilities. This is a complicated method, as it differs depending on the motherboard chip model, manufacturer, etc. To update the bios on a gigabyte motherboard, run the preinstalled @BIOS utility, other manufacturers have other programs. Such programs are similar to the utilities involved in the previous method, but are not as convenient. They also work with them - they find the necessary file on the network and run it.
More often, the method is used in case of computer breakdowns, when it is impossible to enter the OS, because. PC won't boot.
Personal computers must be compatible with new hardware even years after they were purchased. This is necessary so that you can later upgrade.
Often, PC component manufacturers offer users to update the BIOS themselves so that the computer meets modern requirements and is compatible with new hardware. By doing this, you can easily install a processor that was not yet released when you bought the motherboard. In this case, your system will immediately recognize it and will function correctly. Due to what is this possible?
Offline system: BIOS with battery
BIOS (Basic Input/Output System - basic input-output system) is the heart of the software and an important element of any PC. It acts as an intermediary between computer components and the operating system: without the BIOS, the latter would not be able to communicate with and control the hardware. When you turn on the computer, long before the OS logo appears on the screen, the BIOS always starts first. It determines which components are installed in the PC, initializes them and provides all the information to boot the system. The BIOS itself is located on a special flash memory chip on the computer's motherboard, and the contents of the memory are preserved even in the absence of power. This is possible due to the presence of a separate battery, which is responsible for the BIOS.
We will answer the most important questions about the BIOS and possible updates. Who needs to carry out its flashing? How can I find out what motherboard is installed in the computer and what BIOS version it uses? If there is a need to update the latter, then how to carry out this procedure? And what if there are problems? It’s worth noting right away that not every PC needs an update: if the system is stable, this makes no sense. But for those who are planning a computer upgrade and a thorough replacement of equipment or want to improve system performance, flashing the BIOS is indispensable.
BIOS Setup: Additional features after the update
BIOS setup. The main BIOS menu consists of many sections. Any motherboard supports only a limited number of processor models, but by updating the BIOS, this list can be significantly expanded to include more modern chips. A prerequisite for this is the compatibility of the central processor with the motherboard connector. Problems can only occur with very old motherboards: the older they are, the less likely it is that a BIOS update makes sense.
It is also worth noting that when flashing it is far from always possible to achieve an increase in system performance. However, BIOS special features and functions, such as CPU overclocking, are often only available after an update. In the same way, only after flashing the BIOS, new processors are correctly recognized and operate at the desired clock frequency. In addition, recent BIOS versions provide useful features, which expand the customization options for your system. A typical example is support for Turbo Boost technology for Intel processors. But before updating, you need to make some preparations: in addition to the motherboard ID, you need to find out the number of the installed BIOS version. This will help you free utility CPU-Z.
CPU-Z: getting useful information

CPU-Z will provide the most detailed information about components This application provides information about the installed processor: name, manufacturer, core voltage, cache information, supported instruction sets, and other data. CPU-Z can also determine if the processor has been overclocked or is running at factory speed. After launching the utility, on the "Motherboard" tab, you can find out all the information about the manufacturer, the name of the model and chipset, as well as the current BIOS version. Compare these data with the parameters of your motherboard, indicated on the official website of the manufacturer. If the number listed in CPU-Z is the same as the most recent BIOS version, no flashing is required. If there is a more recent version on the site, download the necessary archive. It usually contains an .exe executable file that is used to update the BIOS (for example, amiflash.exe, awdflash.exe, etc.) and a BIOS code file in BIN or ROM format. Flashing methods may vary depending on the manufacturer of the motherboard. Most developers offer their own utilities that allow you to update the BIOS directly from the Windows environment. However, for security reasons, we recommend using a more secure method.
DOS: the best BIOS update environment
DOS - the safest environment for flashing BIOS With the least risk, flashing is done using a boot floppy disk, disk, or "flash drive" in DOS mode. The first of these media can be created, for example, in Windows Explorer: just right-click on the drive shortcut and select "Format" by activating in context menu option "Create an MS-DOS boot floppy disk" and specifying the path to the downloaded BIOS files.

CDBurnerXP is a free disc burning program that allows you to emulate a boot floppy disk for flashing BIOS bootable CDs can be created using almost any free program for burning discs - for example, CDBurnerXP utilities.
You will need a boot image called boot.ima which can be found on the CDBurnerXP website or our DVD. It should be opened using the Ultra ISO program, drag files with your BIOS code into the list that opens and save. After that, launch the CDBurnerXP program, select the data disc burning mode, and click OK. The main program window will open. Make the disk bootable: select Disk | Boot options", in the window that opens, check the box "Make disk bootable" and set the path to the saved boot image, specifying the emulation type "1.44 MB floppy". Burn the CD by pressing the burn button, then restart your computer and point to your drive in the startup menu. The computer will boot into DOS with a command prompt that opens the A:> directory. If you type "dir /w" you can view the contents of the floppy or disk. Flashing the BIOS can be done from command line. Sometimes the BIOS update does not start automatically - in this case, run the dir command and run the BAT file (for example, update.bat). After a successful flashing, remove the disk and restart your computer.
Any computer hardware and software, as you know, becomes outdated over time and ceases to meet current requirements. This applies equally to the primary BIOS / UEFI systems, the software of which is integrated into a special chip on the motherboard. When installing new hardware ("hardware"), it may sometimes be necessary to flash the BIOS. On a laptop, on a stationary computer terminal, such a procedure will be performed, it doesn’t matter. The technology is almost always the same. Some users who are unfamiliar with the basics of such techniques believe (and not without reason) that this process is unsafe and difficult. If you can agree with the first statement, then you can argue about the second. In fact, flashing the BIOS of the motherboard is not such a troublesome business. But for the correct implementation of such a procedure, special attention should be paid to some important details and nuances, which depend on the motherboard manufacturer and the programs and methods used for flashing.
Why do I need a BIOS flashing?
In general, if it is not planned, and the whole system is working stably, there is no point in updating the BIOS version.
But when new equipment is installed on the computer, which may not be supported by the primary system only because of its obsolescence ( Device BIOS just does not recognize), flashing the BIOS becomes an urgent problem. Although many users find this process difficult, nonetheless, anyone who works with a computer will be able to perform such steps on their own. It will take no more than 10 minutes.
Flashing the BIOS of the motherboard: prerequisites
To begin with, pay attention to a few mandatory conditions, failure to comply with which can lead to disastrous consequences.
You should download files and programs for updating primary systems only from the official resources of motherboard manufacturers. In the case of installing an unofficial firmware, no one can guarantee that the process will be successful and the system will work as expected after that.
The second thing to pay attention to is during the update. You need to make sure that there are no power surges or spontaneous disconnection of a computer or laptop from the mains, in advance.
General rules for updating all firmware
Flashing BIOS for almost all models of motherboards involves the use of the same scheme:
For standard BIOS systems, DOS mode is used in most cases. However, for some BIOS versions, as well as for more modern UEFI systems, can be applied special program for flashing BIOS, created by the manufacturer of the motherboard, which is able to run even in the environment operating systems Windows without the need to create bootable media.
How can I find out the motherboard modification and the current BIOS version?
The very first thing to do is to determine which model of the motherboard is installed in the computer system, as well as to find out the version of the primary BIOS system (perhaps it is currently relevant and does not need to be updated).

You can view information about the board and BIOS version in the section that is called from the Run console with the msinfo32 command.

For the motherboard, you can also use specialized utilities like CPU-Z (formerly Everest). For a device determined in this way, on the manufacturer's website, you need to find the latest firmware and save the files on your hard drive.
Preparing Bootable Media (General Method)
In the case of using bootable media, when an update from under Windows is not provided, at the first stage it must be created. The usual recording of downloaded files will not work.

To simplify the work, you can use the Rufus utility, which is very easy to learn and creates a bootable USB flash drive in a couple of minutes. You don't need to change anything in the settings. Only in file system you should specify FAT32, and use MS-DOS mode in the recording method, be sure to check the box next to the line for creating bootable media. If this is not done, then the device will not be recognized as a bootable device when booting again. Then, in some cases, to install the update, you will need to additionally copy the control program and the firmware file to the media.
Next, the BIOS update process will be considered with examples for motherboards from several well-known manufacturers. Although in general they are very similar to each other, nevertheless, each of them has its own nuances. We assume that the priority BIOS settings already installed.
ASUS
Flashing the Asus BIOS can be done in several ways. Among the preferred utilities, it is worth highlighting two programs - AFUDOS and ASUSTeK EZ Flash 2.
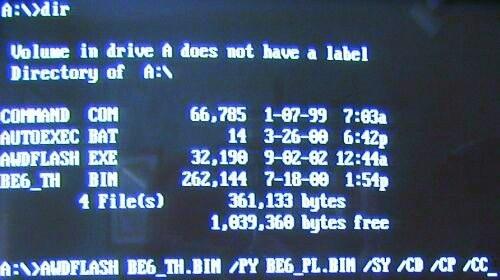
When using the first utility, you should create bootable media and make sure that it contains the afudos.exe program file and the firmware itself (for example, p4c800b.rom).

ASUS BIOS flashing is as follows. Boot from flash drive. Since the media was written for DOS mode, the initial line C:\> will appear on a black screen, in which you need to write the command /i p4c800b.rom and press the enter key. Upon completion of the update, a reboot will occur, during which you just need to remove the media from the USB port so that the system starts from the hard drive.
Flashing the BIOS of an ASUS motherboard when using the second utility is somewhat different from the previous version.
Despite the fact that most firmware on the official ASUS website have the .rom extension, sometimes CAB files can also be found. There is nothing wrong with this, since they are used for UEFI systems.

For firmware, you should enter the UEFI settings on reboot, switch to Advanced Mode (advanced settings) and select the ASUSTeK EZ Flash 2 line in the service (tools) section. Next, select the media with the program again from the list (line of the same name), after which the desired firmware file will be shown on the right. We select it and agree with the warning twice (first to check the file, then to start the firmware process).
At the end of the process, a notification about the restart will appear, and at the beginning of the restart, a proposal will be issued to conduct initial setup. Press F1 and set the desired parameters. Otherwise, just exit the settings without saving the changes.
gigabyte
Flashing the BIOS of Gigabyte systems is quite different from other processes. First of all, this is due to the fact that you can use the online update to install the firmware. But first, consider using the Q-Flash utility, which is considered to be the best for updating firmware.

First you need to enter the BIOS settings and use the option to reset all settings Load Optimized default. After that, you need to save the changes, restart the computer and enter the BIOS settings again. Further, to launch the Q-Flash utility, the F8 key is pressed, and the start is confirmed by pressing the Y and Enter keys. To begin with, it is recommended to save the current version using the Save Bios option, after which you need to use Update Bios. Next, you will be asked to specify the source from which you want to update. HDD 2.0 should be selected as the carrier (this is how the flash drive is displayed in the settings). Then everything is as usual: select the firmware file present on the media and agree with all the warnings.
For an Internet update, you can use the @BIOS utility specially developed by Gigabyte specialists, which runs in a Windows environment. In this case, it is highly recommended to disable Hyper-Threading mode in the primary system settings, as well as deactivate anti-virus and other resident applications, to avoid errors or failures during the upgrade process.
After starting the program, you can immediately save the current BIOS version by clicking the Save Current BIOS button, and then select the Internet Update online update mode, click Update New BIOS and select one of the servers in the list. After that, you will be prompted to specify the model of the installed motherboard, and the program will automatically download all the necessary components and activate the update process.
MSI
Flashing the MSI BIOS, as in the case of ASUS, can be done either from under Windows or from under DOS. For DOS mode, a BIOS-embedded tool called BIOS-MFLASH is used. But the MSI Live Update 5 or 6 application can also be used as an initial management utility. It is notable for the fact that with it you can still update all installed drivers MSI, as well as flashing the BIOS of the corresponding graphics accelerators. Let's start with him.

In the main window, you just need to check the boxes on the necessary elements. Select the MB BIOS component and press the Scan button from the bottom (Scan). If a new firmware version is found, use the Download and Install button, after which the update process will start.

First you will need to select the update environment. To simplify matters, check the In Windows mode item, in the next window click the close button for all programs that appear in the list (Close all listed programs), click the continue button (Next) and in the next window click the process start button.
For DOS mode, select it from the window of the launched update process, after which we indicate the media and agree to the destruction of all data present on it (the process will take no more than a minute, after which a message will be displayed about the successful creation of the boot drive). When you reboot, you will only have to follow the instructions of a kind of "Master".
In the case of updating using the built-in MFLASH mechanism, you will have to download the firmware manually, create bootable media and perform the same actions in the BIOS as described above (select the media and firmware file in the tools menu).
Acer
Flashing the BIOS of Acer systems is surprisingly much easier. You don’t even need to create bootable media, although you still have to format it in FAT32.

To install the update, a special utility called Insyde Flash is used, which is copied to removable media. At the same time, you need to copy the firmware file downloaded from the official website, which has the .fd extension and corresponds not only to the motherboard, but also to the laptop model, to the main directory of the program on the USB flash drive. Please note that the device must contain only one firmware file, otherwise the application will issue an offer to flash only one of several. After running the utility with the power on, you will be prompted to install the update immediately.
The second way is just as simple. First you need to completely turn off the laptop, unplug the cord from the outlet and wait until the power indicator stops blinking. Next, plug the cord into an outlet, insert the USB flash drive into the appropriate port, hold down the Fn and Esc keys and press the power button. As soon as the indicator starts flashing, release the keys. After that, reading information from the drive will begin (this can be seen by the blinking of the LED on the device itself). At the end of the update process, the laptop will reboot on its own.
Video cards
Since GeForce and Radeon are dominant in the video card market, BIOS flashing will be considered using their example.

At the initial stage, you need to download new firmware and control programs for your card on the manufacturer's website. If the system has several video cards, only one should be left for the duration of the update by inserting it into the PCI-Express slot.
For GeForce cards, the NVFlash program is used (two files), for Radeon, the ATIFlash utility (one file). Next, you need to create a bootable USB drive for DOS mode, and then copy the program and firmware files to it.
When starting from a flash drive, you should make sure that the card is single-processor, otherwise the proposed method will not work. For NVIDIA, use the nvflash --list command, for ATI - atiflash -i. If information is given on two cards, then the adapter has two processors, and the proposed firmware method cannot be used (it is better to refer to the manufacturer's website and find instructions there).
At the next stage, flashing the BIOS of the GeForce video card involves disabling protection. This is done with the nvflash -protectoff line.
Further, to start the BIOS update process for GeForce cards, use the nvflash -4 -5 -6 newbios.rom command (the name of the ROM file must match the name of the downloaded firmware), for Radeon cards - atiflash -p -f 0 newbios.rom. After that, we wait for the process to complete and reboot the system in normal mode.
Brief summary
That's all for flashing primary I/O systems. Based on the foregoing, we can conclude that the best option is to install the update exclusively in DOS mode, although you can use special utilities. But they only work if there are UEFI systems, and they are not suitable for standard BIOS versions. You need to be extremely careful with video cards, since incorrect installation of the update or the slightest violation during the flashing process can cause the graphics adapter to fail.