For a long time I couldn’t come up with a good title for this article that would make it clear what it was about, and that you could easily find it if you have problems with Wi-Fi in Windows 10. Now we will try to figure out why there is no Wi-Fi button in Windows 10 Where to look for settings? wireless network, how to turn on Wi-Fi and why this problem occurs. I'll tell you about the error "Could not be found wireless devices on this PC" in Windows 10.
I’ll say right away that when you can’t find “Wi-Fi” on your laptop (no power button, no item in settings, etc.), then most likely you simply do not have the Wi-Fi driver installed, you do not have a Wi-Fi receiver, or it is turned off. Let's look into everything in detail.
The essence of the problem:
The whole problem is that we cannot connect to a Wi-Fi network on Windows 10. I already wrote. But when we open the connection management window, there is simply no control button there Wi-Fi adapter ohm
If we go to settings, in network parameters, then we also won’t find the point there "Wi-Fi". And on the tab Airplane mode we will see the error highlighted "We couldn't find any wireless devices on this computer" .

This problem could mean that:
- Your computer simply does not physically have a Wi-Fi receiver. If you have a laptop, then it should have a built-in wireless adapter. On your computer, you can use an external Wi-Fi receiver. If you are absolutely sure that your computer has Wi-Fi (used before Windows installations 10, looked at the specifications, connected an external receiver, etc.), then you need to check other reasons.
- The driver for the Wi-Fi adapter is not installed. In some article I already wrote that Windows 10 itself installs the driver for wireless adapters. But not always. And these drivers do not always work as they should. Therefore, the most common reason for such problems with Wi-Fi in Windows 10 is the lack of a wireless adapter driver, or an inappropriate driver.
- Well, it may be that The wireless network adapter is simply disabled. I just checked, turned it off, the “symptoms” of the problem are exactly the same as I described above.
One small nuance. You probably know that your laptop has a keyboard shortcut to turn wireless networks on and off. On my Asus, for example, these are the keys Fn+F2. In Windows 10, these keys are responsible for turning Airplane mode on and off. If you have an “airplane” icon on your notification panel instead of the Internet icon, then simply disable this mode using the keys on your laptop, or by clicking on the icon itself and turning off the “Airplane” mode.
In any case, you can check the keyboard shortcut on your laptop, maybe it will help. For different manufacturers, these combinations may be different. Typically, this is the Fn key + the antenna icon key.
Let's check and fix it.
No Wi-Fi on a Windows 10 laptop: problem solving
Let's first check whether the Wireless Network adapter is turned on, and if you don't have this adapter at all, then let's make sure that the problem is in the driver, or in the absence of this adapter in your computer.
Right-click on the Internet connection icon in the notification bar and open Network and Sharing Center. In the new window, select Changing adapter settings.

If you see an adapter there "Wireless Network" (or something like that), and it is disabled, then right-click on it and select Turn on. After this, Wi-Fi should appear on your laptop and you can connect to the wireless network.

If there is no “Wireless Network” adapter at all, then, as I wrote above, your computer most likely does not have a Wi-Fi driver installed. Or it is installed, but does not work stably.
Problems with the Wi-Fi adapter driver in Windows 10
We need to go to the device manager and see what's there. Is there a wireless adapter and how does it work? To do this, click on the menu Start and select .


At the bottom of the page go to device Manager.

In Device Manager, open the tab Network adapters. Usually there are two adapters: LAN - for connecting the Internet via network cable(network card), and wireless adapter. As a rule, the name of the wireless adapter contains the word "Wireless". This is what the Wi-Fi adapter looks like in Device Manager on my laptop:

As you can see, the name indicates the manufacturer and model. If you have the adapter in device manager and it is enabled (I showed how to check above), but you still can’t turn on Wi-Fi, then try updating the driver for your adapter. Or, try performing the operations with the adapter that I wrote about in the article.
If there is no driver, or the adapter itself is missing, then you won’t see it in the device manager either.

But, please note that if there is no adapter in the manager (and in a computer, laptop it is), then in the device manager there should be at least one "Unknown device", as in my screenshot. In this case, you need to try installing the driver for the Wireless adapter.
How to install or update the Wi-Fi adapter driver?
If you have a laptop, then go to the manufacturer’s official website, through the search, or through the menu, look for your model, there find the section with driver downloads, and look for the driver for the Wireless adapter. Please note that there will most likely be an option to select your operating system. Select Windows 10. If there is no driver for Windows 10, you can try selecting Windows 8 (8.1). Also, the driver may be on a disk, which usually comes with the laptop. (but it’s unlikely there will be a driver for “ten”).
Save the driver to your computer and simply start installing it. If you downloaded the archive, then the archive should contain an installation file that you just need to run and follow the instructions. After installation, restart your laptop and try connecting to the Wi-Fi network (Wi-Fi must be turned on).
If you have a desktop computer with a USB/PCI adapter, then look for the driver on the website of the adapter manufacturer itself. According to the adapter model. Well, you should have a driver disk.
As for updating the driver, we do everything the same as in the case of installation: find it, download it to your computer, and install it.
And one more thing...
By the way, after installing the driver on the wireless adapter, when it works, you can - a very useful thing.
Share your results in the comments, ask questions, and I will try to supplement this article with new information on solving this problem with Wi-Fi on the “top ten”.
On drive C I turned on the search and found the wireless LAN folder
C:\eSupport\eDriver\Software\WirelessLan\Qualcomm Atheros\WirelessLan\10.0.0.342\2886\
There are two files there: Setup. I started both of them and everything returned to normal.
If it helps anyone, thanks to Konstantin!
Update: WLAN Service
Check if the WLAN AutoConfig service is running on your computer. I showed how to do this.
Update: Windows Event Log Service
A working solution appeared in the comments, which is that you need to enable the Windows Event Log service. Let's go to services (you can press Win+R and run the command services.msc).
Find the Windows Event Log service and open its properties (by right-clicking on it). We check whether the startup type is set to “Automatic” and whether the service itself is running. If not, click on the “Run” button. You can try stopping it and starting it again.

Share your solutions in the comments! Ask questions.
What could be easier than connecting to a wireless WiFi networks? Just enter the password and wait for the connection to be established. This usually happens, but what if the connection is limited (no Internet access) or communication is not established at all? Let's talk about the reasons why such failures occur and how to deal with them.
Why Windows 8 can't see or connect to WiFi networks
Computer or laptop Windows control 8 does not see the Wi-Fi network for the following reasons:
- WiFi adapter is not installed, disabled or faulty;
- There is no wireless network driver in the system;
- Airplane mode is turned on on the computer;
- there is not a single wireless network access point in your area;
- an access point (wireless router) that is nearby is disabled, incorrectly configured, or faulty;
- communication standards between the computer and the access point are not mutually supported;
- there is a device nearby that interferes with the radio signal;
- The WiFi adapter operates in monitoring mode.
If the network is visible, but the connection is not created or is limited:
- Internet access for this network is not configured or is prohibited;
- network connection is limited by the administrator;
- the access point cannot process the request due to congestion;
- Incorrect access point settings are used.
Restoring the connection to the wireless network
Checking the network adapter
Desktop PCs are sold without WiFi network adapters, so to connect to wireless networks you will have to buy and install an adapter separately. For example, like the one in the picture.
There is no need to buy a Wi-Fi adapter for a laptop - it is already inside.

In order for the laptop to see and connect to wireless networks, WiFi must be turned on. On some models there is a switch or button on the case for this.

On others, the key combination Fn+F1…F12 is used. The key with the image of an antenna is responsible for turning on the wireless adapter.
Once turned on, the WiFi adapter should appear in the manager Windows devices 8. To check this, launch the manager from the context menu of the Windows button (Start)

and expand the “Network adapters” list. If your adapter is in this list, it means the system recognized and installed it. If it appears as an unknown device, go to its manufacturer’s website and install the driver.

If the adapter is connected, but the system does not see it, make sure that it is activated in the BIOS.
The option that is responsible for the operation of the built-in WiFi is called OnBoard Wireless LAN or WireLess LAN support. Its value should be "Enabled".

Among other things, make sure that the wireless adapter is not in traffic monitoring mode (monitor mode). Although those who use this mode are always aware of this (it requires the installation of a special driver).
Checking the access point
If your PC or laptop does not see your home access point, try connecting to another one. To check, you can use public networks, for example, in cafes or parks, or private ones - with your friends. To check your desktop computer without leaving your home, you can temporarily create a virtual access point on another device.
If wireless networks are not detected anywhere, the problem should be looked for in the adapter or WiFi settings on the computer, and if there is no connection to only one access point, the problem probably lies there.
Diagnostic steps (if the previous step did not solve the problem, proceed to the next one):
- Make sure the access point is turned on and is emitting a signal (detected by the wireless indicator light).

- Make sure that there are no devices near the router and computer that create electromagnetic interference - cordless phones, microwave ovens, powerful power cables. Try moving the access point closer to your PC to improve the signal strength.
- Turn off the router's power and turn it on again. If the problems persist, reset the settings: with a sharp object - a toothpick or a paper clip, press the recessed Reset button, which is located on the back or bottom side of the device. After this manipulation, all settings will be restored to the state as after purchase.

- Change the broadcast frequency channel. Connect your computer to the access point via cable, enter the wireless network settings menu, find the option “ Channel" and switch to another channel. Perhaps the connection will be restored on some of them.

- In the same menu, check the “Hide SSID” setting and, if it is active, check “No”. Hiding the SSID disables broadcasting of the network name - such a network is not displayed in the lists of available connections. Also enable standards support wireless communication b/g in case the Wi-Fi adapter on your computer works on one of them, and the access point works on another, for example “a”, which does not support “b” and “g”.

- If many devices are connected to the access point at the same time, it may become unresponsive due to overload. Such situations are unlikely at home, but often occur in organizations. Try connecting to a different, less busy network, or try again after a while.
Checking Windows 8 settings
Airplane mode
WiFi may disappear due to the fact that the user has activated Airplane mode in Windows 8 - in this mode, the network adapter is turned off and the computer does not see any wireless networks. The network icon in the system tray will help you determine that the problems really arose because of this - it takes the form of an airplane.
![]()
To exit Airplane mode in Windows 8, open the Charms flyout and click the Options charm.
Next, click “Change computer settings.”

Make sure that Windows sees WiFi again and that the network icon in the tray returns to its previous form.
Network diagnostics
Windows 8 has a tool that automatically diagnoses network connection problems. It's called "Diagnostics" Windows networks" This tool sees and eliminates many obstacles to WiFi operation, for example, when there is a connection, but the computer does not access the Internet (connection is limited) or there is Internet, but access to sites is limited.
When the connection is limited, the network tray icon is marked exclamation point.
![]()
To launch the Windows 8 Network Diagnostic Tool, right-click on the network icon and select “Troubleshooting” from the menu.

The utility will check all network connections on the computer and determine how Internet access is limited. Local problems that can be fixed will be fixed automatically. And if the connection cannot be restored, for example, due to problems with the access point or problems on the provider’s side, the information will be displayed in a window marked “Not fixed.”

If your PC has multiple connections, of which only one is limited, or the diagnostic tool does not see a problem, you can only diagnose the selected network. To do this, go to the “Network and Sharing Center” and go to the “ Network connections"(click in the transition bar "Change adapter settings").
Open context menu connection that is limited, and click “Diagnostics”.

WLAN AutoConfig Service
Connection problems also occur after network services are stopped, either accidentally or out of ignorance. The WLAN autoconfiguration service is responsible for the operation of WiFi in Windows 8. If the wired Ethernet connection is not limited in any way, but the system simply does not see wireless networks, start checking with this service.
- Launch the Services application: open the context menu of the Windows (Start) button and click Run.

- Next, type in the “Open” line the command services.msc and click OK.

- Find in the list Windows services 8 WLAN auto-configuration, open its menu and select “Properties”.

- If the service is stopped, click "Start" and select "Automatic" from the "Startup type" drop-down list.

For the WLAN AutoConfig Service to start, another service must be running - Manager Windows connections. Find it in the same list and set similar settings for it.
Other parameters WiFi connections on a PC do not require manual configuration. All data for accessing the Internet - IP, gateway address, DNS, etc. - is automatically received by the network from the DHCP server of the access point.
Laptop owners usually use it to access the Internet wireless connection, fortunately, a Wi-Fi adapter is available on all laptop models without exception. However, to use it, sometimes you have to figure out how to turn on wifi on a laptop.
Hotkeys or hardware switch
The first step is to physically turn on the Wi-Fi adapter. On different models For laptops, this procedure is slightly different, but its meaning is the same: you need to find a hardware switch or use the function keys. Let's look at a few examples:
You can continue the options for turning on Wi-Fi for a long time, citing methods for MSI, Acer, Samsung and other brands. Even different series from the same manufacturer have different ways of activating the wireless module, therefore:
- Inspect the laptop case for a hardware switch or Wi-Fi power button.
- Examine the keyboard - one of the keys in the F1-F12 row should be marked with a wireless connection icon. If you press it together with the Fn button, the adapter will turn on or off.

If you have a Sony Vaio series laptop, then there may be neither a hardware key nor an Fn button on its keyboard. For Wi-Fi to work in this case, you need special utility VAIO Smart Network, which can be found on the manufacturer’s official website.
Fn button doesn't work
What to do if the Fn button does not work? How to turn on the adapter in this case? First you need to figure out why the key does not work. Fn runs under BIOS and has its own utility, without which the key does not function. Therefore, if the button does not work, you first need to find the specific model laptop utility for enabling hot keys (the name should contain the word “HotKey”). 
If installing the utility did not help or the key is physically damaged, you will have to use an alternative method of turning on the adapter. On Windows 8 and Windows 10, to enable the adapter, simply click on the Wi-Fi icon in the notification panel and move the “Wireless Network” slider to the active position. If the adapter drivers are installed correctly, then the icon must be there. 
There is no such function in Windows 7, but you can try to enable the wireless connection through the window for changing adapter settings (this is discussed below). If this method does not help, then you will have to look for an external keyboard with a working Fn key and then never turn off the Wi-Fi module.
Setting up Wi-Fi on different versions of Windows
You will figure out how to physically turn on the module quite quickly. Sometimes on this Wi-Fi setup ends: the system performs the remaining necessary actions independently, displaying a list of available wireless points. But sometimes you have to establish the connection manually.
Regardless of Windows versions, first you need to check that the Wi-Fi module drivers were installed without errors:

To be sure, it’s better to go to the official website of the laptop manufacturer and find latest version wireless network module drivers for your model. In addition, right-click on the adapter and select “Enable” (if its operation is stopped).
Windows XP
In theory, Windows XP should have been discontinued a long time ago, but on some older Dell models and other laptops, the legendary system still continues to perform its functions. Wi-Fi in Windows environment XP is configured as follows:

There should be a Wireless Network Connection icon in the File Explorer window. Its presence demonstrates that the Wi-Fi module is working correctly. Right-click the icon and select Enable. Next:

If the list of available points does not include the network that your router distributes, click “Update list”. Then select the desired point by name and click “Connect”. If the network is password protected, you will be prompted to enter an access code, after which a connection will be established.
Windows 7
On Windows 7, the procedure for connecting to a wireless network has changed slightly, becoming a little easier. Now all available networks are displayed after clicking on the Wi-Fi icon in the system tray. But if there is no icon, then:
- Go to Network and Sharing Center.
- Click "Change adapter settings."
- Find your wireless connection and make sure it is turned on.

After turning on the wireless connection, the Wi-Fi icon will appear in the tray. Click on it to see a list of available points, select the network and click “Connect”.
Windows 8
On Windows 8, the procedure for connecting to Wi-Fi remains the same, but an Airplane mode has been added, which you need to know how to work with. If the adapter driver is installed and the wireless connection is working correctly, then in the notification panel you will see a Wi-Fi icon, when you click on it, a list of available networks appears.

If there is no icon, follow the same steps as on Windows 7 - open the “Change adapter settings” window and turn on the wireless connection. If there is no wireless connection itself, check the drivers and the status of the module - everything should be turned on and installed. 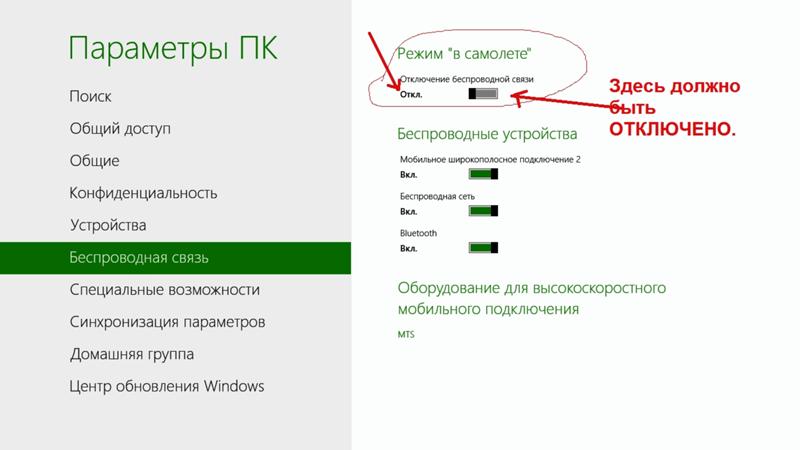
If the adapter is turned on, the drivers are installed, but no available networks are detected, check that the Airplane mode icon is not hanging on the notification panel. If it is, you need to disable this mode. To do this, click on the icon and move the slider to the “Disabled” state.
Windows 10
On Windows 10, everything remains the same with a few minor changes, so you'll quickly figure out how to connect your laptop to Wi-Fi:
- Click on the wireless connection icon in the tray.
- Select the desired network.
- Click "Connect" and enter your password.
If the access point does not appear, try adjusting your network settings. Click on the link of the same name - the “Network and Internet” section will open Windows settings 10.
There are two tabs of interest here:
- Wi-Fi - Make sure your wireless network is turned on.
- Airplane mode - make sure the mode is turned off.
You can go to the section for changing adapter settings and enable the wireless connection. Simply put, on Windows 10 you have several equivalent options - you just need to choose the more convenient method for yourself.
A fairly common problem, especially common after any changes: reinstallation operating system, replacing a router, updating firmware, etc. Sometimes, finding the reason is quite difficult, even for an experienced technician.
In this short article I would like to dwell on a couple of cases due to which, most often, a laptop does not connect via Wi-Fi. I recommend that you familiarize yourself with them and try to restore the network on your own before turning to outside help. By the way, if it says “without access to the Internet” (and the yellow sign is on), then you better look.
1. Reason No. 1 - incorrect/missing drivers
A very common reason why a laptop does not connect via Wi-Fi. Most often, you will see the following picture (if you look in the lower right corner):
No connections available. The network is crossed out with a red cross.
After all, as it happens: the user downloaded a new Windows OS, burned it to disk, copied all his important data, reinstalled the OS, and installed the drivers that were installed before...
The fact is that drivers that worked in Windows XP may not work in Windows 7, while those that worked in Windows 7 may refuse to work in Windows 8.
Therefore, if you are updating the OS, and in general, if Wi-Fi does not work, first of all check whether you have the correct drivers and whether they were downloaded from the official website. And in general, I recommend reinstalling them and watching the laptop’s reaction.
How can I check if the driver is in the system?
Very simple. Go to “my computer”, then right-click anywhere in the window and select “properties” from the pop-up window. Next, on the left, there will be a “device manager” link. By the way, you can open it from the control panel, through the built-in search.
Here we are most interested in the network adapters tab. Look carefully to see if you have a wireless network adapter, as in the picture below (naturally, you will have your own adapter model).
It is also worth paying attention to the fact that there should not be any exclamation marks or red crosses - which indicates problems with the driver, that it may not work correctly. If everything is good, it should be displayed as in the picture above.
Where is the best place to get a driver?
It is best to download it from the manufacturer’s official website. Also, usually, the laptop comes with native drivers instead, you can use them too.
Even if you have native drivers installed, and Wi-Fi network does not work - I recommend trying to reinstall them by downloading them from the official website of the laptop manufacturer.
Important notes when choosing a driver for a laptop
1) Their name, most likely (99.8%), should contain the word “ wireless«.
2) Identify the type correctly network adapter, there are several of them: Broadcom, Intel, Atheros. Usually, on the manufacturer's website, even for a specific laptop model, there may be several versions of drivers. To know exactly which one you need, use the utility.
The utility perfectly determined what hardware was installed in the laptop. You don’t need to install any settings, you just need to run it.
Several websites of popular manufacturers:
Acer: http://www.acer.ru/ac/ru/RU/content/home
HP: http://www8.hp.com/ru/ru/home.html
Asus: http://www.asus.com/ru/
And one more thing! The driver can be found and installed automatically. This is described in the article. I recommend checking it out.
2. Reason #2 - is Wi-Fi turned on?
Very often you have to watch how the user tries to look for the causes of breakdowns where there are none...
Most laptop models have an LED indicator on the case that signals Wi-Fi operation. So, it should burn. To turn it on, there are special functional buttons, the purpose of which is indicated in the product passport.
For example, on Acer laptops, Wi-Fi is turned on using the “Fn+F3” button combination.
You can do it differently.
Go to "control Panel" your Windows OS, then the “network and internet” tab, then “ network and sharing center", and finally - " changing adapter settings«.
Here we are interested in the icon wireless connection. It should not be gray and colorless, as in the picture below. If the wireless network icon is colorless, then right-click on it and click “enable“.
You will immediately notice that even if it does not connect to the Internet, it will become colored (see below). This indicates that the laptop adapter is working and it can connect via Wi-Fi.
3. Reason No. 3 - incorrect settings
It often happens that a laptop cannot connect to the network due to a changed password or router settings. This can happen through no fault of the user. For example, the router settings may be lost if the power is turned off during intensive operation.
1) Checking settings in Windows
First, pay attention to the tray icon. If there is no red cross on it, it means there are available connections and you can try to join them.
We click on the icon and a window should appear in front of us with all the Wi-Fi networks that the laptop has found. Select your network and click “connect”. We will be asked to enter a password, if it is correct, then the laptop should connect via Wi-Fi.
2) Checking the router settings
If you cannot connect to a Wi-Fi network and Windows reports an incorrect password, go to the router settings and change the default settings.
To enter the router settings, go to " http://192.168.1.1/"(Without quotes). Typically, this address is used by default. The default password and login are most often “ admin"(in small letters without quotation marks).
Next, change the settings in accordance with your provider settings and router model (if they are lost). In this part it is difficult to give any advice; a more extensive article on creating local network Wi-Fi at home.
Important! It happens that the router does not connect to the Internet automatically. Go into its settings and check if it is trying to connect, and if not, try connecting to the network manually. This error often happens on TrendNet brand routers (at least it used to be on some models, which I personally encountered).
4. If all else fails...
If you've tried everything and nothing helps...
I will give two pieces of advice that help me personally.
1) From time to time, for reasons unknown to me, the Wi-Fi network disconnects. The symptoms are different each time: sometimes it says no connection, sometimes the icon lights up in the tray as expected, but there is still no network...
A 2-step recipe helps to quickly restore a Wi-Fi network:
1. Disconnect the router’s power supply from the network for 10-15 seconds. Then I turn it on again.
2. I reboot the computer.
After this, oddly enough, the Wi-Fi network, and with it the Internet, work as expected. I don’t know why and why this happens, I don’t want to dig into it either, because... This happens quite rarely. If you can guess why, share it in the comments.
2) There was one time when it was generally not clear how to turn on Wi-Fi - the laptop does not respond to the function keys (Fn+F3) - the LED does not light up, and the tray icon says that “there are no available connections” (and it does not find not one). What to do?
I tried a bunch of methods, I wanted to reinstall the system with all the drivers. But I tried to diagnose the wireless adapter. And guess what - he diagnosed the problem and recommended fixing it by “resetting settings and turning on the network,” which I agreed with. After a few seconds the network started working... I recommend trying it.
That's all. Good luck with your settings...


