For a long time now, Google has made it possible to connect Android devices via USB to various microcontrollers by opening the API. Now everyone who is involved in creating various projects on Arduino can rejoice, because now it will be much easier to debug the Android Arduino system and, in principle, regulate their interaction.
We have already begun to introduce readers to the possibilities of combining a microcontroller and a smartphone - see.
But even before this, various modules allowed Android and Arduino to easily interact. Let's figure out how you can implement a project that will be controlled from a smartphone, and what is required for this.
Where can I use the connection between Android and Arduino?
First of all, you need to think about how to use the ability to transmit a signal from Android to Arduino. After all, before studying any materials, every sane person should understand where it will lead him in the end. Even if we are talking about a hobby. Indeed, the ability to control equipment from your smartphone has long ceased to be perceived as something extraordinary. Nowadays, most TVs, refrigerators and even vacuum cleaners purchased by the middle class have the ability to transfer data to a smartphone.
This solution allows you to significantly simplify the life of the average person, because for the same TV there is no need to constantly buy batteries for the remote control and look for it if it gets lost. We are getting closer to the treasured smart homes, but some people prefer not to buy such equipment, but to design it themselves.

In this case, the Android Arduino package should be considered in two variations:
- Remote control of any device using a smartphone. It is also called smartphone-MK connection. All the same equipment, for example, sliding blinds or lighting in the room, which will be turned off with one click. If you want to do the latter, then there is no need to change the wiring or buy special smart lamps, which can burn out after a month. It is enough to purchase a small Arduino microcontroller, a wireless Internet or Bluetooth communication module and electrical tape. After which it will be enough to solder the simplest circuit, which closes if a signal is sent to the MK.
This signal will be sent from your phone, close the contacts, and the light will start to light up. To avoid problems and for additional security of your home, you can write a script that can automatically open the circuit if the control device is removed from view. Regular switches will still work, but only when the circuit is closed. - Data transfer for information or MK-Smartphone communication. Here you no longer control some equipment, but rather, on the contrary, various equipment allows you to receive certain data on your smartphone. The first thing that comes to mind and the simplest application is a motion sensor. This module is available in standard sensors for Arduino microcontrollers; buying it will not be a problem, as will installing it in the passage. Then all that remains is to write a code, the likeness of which already exists on many English-language forums, sending an SMS or a message to social networks, and also special utility, if someone crosses the infrared beam.
You can create more complex and automated systems that will transmit not only media information about your apartment, but also report if vegetables or fruits are ripening in your home greenhouse. Everything depends solely on the imagination of the engineer himself, but the basis of the technology is still the same - transferring data from one device to another.
So you have chosen a suitable project and set about implementing it. The modules and microcontrollers have already been ordered, and while they are on the way, you can start developing software. After all, a naked Android does not interact with Arduino using magic.
Android applications for interacting with Arduino
We will not develop the utility from scratch, because this is not the basis for programming in Java. The easiest way is to use ready-made engines and environments with a user interface, where you literally only have to add 1-2 lines of code for the button to make it work. Naturally, such an approach significantly limits the functionality of the final product and inevitably impairs creativity, but it will be useful for those who want to quickly implement a simple project without unnecessary problems.
First, let's look at the three basic files that you will encounter when designing a program:
- MainActivity.java is the entire application code in the language of the same name; all functions and methods that you write are saved here.
- Activity_main.xml – layout, as you can easily guess from the file extension. The location of buttons, text and other interactive components is stored here, which are then brought to life in the code.
- AndroidManifest.xml – This file also relates to layouts, but in a slightly different area. It defines the basic parameters for launching the application and the permissions it will need. In our case, this is the need to turn on Bluetooth, because through it we will communicate with the MK. If you are making a sensor that needs to send information over a long distance, then, accordingly, you need to turn on and check the operation of the wireless or mobile Internet.
Basics of data reception and transmission
To understand how your future project will generally work, it would be worth studying the basic physics of electromagnetic fields. But not to overload unnecessary information, it is enough to understand that today data transfer occurs in three main ways:
- Via a USB cable, which is not suitable everywhere, but a good option to set up the project.
- Via Bluetooth and related protocols, for example, in lately It has become popular to use NTFS to manage smart devices. But, since we are talking about a project on the Arduino MK, we will focus on bluetooth.
- Through wireless internet. There is nothing new here, in fact, your mobile or microcontroller acts as a server that receives and processes the received data, and then performs calculations or actions and sends a response.
These are the main methods of transmitting and receiving information; you just have to choose the appropriate one. For projects that will not be used over long distances, the best option in terms of code volume and ease of setup is Bluetooth.
What components may be required for interaction?
We have already mentioned above that for an Arduino project that involves using one of the methods for transmitting data over a distance, you need to purchase additional modules. Again, best choice there will be bluetooth. This module allows you to receive and send signals of a certain frequency, which are picked up by most smartphones, and accordingly, no problems should arise. You can choose one of the devices presented in the main Arduino line, or Chinese analogues, which will be much cheaper.
One of the modules you can take is the Bluetooth Bee, which can be purchased at many stores, from DFRobot.

It all depends on the specific system and what is needed in it " Bandwidth" After all, if it is a video surveillance camera, then the data stream must be transmitted continuously and in large quantities. And for a simple motion sensor, the cheapest Wi-Fi module is enough. It’s the same with automated smart home devices.
When choosing each component, consider your needs and what you are going to implement in the project, and do not overpay for features that you do not need.
Connection setup
So, now you have created and already installed an application or its ready-made analogue on your smartphone to control your microcontroller with Arduino, then you need to:
- Turn on the Bluetooth module itself in the system, powering it from the network or battery.
- Launch the application on your phone and find the desired device.
- Connect to the Bluetooth module using the default password or the one you set when flashing the Arduino.
- Give the first commands and see how the system reacts to them.
It’s worth saying here that there are many applications for Arduino on Google Play, in the next article we will show 7 of them.
The simplest example
So that you understand approximately how the finished project should function, we will give an example using the same add-on to your lamp.
- You connect to the system via your smartphone.
- You press one button and the circuit opens or closes.
- Light appears or disappears.
- Press the button on your smartphone again, and the opposite effect occurs.
Naturally, to do this, you must first close the circuit by turning on the light bulb using a wall switch. But this is only a conditional example of what can be realized using this technology.
In the coming lessons, we will dwell in more detail on the interaction of smartphones and microcontrollers, and together with you we will do several useful lessons.
Today we will show you how to upload code to Arduino board from using Android. It's very easy with free software available under the name ArduinoDroid. So let's get started.
Step 1: What do we need
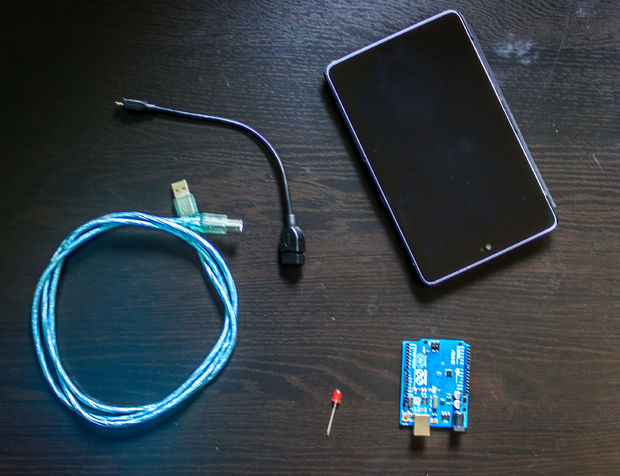
We actually need only 4 things.

- Any Arduino board;
- OTG cable;
- USB cable compatible with Arduino board;
- Android device.
USB OTG (On-The-Go) technology is designed to connect peripheral devices with each other without using a computer as an intermediary. With its help, you can connect a USB flash drive to your Android smartphone, computer mouse, printer or other peripherals. A special OTG cable is used for this.
Step 2: Install ArduinoDroid on Android Device

A fairly simple step, open Google Play, find ArduinoDroid and install. You can download the application. But not everyone will be able to follow the link.
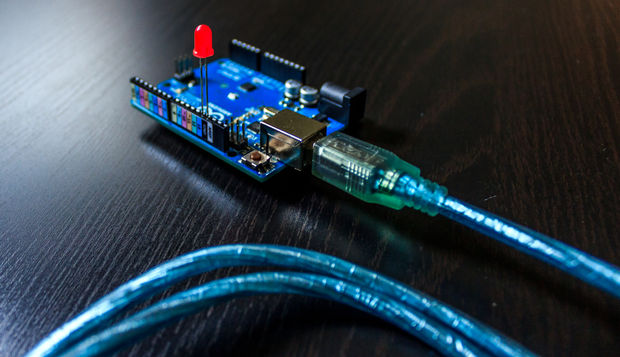
Now get your cables and Arduino board ready. We're actually going to upload the code.
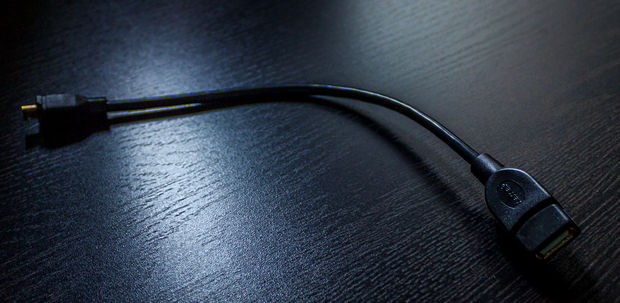
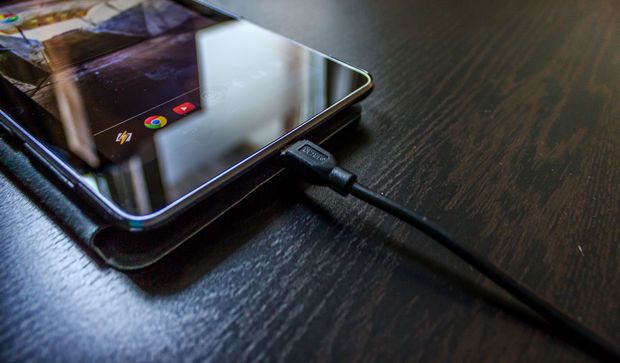
Step 3: Connect everything and open ArduinoDroid

Take the OTG cable and connect it to your Android device. Take a USB cable and connect it to the OTG cable and the Arduino board. Open the ArduinoDroid app on your Android device.
Step 4: Type your code into the ArduinoDroid app


Enter your code for the Arduino to respond to. Entering the code is approximately the same as in Arduino IDE on the computer.
Save your code often because... as many say, he sometimes falls. Don't worry, over time you will have enough experience with the application.
Step 5: Conclusion
Since the app is still in beta, it is still difficult to upload the code to the Arduino. So we still program our Arduinos using a laptop or computer.
We hope you got an idea about how to upload code to Arduino board using Android device.
This article presents step by step instructions, which will help you create your own application for an Android smartphone designed to control something via Bluetooth. To demonstrate, we will analyze in detail an example of blinking an LED on Arduino using commands from a phone or tablet. As a result of following our instructions, you will learn to do this:
To control a home robot, you just need to add buttons and process their commands on the Arduino side.
What will it take?
- Any Arduino-compatible board
- Bluetooth module
- Device on which Android OS is installed
It is best to use HC-05 as a Bluetooth module. It's easy to buy at Chinese Internet store or on eBay. The module is powered by 3.3V, but its I/O lines can handle 5V logic, allowing its UART to be connected to an Arduino.
Bluetooth module HC-05
Connecting a Bluetooth module to Arduino
So now we need to connect our Arduino with Bluetooth. If the Arduino does not have a 3.3V output, but only 5V, then you will need to install a stabilizer to reduce the power. The assignment of the HC-05 pins is easy to find on the Internet. For use, we recommend that you make a board with power lines, Rx and Tx. Connection to Arduino must be done in the following order:
- Arduino output 3.3V or (5V through a stabilizer!) - to pin 12 of the Bluetooth module
- Arduino GND output - to pin 13 of the Bluetooth module
- Arduino TX output - to pin 2 of the RX Bluetooth module
- Arduino RX output - to pin 1 of the TX Bluetooth module
After connecting, you need to check the functionality of the Bluetooth module. Let's connect the LED to pin 12 of the Arduino and upload the following sketch to the board:
Char incomingByte; // incoming data int LED = 12; // LED is connected to pin 12 void setup() ( Serial.begin(9600); // initializing the port pinMode(LED, OUTPUT); // Set pin 12 as output Serial.println("Press 1 to LED ON or 0 to LED OFF..."); ) void loop() ( if (Serial.available() > 0) ( //if data arrived incomingByte = Serial.read(); // read the byte if(incomingByte == "0" ) ( digitalWrite(LED, LOW); // if 1, then turn off the LED Serial.println("LED OFF. Press 1 to LED ON!"); // and print back the message ) if(incomingByte == "1") ( digitalWrite(LED, HIGH); // if 0, then turn on LED Serial.println("LED ON. Press 0 to LED OFF!"); ) ) )
Who doesn't want to get rid of those bulky buttons and tangled wires while working on projects? Applications for remote control Arduino on Android provides a graphical user interface (GUI) for easy control of the microcontroller.
Created in 2003, the Arduino platform quickly caught the eye of the open source and electronics communities due to its low price, tons of online tutorials, and multi-million dollar supportive community. The boards come with a variety of microprocessors and microcontrollers, the most popular being the Atmega328. With a large number of commercially available expansion modules, these Italian boards have become the choice for beginners to explore the world of embedded systems.
1. Arduino Bluetooth Controller
This app has a simple user interface and is easy to customize. Connect the Android to the Bluetooth module connected to the Arduino. You can connect in 4 different modes:
- Controller Mode: This mode is the game controller interface. When you press any of the on-screen buttons, the corresponding command will be sent to the Arduino. Control your robot easily with this nice interface.
- Switch Mode: This mode consists of one button that you can use to control the switch remotely.
- Dimmer Mode: Dimmer mode can send changing values to Arduino. Very useful when you need to capture data such as brightness and speed.
- Terminal mode. Send your custom commands in this mode and write a few lines of code on your Arduino to decode the commands.
2.Bluetooth Controller 8 Lamp

Thanks to the support Bluetooth modules HC-05, HC-06 and HC-07, this app allows you to control up to 8 channels. It has a simple user interface consisting of 8 buttons for the corresponding channels.
The buttons are also designed to switch all channels at once. The advanced tutorials also provide code examples.

Arduino does not have enough memory and processing power for effective speech recognition. What if we can use Android's speech recognition feature to send commands to Arduino?
That's exactly what this app is made for. It takes speech input and sends it to Arduino via Bluetooth as a string.
4. RemoteXY: Arduino Control

The app allows you to control your Arduino using Bluetooth, Wi-Fi, and even Ethernet. Create your own unique GUI for this application by visiting the application website - remotexy. Have fun creating buttons, switches, sliders, joysticks and other GUI elements to control your Arduino.
Plus, it allows you to connect via a cloud server, so your devices can be accessed from anywhere in the world.
5.Virtuino

Virtuino allows you to visualize your projects like no other application. Control multiple Arduino boards simultaneously via Bluetooth, Wi-Fi, Internet or even SMS.
Create visual interfaces for LEDs, switches, diagrams, analog instruments, meters, and more. It comes with library support and plenty of tutorials (including video tutorials) to help you through the process. Add a few lines of code to existing examples and you can start inventing.
6. Blynk

Thanks to its beautiful design, Blynk allows you to create user interfaces for Arduino and control them using USB, ethernet, Wi-Fi and Bluetooth. Sharing projects have become easier, just share the link to it.
7. IoT Wifi Controller

IoT Wifi Controller has a unique interface that displays the configuration of each of the Arduino IO pins. Toggle GPIO high or low and view it in real time. The ADC value is also displayed. It connects to the board using your phone or through a router.
You have found for yourself in this list Android app to control Arduino? Share your feedback and suggestions in the comments in our VKontakte group.
In this project I want to show how to upload a sketch to Arduino using conventional device based on operating system Android. This device can be useful for permanently installed Arduino boards, such as lighting controllers...
Step 1: Materials and Tools
Materials:
USB-A to USB-B cable
USB to Host Cable (OTG Cable)
Arduino
1 LED (for testing)
Android device, Android OS version 4.0.0+ (or with support for host mode)
Software:
ArduinoDroid or ArduinoCommander, which can be downloaded from the Google Play Store
Step 2: USB to Host Cable
A USB to Host cable is basically the same as a USB cable, but the micro USB connector has different resistors. Internal resistors allow the Android device to activate USB-Host mode. In this mode, you can also use USB flash drives or other devices that support a USB interface. This is very useful feature, and now you can even connect a USB printer.
The problem is that after USB connections device, it will receive power from the host device, thereby discharging its battery.
Step 3: Connections

This is a very simple step and does not require much attention. Just paste USB-A cable– USB-B to USB female connector Host cable. Then plug the USB-B connector into the Arduino and the Micro USB into the Android device.
Step 4: Powering up the Arduino

All connections must be made as shown in the photograph. Next, you can turn on your Arduino and load the latest downloaded code into it. I used the Blink sketch on my Arduino. If the Arduino does not start, then check that the connections are correct.
Step 5: Applications

Now the Arduino is ready to download the code, but your Android device is not yet...
Let's change this situation!
On at the moment There are two applications that allow you to work with our Arduino through Host mode.
To download them, go to the Play Store website, then enter "Arduino" in the search bar. Next, click on "Apps", after which only applications will be displayed. We need two applications: "ArduinoDroid" and "ArduinoCommander". Install them, then launch "ArduinoDroid". This application needs to update the IDE, which will take some time. The "ArduinoCommander" application will be required next.
Note: It is not necessary to use both applications at the same time, I just want to show how both work!
Step 6: ArduinoCommander, program author Anton Smirnov
Well, let's start with the ArduinoCommander application. It was developed by Anton Smirnov for Andorid version 2.2 or higher.
This application is designed to work with Arduino using an Android device. With it, you can easily change pin states (directly set high or low), upload sketches, or read analog pins in oscilloscope mode.
This application is easy to understand, even if the controls are non-standard. It automatically detects Arduino and operates very stable.
However, some functions do not work. I hope these bugs will be fixed in future versions of the application. The sketch upload was successful!
I bet this application 4.0 out of 5 stars.
Now let's take a quick look at connecting to Arduino.
Step 7: Part 1
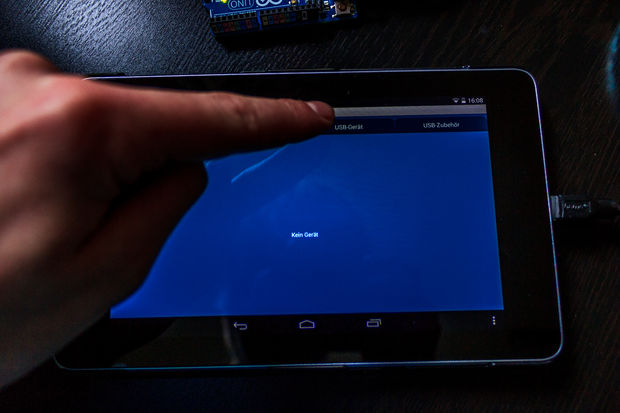
Other options include:
Ethernet
Bluetooth
USB-extras
Step 8: Part 2

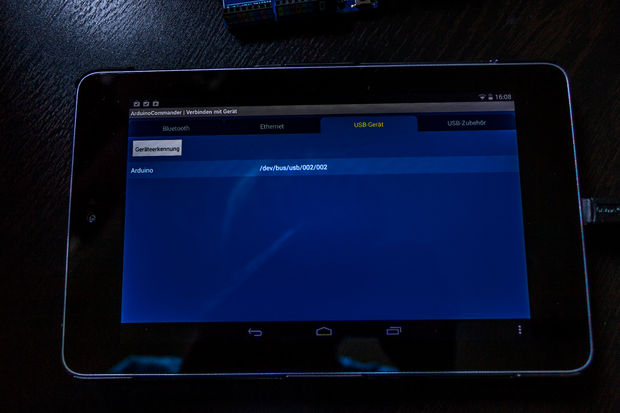
Now click on "Autodetect". Android device will start automatic search Arduino will then show it on the screen. Now let's select our Arduino (just click on it).
Step 9: Part 3

After completing the previous step, our Arduino will be shown on the screen. It is usually shown in color and you can click on the pins to change their mode. However, the mode selection did not work for me, and I could not fix this problem; Perhaps everything will work for you without failures. When you click on the bottom right corner, it will take you to a menu that will allow you to download your sketches from your SD card. This feature works very well.
Step 10: ArduinoDroid
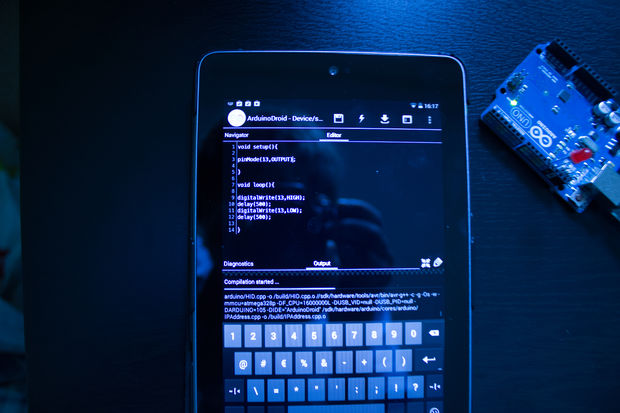
Now let's move on to another application that allows you to upload sketches to your Arduino. This application is called "ArduinoDroid" and works for Android version 4.2.2 or higher. The author of this application is also Anton Smirnov!


