PDF files with lots of graphic elements look nice, but transferring them via e-mail- continuous torment due to the large size of such documents. You don't have to wait long for the file to be attached to the email, because you can reduce its size with almost no loss of quality. Fortunately, there are plenty of ways to do this - choose whichever you want.
It is worth noting, however, that half of the methods listed below are feasible only with Adobe's Acrobat DC installed on your PC. This is a paid product, but the 30-day trial version is absolutely free. It is available on the official website of Adobe Systems.
With CutePDF or another PDF converter
You can reduce the size of a PDF file using one of the converters, such as CutePDF. It allows you to convert files from any printable format to PDF, as well as change the size of the document, increasing or decreasing the quality of images and text. When this product is installed, a virtual printer is created in the system, which converts documents to PDF format instead of printing documents.
1. Download CutePDF from the official website (free) and install. Do not forget to install the converter along with it, otherwise nothing will happen after clicking the "Print" button.
2. Open the file in a program that supports its format and has the ability to print documents. If it's a PDF file, it can be opened in Adobe Reader; what if the file has doc format or docx will do Microsoft Word. Click on the "File" menu item and select "Print".

3. When the print settings window opens, select CutePDF Writer from the list of printers.

4. Click on the "Printer Properties" button, in the window that opens, click on the "Advanced" button and select the content display quality. To compress the file to the desired size, choose a quality lower than the original.

5. Click on the "Print" button and save the file to the desired location. Only PDF is available for saving, regardless of what format the document originally had.
Using online tools
If you do not want to download and install anything, then you can compress the PDF file online. Compressing and converting documents online is fast and convenient.
1. Find a suitable tool on the Internet, such as Smallpdf. Unlike other similar online tools, here the user is not limited by the size and number of uploaded documents.
2. Having entered the site, upload the necessary document to it. This can be done by clicking on the inscription and selecting the file using the explorer, or by dragging the file with the left mouse button and dropping it in the desired area. You can also add a document from Dropbox or Google Drive.

3. At the end of the process, click on the "You can save the file" button and select a location for it on your PC. To upload a compressed document to Google Drive or Dropbox, click the corresponding icon on the right side of the button.

In addition to Smallpdf, there are many other online compressors on the Internet: Compress PDF, Online2pdf, PDFzipper and others. Some allow you to upload files up to 50 MB in size, the second - up to 100 MB, others do not have any restrictions at all, but they perform their work at approximately the same level.
In Adobe Acrobat
You can also compress a PDF file in Adobe Acrobat DC, but not in the free Adobe Reader.
1. With a document open in Acrobat, click on the File menu item, then select Save As Other and click on Reduced Size PDF File.

2. Click in the drop-down list on the version of the program with which your document should be compatible. By choosing the most new version, you can compress the file as much as possible, but there is a risk that it will become inaccessible in previous versions"Acrobat".

3. Click on the "OK" button, wait for the compression process to finish and save the compressed document to the desired location.
Another PDF compression method in Adobe Acrobat DC
If you have Adobe Acrobat installed and need to compress a document located on your PC, it is much more appropriate to use the previous method. The same method can be used when the desired file is uploaded, say, to Google Drive, and you need to download it, reducing the size along the way.
1. Log into Google Drive with your account, double click the PDF file you want to compress, and click the printer icon to open the print screen.

2. In the window that opens, click on the drop-down list and select the line Adobe PDF.

3. By clicking on the "Properties" button, you will open another window where you need to select the "Paper and print quality" tab, and then click on the "Advanced" button at the bottom of the window.

4. In the drop-down list (see screenshot below), select the desired document quality, click on the “OK” button at the bottom of the window, then in the next two windows, also click on “OK”.

5. Save the reduced file to your PC.

Using Adobe Acrobat and Microsoft Word
The essence of this method of compressing PDF documents is that you first convert the file from one format to another, and then do the reverse conversion.
1. Open a PDF document through Adobe Acrobat, go to the "File" menu and select "Save As".

2. Click the "Choose a different folder" button, then select the file type " Word Document(*.docx)" and save location. Click on Save.

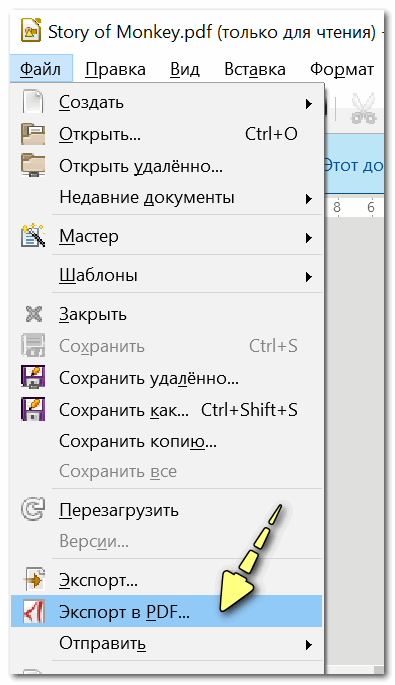
3. With the document open in Microsoft Word, click on the "File" item and select the "Save as Adobe PDF" sub-item.

Using the PDF Optimizer
This method of reducing the size of PDF files is also not complete without the use of software from Adobe Systems.
1. Open the document you want to reduce using Adobe Acrobat. Next, go to the "File" menu, click on the line "Save as Other" and select "Optimized PDF File" to launch the PDF document optimizer.

2. In the “PDF Optimization” window that opens, click on the “Estimate space usage” button to understand which elements take up how much space in the file (in bytes and percentages).

3. After evaluating what can be reduced and what does not make sense to compress, close the window by clicking on the “OK” button and set the necessary compression parameters. To do this, in the left part of the window, left-click on one or another item, and in the right part, change the parameters.

4. You can delete images, convert them from color to black and white, compress them, change resolution, change built-in fonts, etc. "Playing enough" with the parameters, click on the "OK" button and save the optimized file to the desired directory.
Way to Compress PDF Files on Mac OS X
PDF documents created by Mac OS X are noticeably larger than files with the same content created using Adobe Acrobat. If you are a Mac OS X user and would like to reduce the size of the PDF you have created, do the following:
- Open the TextEdit application, then in the program menu, click on the "File" item, and then select "Print".
- In the lower left corner of the window that opens, you will see a button with the name PDF. Click on it, and then on the line "Compress PDF" in the drop-down list. As a result, you will get a more compact PDF file.

File archiving
To make the document take up less space on your computer, you can archive it using one of the archivers, for example, 7Zip or WinRAR. Both programs are quite popular, but the first is distributed free of charge, and you will have to pay for using the second over the period limited by the trial version.
To compress a document using the 7Zip archiver, right-click on the file, then left-click on the 7Zip line first, and then on the inscription "Add to" file_name ". Then the archive will be created automatically.

If you want to set certain parameters before archiving, select the line "Add to archive". Then a window like the one in the screenshot below will open.

Using the archiver, you can significantly reduce the size of the document, as well as create an archive consisting of several files, compressed and combined with each other. This will greatly facilitate their storage and transmission by e-mail. Just before sending an archived PDF file, make sure that the recipient also has an archiver installed, otherwise he will not be able to open the archive.
Note A: Adobe Acrobat and Adobe Reader are not the same thing. Reader is free, but its PDF editing features are extremely limited, so you can only reduce the size of documents in Acrobat. However, Adobe Acrobat is a paid program. And if you do not have it and you do not want to buy it, use other options for compressing PDF documents that are not related to it.
Hi all!
Often faced with printing PDF files on different devices, from printers to plotters, I decided to write an article in which I will tell you what problems can be when printing non-standard formats. For example, do you know how to print an A1 format drawing on a simple printer? Here! I will talk about such problems in this article.
In fact, as usual, nothing complicated, you need to understand a little the settings of the Adobe Reader program
I will try to write not very long, otherwise, as Sergey ruskweb.ru said, in the matter of writing articles “Size matters!”. I'll try to keep within 3-4 kilosigns, but how will it go.
For everyone else who accidentally stumbled upon this article, I suggest reading something else. For example, my epic with or, here's another, how to do it right.
Sometimes you need to print an A3 size document on A4 size or vice versa. Not everyone needs this, but most often it is engineering and technical workers who need to pervert documents like this.
A fragment of the document to print or a huge drawing of A2 format must be received on an A4 sheet. This is what I'll tell you about.
Task one. From big to small
In all our manipulations, only one tool is required - Adobe Acrobat Reader with a version of at least 10.
You can download the latest version if someone else does not have it. Just uncheck the box, otherwise Adobe Acrobat Reader comes with McAfee, which is also installed by itself. So don't forget to uncheck the box.
Let's say we have a drawing or a large table in PDF format. This file can be created in several different ways, which I wrote about more than once and you can read it here, but best of all in our this case a virtual printer will do and I highly recommend PDF Creator.
For example, I stole a piece of drawing in A2 format from work.

The algorithm for creating from large to small format is as follows.
You send the source file for printing, but select the virtual printer as the printer and select the paper format in which the drawing was made. In no case do not make the format smaller, all line thicknesses will “float” and your document will not be readable. So, if you have an original A2 document, then you need to print on a virtual printer in A2.
Thus, we get a drawing in PDF format with the preservation of all proportions, thicknesses and font sizes. And then it remains only to print the received file on a standard printer.
Foreshadowing the logical questions “Why be so perverted?” explain. Here's the situation for you. You have created a Word document in A3 format. Such a beautiful poster, and if you start formatting it for A4, then you will have to redo everything: from the font size to the size of the pictures. But if this poster is made into a PDF file in its original format, then in the future it will be possible to print on paper of any size: from A0 to A5.
Task two. From small to big
While writing the article, I had to use this method in practice.
If you have a plotter, then of course this method will be of no use to you, but I often only have an A4 printer available. Well, how to print something big on it? Do not know? Now I will tell you. Naturally, the resulting sheets will have to be glued. At this point, everyone chooses for himself: glue the sheets or run around with his tongue hanging out in search of a plotter.
So, open the desired file in Adobe Reader and go to the menu File - Print.
And in this window we need the Poster button. Of course, you can also use the Size button, but the Poster is much simpler. Click on the Poster button...
And with the help of the Scale Section, we adjust our sheet to the required number of pages.

By the way, you can put a tick on the Clipping Marks item. Thus, get special marks on the printed sheet, according to which it is convenient to cut the sheets.
Using scissors and stationery glue (adhesive tape), a couple of A4 pages turn into one A3 sheet. Well, or four sheets of A4 into one - A2, it depends on what you want to get at the output.
Perversion, of course, but sometimes you can't do without it.
Task three. Print snippet.
I thought about finishing with two tasks, but I remembered how some of my blind-sighted employees ask me to print a piece of text or a drawing in an enlarged format.
This is done quite simply
Open the desired document (I show in the same drawing)

And increase the fragment that you want to print. Just zoom in, as you see it on the monitor screen, this is how it will look in printed form.
Now go to the print menu and select the item Extra options– Current view.

We press the Print button and we get an enlarged fragment of a piece of the document.
Task four. The PDF file does not print.
Sometimes there is such a thing that the PDF file does not print as it should. More precisely, it is printed, but on the printed sheet, instead of the normal text, all sorts of krakozyabry appear.
I met with this, though for a long time, I have not seen this recently. Most often this is due to incorrect encoding, that is, printer drivers cannot correctly determine in which language the text is written and, accordingly, they display on paper how God puts it on the soul.
There is a way around this problem.
Click the Advanced button on the Print menu
And in the window that appears, check the box "Print as image"
Everything. The program "thinks" that the file is not text, but a picture and prints it like an ordinary image. Only in earlier versions of Adobe Reader, this feature was called - "Print as on the screen"
Something like that. When you know, everything is simple.
Therefore, let me take my leave, I hope the article was useful to you. Good luck to all!
A good song, on the topic of working for “uncle”, I’m going to write everything on this topic. I think the next one will be, so subscribe to news from the blog so as not to miss anything interesting.
Good day!
PDF files seem to be good for everyone, but they have one cornerstone ... The fact is that the size of some PDF files is far from "ideal", often, when they weigh even 100÷500 MB, sometimes it reaches 1 GB! Moreover, such a file size is far from always justified: i.e. it does not have some very high-precision graphics that take up so much space.
Of course, when dealing with such a size, it is difficult to transfer it to other PCs, tablets, phones (for example, the phone simply may not have enough memory for a dozen of these files!) .
In such cases, you can "somewhat" reduce the size of the PDF by compressing it. By the way, compression can be done in different ways. Actually, this is what today's article will be about ...
By the way! If you remove some pages from a PDF document, then you can reduce its size due to this. If this option suits you, then I recommend this note:
Method number 1: archiving
Perhaps the most simple and obvious is to add PDF files to the archive. Thus, sometimes, it is possible to significantly reduce the size they occupy. In addition, one archive file is much faster and more convenient to copy from one PC to another. (rather than a dozen or even a hundred PDFs) .
Addition! Best free archivers for Windows -
To send a file to the archive - just 1-2 mouse clicks are enough. For example, in such a popular archiver as 7-Zip (you can also find it at the link above) : just right-click on the file and select from the menu that appears "Add to archive..." . See screenshot below.


Actually, my file was compressed almost 3 times! An example is below.

Advantages of the method:
- after unpacking the archive, the PDF file does not lose its quality;
- ZIP archive formats can open most modern ;
- one archive file (in which there are hundreds of PDFs) is copied much faster than doing it with the same files without adding them to the archive.
The disadvantages of the method:
- to open a file, you need to extract it from the archive (and not all PCs/phones/tablets may have the required archiver installed);
- not all files compress equally well: one can be compressed very decently, another - by 0.5%...
- when choosing some archive formats, it may take a long time to pack the files.
Method #2: Compress with Downscaling (DPI)
DPI is the number of dots per inch. The more dots per inch - the higher the quality of the displayed image (and the more the file weighs). Naturally, when re-saving a PDF file, you can specify a new number of dots per inch (DPI) and thereby reduce the file size (along with its quality).
However, I’ll note right away that it’s far from always that with a decrease in DPI, the quality of the picture worsens (in many cases you won’t notice a difference by eye!).
It is possible to do such a procedure in many programs : Adobe Acrobat (not to be confused with Adobe Reader), Fine Reader, Cute PDF Writer, Libre Office, etc. Here are a couple of free examples...
1) LibreOffice ()
Good and free office suite (I have previously recommended it as an alternative to MS Office). It has a DRAW program in its arsenal, which can easily and naturally make changes to PDF (including changing DPI). Let's take a closer look...
To launch DRAW - launch Libre Office, and select "DRAW Drawing" from the menu.

A window will open with many options for saving. Here you can change the compression quality, resolution (DPI) and other parameters. In general, I have highlighted the most necessary on the screen below.
After setting the parameters - click the export button to create a new file.

Fast, simple and easy! Is not it?
2) CutePDF Writer ()
This free program after setting "creates" a separate special line when printing a document (with the necessary properties for compression) ...
Those. install it, then open some PDF file, say, in Adobe Reader (you can also use any other program for PDF reader) and press "Print" (combination Ctrl + P).
Then choose instead of a real printer the line " CutePDF Writer", and open its "Properties".

Properties of CutePDF Writer
After you need to open the print quality tab and go to "Advanced".

Here you can set the print quality in DPI (and other parameters).

NOTE.
By the way, you need to install both files that are available on the official website of the program!

Pros of the method:
- do not lose compatibility (the file then remains the same PDF);
- the operation is quite fast;
- the operation "by changing the DPI" can be carried out by dozens of different programs.
Cons of the method:
- in some cases, the quality drops a lot (for example, if you are dealing with schemes and high-quality portfolios, this option is most likely not suitable).
Method number 3: converting to DjVU format
The DjVU format, on average, provides stronger compression than PDF. And I must admit that DjVU is one of the few formats that really competes with it.
To convert from PDF to DjVU, in my opinion, it is most preferable to use one small utility - PdfToDjvuGUI .
PdfToDjvuGUI
Of. website: http://www.trustfm.net/software/utilities/PdfToDjvuGUI.php
Note: Please note that the utility sometimes incorrectly reads the "names" of files written in Russian.

PDF to DjVU - a small utility
Using it is very simple: just add the desired file (Add PDF), set the settings (you can not touch anything) and click the button "Generate DjVU". A "black" window should appear for a while, after which the program will inform you that the file has been converted.
By the way, the program will place the DjVU file in the same folder where the original PDF was located. See the screenshot below as an example. Without changing the quality (and the program allows you to change the DPI), we managed to reduce the space occupied by the file by almost 2 times!

PS
Below are a few more online servicesthat can do a similar conversion operation.
Advantages of the method:
- maximum file compression (i.e. saving disk space!);
- the file can be immediately opened in the reader, just as you do with PDF (i.e. it is not an archive).
The disadvantages of the method:
- large files require significant time to convert;
- quality may be "lost" during conversion (so check important graphics manually to see how they are compressed);
- DjVU format is supported by fewer programs than PDF.
Method #4: Using Online Tools
Great site for fast compression and conversion from one format to another. Files up to 20-30 Mb in size are processed literally within 10-15 seconds! The service does not touch the document markup, links, menus, and other elements. Compression occurs due to graphics (that is, the PDI parameter).
Another one-stop service for quick PDF conversion to DjVU, or to compress PDF without changing the format. The result can not only be downloaded to your PC, but also immediately sent to a cloud drive: Google Drive, Dropbox...

There are 3 compression levels available on the service: minimum, normal and extreme. It works very fast, it processes files up to 3-040 MB in 5-10 seconds. (at least that was the case with my dozen test files) .

The files have been compressed // Service "I love DPF"
I also note that on this service you can split a PDF file into several parts, convert it to other formats, merge several PDFs, etc. In general, a rather multifunctional service, I recommend it for review!
Advantages:
- there is no need to install any programs on your computer;
- services can be used even from mobile devices;
- as a rule, compression of small files on services is faster.
Disadvantages:
- confidentiality (I think not everyone will dare to send some of their documents to an unfamiliar service);
- the need to upload / download files to the service (if the Internet is not very fast and there are a lot of files, this will turn into a "headache").
Suggestions on the subject are welcome...
If the book has a large volume, then the inner margins should be much larger than the outer margins. We received a book with over 600 pages. The customer sent a PDF file ready for printing. But there is one catch - the internal fields are not large enough. They must be increased due to external fields. How to do it?
Open PDF in Acrobat. Go to Document - Crop pages (Crop pages).
We find Change page format (Change Pade Size) (slightly at the bottom of this panel). Our page parameters are A4 (210 by 297). We need to increase the internal margins by 1 cm and reduce the external margins by the same 1 cm, taking into account even and odd pages.
We set custom file sizes - 220 by 297 (that is, the width was increased by 10 mm). Uncheck the box for Centered. On the right, we set the range of pages to which this should be applied: All, Only even pages.

It should look like this (even ones are larger, odd ones are smaller, we have not worked with them yet):

Working with odd ones: We set the custom file size - 220 by 297, uncheck the “Centered”, set the offset of 10 mm on the X scale, select the page range (All, Odd pages only).

We now have it like this:

Margins are different, taking into account even and odd pages. The internal field is increased by 1 cm everywhere.

After creation PDF document it tends to be very large, in order to optimize it you need to know how to reduce the PDF file size.
PDF- a very popular document format among users. Universal Viewer this format on all types of OS - adobe reader.
Format advantages:
- The quality of file display is superior to compression types such as JPEG and GIF;
- Standardization - documents with this format can be opened on all devices, while appearance document will not change;
- Ensuring security - by transferring PDF files online, you can always be sure that no one will have access to edit the file. It is also difficult to embed a viral malicious script into such files;
- Support for a large number of compression algorithms;
- Automatic detection of document authenticity.
Adobe Acrobat Pro for compression. Using Standard Functions
One of the most popular programs for working with PDF files is Adobe Acrobat Pro. With it, you can edit a previously created document and reduce its final size.
The application is paid, however, users can download a free trial version for 30 days or a portable version with reduced functionality for editing.
The program allows you to significantly reduce the size of the final file.
Follow instructions:

- Open your document in Adobe Acrobat;
- On the main panel, enable the File tab;
- Find and select an item "Save as another document..." and then "Reduced File", as indicated in the figure below;

- Next, a window will appear in which you will need to specify the necessary parameters and the level of protection of the document being created;
- Once the file has been converted, click on the "Open" tab again - "Optimized File" and in the pop-up list, click on the item "Save as different...";
- Select a location on your hard drive where you want to save the document with a reduced size and click on the OK button. This program allows compression without loss of quality.
In Adobe Acrobat, you can not only optimize the file, but also forcefully reduce its size.
To do this, follow the instructions:

- Open the document in the program;
- Now enable the File tab on the utility's main toolbar;
- Select an item "Save as different" and in the new list that appears, click on "Reduce size" as shown in the figure below;
This method is perfect if, after optimization, the size has not decreased to the level you need.

- In the new window, select the version of the program with which the final file will be compatible;
- Press the OK key to apply the options to only one file, or Apply To Multiple to save the settings for multiple PDFs at once.
You can compress a file using the built-in functions of the operating system. Windows systems. If the document does not open or takes too long to start, you need to perform an emergency compression.
To do this, open the properties of the PDF file.
Then in general settings find the button "Others" and in the window that opens, check the box next to the item marked in the figure below "Compress content...".
Save your changes by pressing the OK key.
This compression method is the simplest, so after compressing files that are several GB in size, it may be slightly distorted. general image content.

After compression, open the document in adobe reader to check its quality.
If it is invalid, return the original properties and optimize the file using third-party utilities.
If you need to reduce the file size only for a certain amount of time, use data archiving utilities.
For example, or WinRAR. In the future, if necessary, you can quickly unpack the archive and get a PDF with the initial size.
Cute PDF Utility
Consider the Cute PDF program. It is one of the most common applications for converting to PDF and for optimizing final documents.
The utility is free to download and offers a wide range of features.
The program creates a virtual printer on the computer, through which the user interacts with the main functions.
To reduce the size desired file using Cute PDF follow the instructions below:

- Open the document in any PDF reader;
- Now click on the "Print" button;

- In the window that opens to configure print settings, specify that the printer has the name "Cute PDF", find the "Properties" or "Properties" button and click on it. IN operating system Windows, this key is located opposite the printer name;
Note! If there is no Cute PDF name in the drop-down list of available printers, the program may not have been installed correctly or you did not restart your computer after installation.
- In the window that appears, open the Compression tab, then select the desired quality level and compression level for the document. Save the settings and close the properties window;
- Now in the printer settings window for printing, press the "Print" key;
- Next, a window will appear for selecting a location to save the document;
- Wait for the save to finish and check the size of the final file. If necessary, you can carry out all the above steps with a compressed file to further reduce its size.
Using Google Drive storage and Adobe Acrobat
Compression can be done directly through your Google drive. You must also have Adobe Acrobat installed on your computer.
Log into your account on disk and download the required PDF file.
Then you need to open the PDF in your browser.

To do this, select a document from the list of previously downloaded ones, right-click on it and click on the item "Open" or "Open".
Now we need to send the contents of the PDF tab to the print queue. To do this, open the print settings window in the browser settings.
Select Adobe PDF from the list of available devices. Next, press the "OK" key.
Instead of the usual printing process, the process of saving the document to HDD computer.
At the same time, the program automatically optimizes it, due to which the size will be reduced.
Remember! In order for the Adobe PDF item to be available in the print list, on your personal computer Adobe Acrobat must be installed. Otherwise, saving in this way will not be possible.
Compressing with MS Word
The popular word processor Word from the MS Office software package will also help you reduce the size of the final PDF. Open the file with Adobe Acrobat.


Now find the saved object and click on it with the right mouse button. In the pop-up list, click on the "Convert to Adobe PDF" item, as shown in the figure below.
Wait until the end of the process. As a rule, it will not take more than two minutes.
In this way, you can reduce the document size by about thirty percent without significant loss of quality.
The best online converters
Thanks to software With open source, a lot of services have appeared on the Internet that replace some desktop programs.
To reduce the size of the document you need, you can use the following services:
- Shrink PDF. Official link to the resource. This online converter allows you to reduce the size of up to 20 documents at a time without losing quality.
To get started, click on the "Open" button and select the documents to be compressed on your computer. Wait for the object to be uploaded to the service.
The file and the status of its compression process will now appear at the bottom of the page. Wait for the process to complete and download the resulting file to your device.
The figure below shows an example of using the service;


Also with the help of this service you can perform instant file compression JPEG format and PNG. To do this, switch to the corresponding service tab.
- SmallPDF. Link to the main page of the site. With this service, you can optimize popular formats, including PDF.
To get started, drag the file from the desktop to the red area open page in the browser. Also you can open the file with cloud storage from Google or Dropbox.

Wait for your document to finish uploading. The compression process will then start automatically. As a rule, the service allows you to compress the file by 5-20%.

- IlovePDF online converter. Link to the page . This online utility allows you to compress as quickly as possible.
The scheme of its work is standard: drag the PDF to the field in the browser window, then wait for the compression to finish and download the file.

- Universal online utility PDF-docs. Link to site page.
To compress, find the small box on the right side of the page. Then upload your file and select the compression type.
Press the Forward key and wait a few minutes for the process to complete.

Video footage: