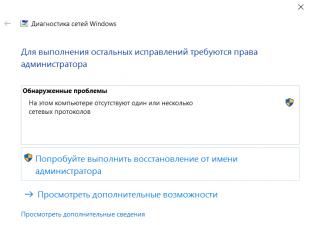
3. After the download is complete, all programs and utilities need to be installed on your PC. To do this, disable the antivirus and firewall, then install the program for flashing the Sony Xperia Z1 (С6903) phone - flashtool-0.9.15.0-windows.exe. The next step is to install the Xperia_Z1_ZUltra_driver.zip drivers:
Installing the driver fastboot:
When the phone is connected in fastboot(press the "volume DOWN" button), in the device manager on the PC, you will see a new device ' S1Boot Fastboot
‘. The device will be labeled exclamation point- the drivers are not worth it. Right-click on this device => update drivers => search for drivers on this computer => select a driver from the list already installed drivers. A window with a list of “standard types of equipment” will appear, select the topmost item “show all devices”, press the “next” button => install from disk => overview, specify the folder with the driver, click “open” and select the driver, click the button “ Further"'.
Install android_root.exe. The first time you connect, you need an active internet connection on your computer. Unpack Z1-lockeddualrecovery2.7.123-BETA.installer.zip (the path is as short as possible and without Russian letters, for example "C: Z1-DualRecovery-LOCKED_FIXED")
Upon completion of all installations, you need to restart your PC
4. For successful firmware Sony smartphone Xperia Z1 (C6903) needs to go back to stock firmware C6903_14.1.G.1.534_PCT_1276-7743
Disable antivirus and firewall, copy the file C6903_14.1.G.1.534_PCT_1276-7743.ftf copy to a folder /flashtool/firmwares
- Run FlashTool.exe or FlashTool64.exe, depending on the type of OS installed on the computer (x86 or x64, respectively);
- Turn off the phone and wait 30 seconds (so that all processes are completely completed). After 30 sec. press the button with the lightning icon. Select "FLASHMODE", double-click on the firmware we need (or you can simply drag the desired firmware into the program window). Press the "Flash" button;


A window will appear asking you to connect your phone. Hold down the "Volume Down" key and connect the USB cable connected to the computer. Perhaps (at the first connection) a window for installing drivers for your phone in this mode (FLASHMODE mode) will appear;

In the Flashtool program, your phone should be identified, the phone's firmware should start.

At the end, words should slip in your program log Flash finished(highlighted in red in the screenshot). After these words, disconnect the cable from the phone and turn it on.After the rollback, the phone will no longer see the cellular network. This is fine! After completing all the instructions, everything will be fine.
5.
Getting root rights on Sony Xperia Z1 (С6903)
After the firmware, we turn on our smartphone, go to the settings and turn on the debugging mode on the phone (settings, functions for developers, debugging via USB, check the box). Then we launch the Kingo Root application (the first time you connect, you need an active Internet connection on your computer);

We connect the phone to the PC, wait for the application to install the drivers and the ROOT button will appear.

We press the ROOT button and wait for the end of the process of obtaining super user rights on the Sony Xperia Z1 (C6903) phone;

After successful rooting, the phone should reboot on its own and a window will appear on the PC

Sony Kingo android root- finish
Feel free to press the FINISH button, and disconnect the phone from the USB cable.
If you have problems getting root on Windows 8, use the VRoot program
6.
Install TeamWin Recovery ( TWRP) (Custom recovery)
In the phone, turn on the debugging mode (settings, functions for developers, USB debugging, check the box). If there is no “features for developers” item in the “settings” menu, do the following: go to the phone settings, look for the “About phone” item, in it we find the lowest item “build number”, click several times until the item “functions for developers"; We connect the smart to the PC;
Run the file on the PC install.bat from unpacked folder С:Z1-DualRecovery-LOCKED_FIXED; then select the program that was installed as a superuser when root was obtained;
Upon completion of the process, disconnect the smartphone from the PC and reboot it.
7.
Installing custom firmware 14.3.A.0.757_PCT_1276-7743 (using TWRP)
Copy the firmware file (without unzipping - in the ".zip" format) to the memory card (file C6903_14.3.A.0.757_ODEX_PCT_1276-7743.flashable_1.0.zip (odex version) or C6903_14.3.A.0.757_DEODEX_PCT_1276-7743 .flashable_1.0.zip (deodex version)).
Load the phone in TWPR mode (after SONY appears on the screen, press the "Volume DOWN" button, after two vibrations of the phone, immediately release the button (the purple indicator will blink, TWPR will start).
You clear the smartphone of unnecessary data, that is, you do a "wipe" in TWRP. After downloading TWRP, a screen with buttons will appear. Select WIPE > ADVANCED WIPE, check the boxes for SYSTEM, DATA, CACHE, DALVIK CACHE, press the "Swipe to Wipe" button, wait for the process to end (after the wipe, in no case, do not turn off, do not restart the phone - because it will turn into a brick);
Flashing C6903_14.3.A.0.757_ODEX_PCT_1276-7743.flashable_1.0.zip (odex version) or C6903_14.3.A.0.757_DEODEX_PCT_1276-7743.flashable_1.0.zip (deodex version) Go to TWRP select install, select file C6903_14.3.A.0.757_ODEX_PCT_1276-7743.flashable_1.0.zip (odex version) or C6903_14.3.A.0.757_DEODEX_PCT_1276-7743.flashable_1.0.zip (deodex version) (in order to select a file from the card memory, in the window that appears with a list of folders, select the topmost item Up A Levelexternal_sdtransferred (
Xperia Z1 before latest version Firmware with a new version of android can be done in several ways. This article details all possible ways updates.
The simplest and most accessible method for any user is the possibility of an "over the air" update (OTA). Updates of this type are supplied by manufacturers in automatic mode. In order to install them, just a couple of touches are enough. Moreover, in this case, all personal data and OS settings are not deleted, but remain.
Another way to update Sony Xperia Z1 is to install official firmware in manual mode. Here you have to wipe the data, so it is recommended to save the latter in advance in the form backup. This method is relevant in situations where the network already has official firmware for your smartphone model, but the OTA update does not work yet. In addition, it can be used in cases of need to restore the official firmware with the return of the warranty on the gadget.
Another popular method to update the Sony Xperia Z1 is to install custom ROMs. In this case, you can radically change the interface and functionality of the device, with better optimizations and increased performance, as well as get a number of other useful benefits. When installing custom firmware, it is strongly recommended to backup all memory, and in addition, it is imperative to install and.
To use the second and third methods, you will need to do the following:
- disable anti-virus protection on the computer;
- activate on the gadget;
- charge the Sony Xperia Z1 battery;
- use the update file specially designed for this model;
- understand that all responsibility for manipulating the smartphone lies solely with the owner.
Steps to update Sony Xperia Z1 firmware via OTA:
1. Connect to WiFi networks with your Sony Xperia Z1.
2. Find in the settings and open the item that contains information about the device.
3. Select the option with firmware data.
4. If it shows that updates are available, you need to download and install them.
Manual update method for Sony Xperia Z1:
1. On the official Sony website, find the update file for your Sony Xperia Z1 model and download it.
2. Download and install on your computer.
3. Copy the .ftf file (upgrade file) to the XPERIA Flashtool related Firmware folder.
4. Launch the Flashtool application, through the interface of which you need to find the update file suitable for Xperia Z1.
5. Turn off your smartphone.
6. After receiving a notification from Flashtool that the gadget should be connected, you need to quickly connect it using USB connector to the Sony Xperia Z1 computer, while holding down the volume down button.
7. Wait while the update process takes place.
Sony Xperia Z1 update via custom firmware
1. Here, as before, it is mandatory to preliminarily and.
2. Find and download custom firmware, which is designed specifically for Sony model Xperia Z1.
3. In addition, you need to find and download Google services, which may not be in the new firmware.
4. Move or copy both archives to your smartphone without unpacking.
5. Turn off the gadget, then boot it into recovery mode.
6. Wipe using commands wipe data factory reset, wipe dalvick cache and wipe cache partition.
7. Install the update file using the functions install zip from SD card and then choose zip from SD card.
8. Similar to point 7, use the same commands to install Google services.
9. Reboot the gadget from the main menu using the command: reboot system now.
Sony Xperia Z1 firmware guide (С6903) or how to update it to Android version plus a few inaccuracy (bug) fixes for open and closed bootloader.
Smartphone firmware procedure
1. If your device has important data, they must be stored in a safe place - for example, using a backup.
2. First, download everything to your computer necessary files(driver, programmer, firmware, etc.):
Drivers (connection between smartphone and computer) - Xperia_Z1_ZUltra_driver.zip
Utility to get Root rights - android_root.exe
Firmware for Z1- C6903_14.3.A.0.757_ODEX_PCT_1276-7743.flashable_1.0.zip (odex version) or C6903_14.3.A.0.757_DEODEX_PCT_1276-7743.flashable_1.0.zip (deodex series)
3. After completing the downloads, all utilities must be installed on your PC. To do this, disable the antivirus and firewall, then install the flashtool-0.9.15.0-windows.exe utility for smartphone firmware. Driver installation will be the next step. Xperia_Z1_ZUltra_driver.zip:
Install the fastboot driver:
When you connect your smartphone in fastboot mode (hold down the "volume -"), in the device manager on the computer, find a new device 'S1Boot Fastboot'. It will be marked with an exclamation point - the driver is not installed. right-click on this device → update drivers → search for a driver on this PC → select a driver from the list of already installed drivers. A window will appear with a list of "standard types of equipment", select the topmost section - "show all devices", press the "next" key → install from disk → browse, specify the folder with the driver, click "open" and select the driver, press the key - " Further".
Install android_root.exe. When connecting for the first time, you must have an active Internet connection on your PC. Unpack Z1-lockeddualrecovery2.7.123-BETA.installer.zip (the path is as short as possible and without Russian letters - for example "С:\Z1-DualRecovery-LOCKED_FIXED")
After completing all installations, you must restart your computer.
4. For a successful phone firmware, you need to return to the stock firmware C6903_14.1.G.1.534_PCT_1276-7743
Disable antivirus and firewall, copy file C6903_14.1.G.1.534_PCT_1276-7743.ftf copy to /flashtool/firmwares folder
Run FlashTool.exe or FlashTool64.exe, it all depends on the type of OS installed in the PC (x86 or x64, respectively);
Turn off the device and wait 30 seconds. (so that all processes are completely over). After 30 sec. press the lightning key. Select "FLASHMODE", double click on the firmware you need (or you can just drag and drop required firmware to the utility window). Press the "Flash" key;


A window will appear asking you to connect your smartphone. Hold down the "Volume -" button and connect the USB cable connected to the PC. Maybe (at the first connection) a driver installation window for your smartphone will appear in this mode (FLASHMODE mode);

In the Flashtool utility, your smartphone should be identified, and the smartphone firmware will begin.

At the end, you should run the words Flashing finished in the utility log (in the screenshot it will be marked in red). After that, you need to disconnect the cable from the smartphone and turn it on. After the rollback, the smartphone will stop monitoring the cellular network. Don't worry - it's normal! After completing all the points of the guide, everything will be fine.
5. Get root rights
After the firmware procedure, turn on your phone, go to settings and enable debugging mode on your smartphone (settings\developer features\USB debugging, check the box). After that, launch the Kingo Android Root application (the first time you connect, you will need an active Internet connection on your PC);

Connect the smartphone to the PC, wait for the application to install the drivers and the ROOT key will appear.

Press the ROOT key and wait for the end of the procedure for obtaining super user rights on the smartphone;

After proper rooting, the smartphone should reboot on its own and a window will appear on the computer

Feel free to press the FINISH key and disconnect your smartphone from the USB cable.
If you have problems getting a mouth on Windows 8, use the VRoot utility
6. Install TeamWin recovery (TWRP) (Custom recovery)
Enable debugging mode on your smartphone (settings\developer features\USB debugging, check the box). If there is no “developer features” section in the “settings” menu, do the following: go to the smartphone settings, find the “About phone” item, find the lowest section “build number” in it, click several times until the item is “developer features” will not open; Connect smart to computer;
On the computer, run the install.bat file from the unpacked folder C:\Z1-DualRecovery-LOCKED_FIXED; then select a utility that will be installed as a super user when root rights are obtained;
At the end of the procedure, disconnect the phone from the computer and restart it.
7. How to install custom firmware 14.3.A.0.757_PCT_1276-7743 (using TWRP)
Copy the firmware file (without unzipping - in “.zip” format) to a memory card (file C6903_14.3.A.0.757_ODEX_PCT_1276-7743.flashable_1.0.zip (odex series) or C6903_14.3.A.0.757_DEODEX_PCT_1276-7743 .flashable_1.0.zip (deodex series)).
Boot the smartphone in TWPR mode (after SONY appears on the screen, press the "Volume -" key, after two vibrations of the smartphone, immediately release the key (the indicator lights up in purple, TWPR starts)).
Delete unnecessary information from the phone, that is, make a “wipe” in TWRP. After loading TWRP, a screen with keys will appear. Select WIPE > ADVANCED WIPE check the boxes for SYSTEM, DATA, CACHE, DALVIK CACHE swipe on the “Swipe to Wipe” button wait for the procedure to end (after the wipe, do not turn off or restart the phone in any case - so that it does not turn into a brick) ;
Flashing C6903_14.3.A.0.757_ODEX_PCT_1276-7743.flashable_1.0.zip (odex version) or C6903_14.3.A.0.757_DEODEX_PCT_1276-7743.flashable_1.0.zip (deodex version) Go to TWRP select install, select file C6903_14.3.A.0.757_ODEX_PCT_1276-7743.flashable_1.0.zip (odex series) or C6903_14.3.A.0.757_DEODEX_PCT_1276-7743.flashable_1.0.zip (deodex series) (to select a file from a memory card, in in the window that appears with a list of folders, select the topmost section Up A Level\external_sd\transferred (the name of the last folder may be different, depending on the manufacturer of the memory card)), select the file we need, swipe on the "Swipe to Confirm Flash" button and wait for the end procedures;
After the installation is completed, turn off the smartphone (power key and “volume -” up to three vibrations);
8. Flash firmware C6903_14.3.A.0.757_PCT_1276-7743 (camera fix)
Disable your antivirus and firewall. Copy file C6903_14.3.A.0.757_PCT_1276-7743.ftf to /flashtool/firmwares folder
Run the FlashTool.exe or FlashTool64.exe file on your computer, depending on the type of OS installed in the PC (x86 or x64, respectively);
Turn off your smartphone and wait 30 seconds until it turns off completely;
Press the lightning key. Select "FLASHMODE", double click on the firmware you need (or just drag and drop the desired firmware into the utility window). Uncheck the wipe section, check the - exclude (Exclude) section SYSTEM, NO FINAL VERIFICATION. Press the "Flash" key;
A window will appear asking you to connect your smartphone. Hold down the "Volume -" button and connect the USB cable connected to the computer;
In the Flashtool utility, your smartphone should be identified and the smartphone firmware should start.
At the end, you should run the words Flashing finished in the utility log (in the screenshot it will be marked in red). After that, you need to disconnect the cable from the smartphone and turn it on. Basically, the first launch of the phone after the firmware takes much more time than all the following, so don't worry, just wait.
Xperia Z1 (С6903) or how to update to the latest version of android plus a couple of bug fixes (bugs) for the closed and open bootloader.
The process of flashing the phone Sony Xperia Z1 (С6903)
1. If you have sensitive information on your phone, you need to keep it in a safe place. This can be done with a backup! Before you start flashing your own Sony Xperia Z1 (С6903) - one hundred percent, from beginning to end, read the annotation, then think again - do you really need it, and only later start flashing (or updating) the phone .
2. First, download all the necessary files to the PC (drivers, programmer, firmware, etc.):
3. After the download is over, all programs and utilities must be installed on your PC. To do this, turn off the antivirus and firewall, then install the program for flashing the Sony Xperia Z1 (С6903) phone - flashtool-0.9.15.0-windows.exe. The next step is to install the Xperia_Z1_ZUltra_driver.zip drivers:
Install android_root.exe. The first time you connect, you need an active web connection on your computer. Unpack Z1-lockeddualrecovery2.7.123-BETA.installer.zip (the path is as short as possible and without Russian letters, for example "С:\Z1-DualRecovery-LOCKED_FIXED")
At the end of all installations, you need to restart your PC
4. To successfully flash your phone Sony Xperia Z1 (C6903) needs to go back to stock firmware C6903_14.1.G.1.534_PCT_1276-7743
How to flash Sony Xperia Z1 (С6903), Sony flashtool
 sony flash tool
  sony flash tool
A window will appear asking you to connect your phone. Hold down the "Volume Down" button and connect the USB cable connected to the computer. Maybe (at the first connection) a window for installing drivers for your phone in this mode (FLASHMODE mode) will appear;
Firmware for Sony Xperia ZR,Z,Z1,Z2,Z3,Z5,C,M5,E,GO,U,P,V,TX,T,J,ZL,L,SP via USB flash drive from scratch!
This annotation fits x Sony Xperia C5 M5 Z3 C4 M4 E4g E4 Z3 Z3 Compact Sony Xperia E3 M2 Aqua C3 (Dual) Z2A T3 .
Phone firmware Sony Xperia Z1 C6903
 Sony Z1 FlashMode
 Sony Z1 flashtool firmware
Flash finished(highlighted in red in the screenshot). After these words, disconnect the cable from the phone and turn it on. After the rollback, the phone will no longer see the cellular network. This is fine! After completing all the instructions, everything will be fine.
5.
Getting root rights on Sony Xperia Z1 (С6903)

Sony Kingo Android Root
We connect the phone to the PC, wait for the application to install the drivers and the ROOT button will appear.

We press the ROOT button and wait for the end of the process of obtaining super user rights on the Sony Xperia Z1 (C6903) phone;
 Sony Kingo Android Root
After successful rooting, the phone should reboot alone and a window will appear on the PC
 Sony Kingo Android Root-finish
Feel free to press the FINISH button, and disconnect the phone from the USB cable.
If you have problems getting root on Windows 8, use the VRoot program
6. Install TeamWin Recovery ( TWRP) (Custom recovery)
7. Installing custom firmware 14.3.A.0.757_PCT_1276-7743 (using TWRP)
8. Flashing firmware C6903_14.3.A.0.757_PCT_1276-7743 (camera fix)
A window will appear asking you to connect your phone. Press the "Volume DOWN" button and connect the USB cable connected to the computer;
Sony Z1 FlashMode
In the Flashtool program, your phone should be identified, the phone's firmware should start.
Sony Z1 flashtool firmware
At the end, you should skip words in the program log Flash finished(highlighted in red in the screenshot). After these words, disconnect the cable from the phone and turn it on.
Usually the first start of the phone after the firmware takes much longer than all the next, so do not panic, wait!
Instructions on how to flash a smartphone Sony Xperia Z1 (C6903) or how to upgrade to new version android plus a couple of bug fixes for the closed and open bootloader.
The process of flashing the phone Sony Xperia Z1 (С6903)
1. If your phone has important information, it must be kept in a safe place. This can be done with a backup! Before you start flashing your Sony Xperia Z1 (C6903) - completely, from beginning to end, read the instructions, then think again - do you really need it, and only then proceed to the firmware (or update) smartphone.
2.
First, download all the necessary files to the PC (drivers, programmer, firmware, etc.):
3. After the download is complete, all programs and utilities need to be installed on your PC. To do this, disable the antivirus and firewall, then install the program for flashing the Sony Xperia Z1 (С6903) phone - flashtool-0.9.15.0-windows.exe. The next step is to install the Xperia_Z1_ZUltra_driver.zip drivers:
Installing the driver fastboot:
When the phone is connected in fastboot(press the “volume DOWN” button), in the device manager on the PC, you will see a new device ‘ S1Boot Fastboot
‘. The device will be marked with an exclamation mark - there are no drivers. Right-click on this device => update drivers => search for drivers on this computer => select a driver from the list of already installed drivers. A window with a list of “standard types of equipment” will appear, select the topmost item “show all devices”, click the “next” button => install from disk => browse, specify the folder with the driver, click “open” and select the driver, click the “ Further"'.
Install android_root.exe. The first time you connect, you need an active internet connection on your computer. Unpack Z1-lockeddualrecovery2.7.123-BETA.installer.zip (the path is as short as possible and without Russian letters, for example “С:\Z1-DualRecovery-LOCKED_FIXED”)
Upon completion of all installations, you need to restart your PC
4. For a successful firmware update of the Sony Xperia Z1 (C6903) smartphone, you need to return to the stock firmware C6903_14.1.G.1.534_PCT_1276-7743
- Disable antivirus and firewall, copy the file C6903_14.1.G.1.534_PCT_1276-7743.ftf copy to the folder /flashtool/firmwares
– Run FlashTool.exe or FlashTool64.exe, depending on the type of OS installed on the computer (x86 or x64, respectively);
- Turn off the phone and wait 30 seconds (so that all processes are completely completed). After 30 sec. press the button with the lightning icon. Select “FLASHMODE”, double-click on the firmware we need (or you can simply drag the desired firmware into the program window). Press the "Flash" button;


A window will appear asking you to connect your phone. Hold down the "Volume Down" key and connect the USB cable connected to the computer. Perhaps (at the first connection) a window for installing drivers for your phone in this mode (FLASHMODE mode) will appear;

In the Flashtool program, your phone should be identified, the phone's firmware should start.

At the end, words should slip in your program log Flash finished(highlighted in red in the screenshot). After these words, disconnect the cable from the phone and turn it on.After the rollback, the phone will no longer see the cellular network. This is fine! After completing all the instructions, everything will be fine.
5.
Getting root rights on Sony Xperia Z1 (С6903)
After the firmware, turn on our smartphone, go to the settings and turn on the debugging mode on the phone (settings \ functions for developers \ USB debugging, check the box). Then we launch the Kingo Android Root application (the first time you connect, you need an active Internet connection on your computer);

We connect the phone to the PC, wait for the application to install the drivers and the ROOT button will appear.
We press the ROOT button and wait for the end of the process of obtaining super user rights on the Sony Xperia Z1 (C6903) phone;
 Sony Kingo Android Root-rooting
 After successful rooting, the phone should reboot on its own and a window will appear on the PC
 Sony Kingo Android Root – finish
 Feel free to press the FINISH button, and disconnect the phone from the USB cable.
If you have problems getting root on Windows 8, use the VRoot program
6.
Install TeamWin Recovery ( TWRP) (Custom recovery)
In the phone, turn on the debugging mode (settings\functions for developers\debugging via USB, put a tick). If there is no item “functions for developers” in the “settings” menu, do the following: go to the phone settings, look for the item “About phone”, in it we find the lowest item “build number”, click several times until the item “functions for developers”; We connect the smart to the PC;
Run the file on the PC install.bat from unpacked folder C:\Z1-DualRecovery-LOCKED_FIXED; then select the program that was installed as a superuser when root was obtained;
Upon completion of the process, disconnect the smartphone from the PC and reboot it.
7.
Installing custom firmware 14.3.A.0.757_PCT_1276-7743 (using TWRP)
Copy the firmware file (without unzipping - in “.zip” format) to a memory card (file C6903_14.3.A.0.757_ODEX_PCT_1276-7743.flashable_1.0.zip (odex version) or C6903_14.3.A.0.757_DEODEX_PCT_1276-7743 .flashable_1.0.zip (deodex version)).
Load the phone in TWPR mode (after SONY appears on the screen, press the “Volume DOWN” button, immediately release the button after two vibrations on the phone (the purple indicator will blink, TWPR will start).
You clear your smartphone of unnecessary data, that is, you do a “wipe” in TWRP. After downloading TWRP, a screen with buttons will appear. Select WIPE > ADVANCED WIPE, check the boxes for SYSTEM, DATA, CACHE, DALVIK CACHE, click on the “Swipe to Wipe” button, wait for the end of the process (after the wipe, in no case, do not turn off, do not restart the phone - because it will turn into a brick);
Flashing C6903_14.3.A.0.757_ODEX_PCT_1276-7743.flashable_1.0.zip (odex version) or C6903_14.3.A.0.757_DEODEX_PCT_1276-7743.flashable_1.0.zip (deodex version) Go to TWRP select install, select file C6903_14.3.A.0.757_ODEX_PCT_1276-7743.flashable_1.0.zip (odex version) or C6903_14.3.A.0.757_DEODEX_PCT_1276-7743.flashable_1.0.zip (deodex version) (in order to select a file from the card memory, in the window that appears with a list of folders, select the topmost item Up A Level \ external_sd \ transferred (the name of the last folder may differ depending on the manufacturer of the memory card)), select the file we need, click on the “Swipe to Confirm Flash” button, wait the end of the process);
After the installation is completed, turn off the phone (power button and volume up to three vibrations);
8.
Flashing firmware C6903_14.3.A.0.757_PCT_1276-7743 (camera fix)