There are two main types of WLAN networks: ad-hoc mode and infrastructure mode
ad-hoc mode
The simplest wireless network is created by combining two or more wireless clients in a peer-to-peer network. A wireless network built in this way is called an ad-hoc network (ad hoc, decentralized) and there is not a single access point in it. All clients within the ad-hoc network are equal. The coverage area of this network is called the Independent Basic Service Set (IBSS). A simple ad-hoc network lets you share files and information between devices without the expense and hassle of purchasing and configuring an access point.
infrastructure mode
Although ad-hoc mode may be sufficient for small networks, larger networks require a single device to manage communications within a wireless cell. If the network has an access point, then it takes over these functions: it determines which nodes and at what time can communicate. This mode is called infrastructure mode. wireless communication; most often they are used in home and business environments. With this form of organization of WLAN networks, individual STA devices cannot interact directly with each other. In order for these devices to communicate with each other, they need permission from the access point. The access point manages all interactions and provides equal access to the environment for all STA devices. The coverage area of a single access point is called a basic service set (BSS) or cell.
What is the difference between "Ad-hoc" (direct connection mode) and "Infrastructure" (infrastructure mode) wireless connection modes?
Direct connection mode (Ad-hoc):
In an Ad-hoc network, each device can communicate with each other directly. In such a network, there is no access point that controls the connection of devices. Ad-hoc network devices can only communicate with other ad-hoc devices. They cannot connect with wireless connected devices. wired network in infrastructure mode, or devices connected to a wired network. In addition, the security of Ad-hoc mode is less reliable compared to infrastructure mode.
Infrastructure mode:
An access point is required for a wireless network with infrastructure mode. The access point manages the wireless connection and provides several important advantages over ad hoc network. For example, a network in infrastructure mode supports enhanced levels of security, higher data rates, and wired network integration.
To be honest, I rarely encountered this mode of operation of wireless networks, when two network adapters connected directly to each other, bypassing routers or access points. But, having started another network upgrade, he "lost" the print server. I had to put pressure on "Reset" and set it up again in Ad-hoc mode, and the computers are all with Windows 10, and as in that saying: "this has never happened and here it is again!"
Jokes aside, but it soon became clear that in Windows 10 there really is no explicit way (through only the graphical interface operating system) connect to another device in Ad-hoc mode. A search on the net also did not lead to anything special, until a hint of a solution to the problem was found, where would you think - on the website of the print server manufacturer.
The problem and its solution
So, the problem boiled down to the following: connect to the TP-Link TL-WPS510U print server via WiFi in Ad-hoc mode from a computer under Windows control 10.
Solution in a nutshell
Let's add a connection in infrastructure mode (ESS) and use the command line and "tambourine" to change it to Ad-hoc mode (IBSS).
Solution step by step
First you need to make sure that there is no connection to the print server in the system - otherwise delete it. You can get to the list of "Known networks" in Windows 10 by first clicking "" and then selecting " Parameter management WiFi networks ". Again, if you have already created a connection before, you must delete it or, in Windows 10 terms, " forget".
Now you can open the "Network and Sharing Center" and click on "Create and configure a new connection or network". Since Windows 10 has forgotten how to work with wireless networks in Ad-hoc mode, it is logical to assume that we will create a new connection manually, and so that the systems do not try to start the connection automatically, remove the corresponding checkbox - this checkbox is, in fact, the most important in the whole story.
After that, the screen Windows interface we are no longer an assistant: except that you can still write in it the IP address of the wireless adapter for a future connection, because the print server will not automatically assign it to us, like, for example, an access point. And now it's time to "go down to a lower level" and load the command line window, and do it on behalf of the administrator - right click on the start button and " Command line(administrator)".
The following four commands will allow us to solve our problem. More precisely, the second and third will solve the problem, the first and last will only help to make sure that the problem is solved. So, about everything in order.
1. netsh wlan show networks- will show us if there is "WLAN-PS" in the list of available networks - the one to which we must connect;
2. netsh wlan set profileparameter WLAN-PS connectiontype=ibss- literally, we set the connection type "IBSS" (Independent Basic Service Set) for the "WLAN-PS" network, well, or, as I wrote at the very beginning, the "Ad-hoc" mode we need;
3. netsh wlan connect WLAN-PS- connect to the "WLAN-PS" network;
4. ipconfig- display information about all network connections to make sure that the "WLAN-PS" network is connected.
802.11g Wireless USB Adapter User Guide
Navigating the Wireless Configuration Utility
Wireless Configuration Utility
The following section describes the various functions of the Wireless Configuration Utility. This utility provides quick access to all adapter settings.
When the installation is complete, the Wireless Configuration Utility icon will appear on the right side of the taskbar, next to the clock. Double-clicking the system tray icon will open the main menu of the Wireless Configuration Utility, from which you can quickly access all of the adapter's settings. The Configuration Utility icon will be displayed in different colors depending on the status of the wireless network: red when not connected, green when connected.
There are two types network connection that can be installed using the 802.11g Wireless USB Adapter: Infrastructure(Infrastructure) and ad hoc.
- If the connection will be established with a wireless router or access point, you will need to create a connection Infrastructure(Infrastructure).

- If the connection will be established directly with another wireless adapter, you will need to create a connection ad hoc.

- network name
- network type
- Authentication Mode
- Encryption
- Data Encryption Key Type
- Encryption Key(Encryption key)
The Wireless Configuration Utility has four sections: (Connection Status), (Site Overview), (Profile), and (About).
Link Status:

In area Link Status(Connection Status) provides a graphical representation of the connection status.
If you see how 1 and 0 move between the computer on the left and the wireless device in the center, then a connection to the wireless network is established.
If you see how 1 and 0 move between the computer on the left, the wireless device in the center, and the cloud that represents the Internet on the right, then you are connected to the wireless network and the Internet.
You can click the button for more information about wireless connection. More(More).

The main section of this screen provides information about the connection to the wireless network (Wireless Information). The first lines will indicate the SSID (service area ID) of the wireless network and the MAC address of the wireless router or access point with which the connection is established. In line network type(Network Type) will indicate the type of wireless network you are currently connected to: Infrastructure or Ad Hoc. In line Channel(Channel) will indicate the channel on which the wireless signal is being transmitted. In line Encryption(Encryption) indicates whether encryption is enabled or not and, if enabled, at what level (64 bits, 128 bits, etc.). In line Link Speed(Link Speed) indicates the speed at which the connection is made. In charts Signal Strength(Signal level) and Link Quality(Link Quality) Displays the quality level of the wireless network connection. The longer the strip, the better the connection. The bottom section shows the IP connection information for the wireless network.
Click exit(Exit) to return to the main Link Status screen.
Site Survey:
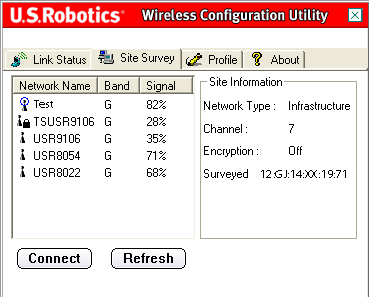
Selecting this tab opens the area site survey(Review of the site).
On the left, a list of available wireless networks that you can connect to will be displayed. Select the required network name and click the button Connect(Connect). Only five or six available wireless networks will be displayed in the list. If you cannot find the wireless network you want, click Refresh(Update).
If you still cannot find the desired wireless network when performing a Site Survey, try creating a profile: use the necessary connection information for the appropriate wireless network, select the profile, and then click the button Connect(Connect) on the Profile tab. For more information about creating a profile, see the section in this User's Guide.
Next to the Network Name list, there is a Band column. It displays the ranges of each wireless network. The 802.11g Wireless USB Adapter is compatible with both 802.11g and later products.
The Signal column appears next to this column. It provides a percentage indicator of the strength of the signal received from each wireless network that can be connected to.
When you select a network, information about the selected network will be displayed in the Site Information section on the right.
If you attempt to connect to a network that has security settings enabled, you will be asked to provide the required information. See the documentation for your wireless router or access point for instructions on finding the security information you need. Examples of required security information include the following: SSID (service area ID), authentication mode, and encryption level.
Note. When establishing a connection with a Wireless Access Point, it must support the Transmit Rate setting. If the Wireless Access Point does not support the Transmit Rate setting, the result may not be desirable.
Profile (Profile):

If you plan to connect to different networks in different locations, you can create profiles to make it easier to move from one network to another depending on your location or conditions.
If you attempt to connect to a network that has security settings enabled, you will be prompted to create a profile and provide the required information. See the documentation for your wireless router or access point for instructions on finding the security information you need.
Before establishing a wireless connection, you need to obtain the following network configuration information:
- network name(Network Name) (SSID - Service Area ID)
- network type(Network Type): Infrastructure and Ad Hoc
- Authentication Mode(Authentication Mode): Off, Open System, Shared Key, or WPA-PSK
- Encryption(Encryption): 64bits WEP (64bit WEP), 128bits WEP (128bit WEP), TKIP or AES
- Data Encryption Key Type(Data Encryption Key Type): ASCII (Alphanumeric), HEX (Hexadecimal) or Passphrase
- Encryption Key(Encryption key)
When you press a button Add(Add) you will need to follow the instructions on several screens in order to .
Select a profile and click the button Edit(Edit) to modify any created profile.
If you need to delete a profile, select it from the list and click Delete(Delete).
To establish a connection with this wireless device and network, press the button Connect(Connect).
Create a profile
There are four main scenarios that can be configured. Click the appropriate link below for instructions on setting up different types of profiles. The type of encryption you select must match the wireless device or network you plan to connect to.
- If you are going to connect to a wireless router or access point, you will need to create an Infrastructure connection. All forms of encryption can be used for an Infrastructure connection.
- If you will be connecting directly to another wireless adapter, you will need to create an Ad Hoc connection. WPA-PSK encryption cannot be used for Ad Hoc connections, so you must select one of the options below.
Profile for connecting to a wireless network without using encryption
When you press a button Add profile name(Profile name).
Next(Further).
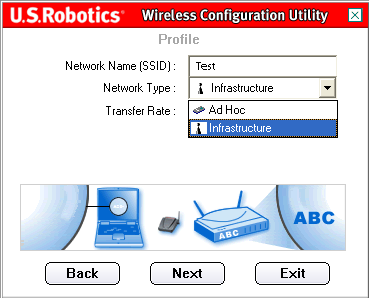
On the next screen, you must specify network name(Network name).
network type(network type): Infrastructure(Infrastructure) or ad hoc.
ad hoc:
Transfer Rate(Transmission speed): Automatic(Automatically), 6 Mbps (11G)(6 Mbps - 11G), 9 Mbps (11G)(9 Mbps - 11G), 12Mbps (11G)(12 Mbps - 11G), 18 Mbps (11G)(18 Mbps - 11G), 24 Mbps (11G)(24 Mbps - 11G), 36 Mbps (11G)(36 Mbps - 11G), 48 Mbps(11G)(48 Mbps - 11G), 54 Mbps (11G)(54 Mbps - 11G) or 54g+ (Xpress).
54g+ (Xpress)
When choosing a value Automatic
Infrastructure Next
ad hoc Channel(Channel).
Next(Next) to go to the next screen.
Authentication Mode Off(Off).
Note. When choosing a value Off(Off) Security options will be disabled.
enable(Allow) or Disable(Prohibit).
Note. enable(Allow).
Note. enable(Allow).
When choosing a value Disable(Disable) click complete
When choosing a value enable(Allow) click Next
Note.
enable complete(To complete).
Note. When establishing an Ad Hoc connection, select Disable(Prohibit).
If DHCP Status is set to Disable
Ad Hoc Users:
complete(Finish) to complete the profile setup.
Profile for connecting to a wireless network using open system encryption
When you press a button Add(Add) the first screen that appears will prompt you to enter a profile name in the profile name(Profile name).
Specify a name that can be used to easily identify the profile on the Profile screen. After entering the name, press the button Next(Further).
This is the SSID (Service Area ID) of the wireless device you want to connect to. This is also the name that will appear in the Site Survey list of available network devices. You must enter the correct SSID (Service Area ID) or you will not be able to connect to the wireless network. This field is case sensitive.
Then you will need to select network type(network type): Infrastructure(Infrastructure) or ad hoc.
Infrastructure (Infrastructure): select this mode if the connection will be established with an access point or wireless router. Infrastructure mode provides additional functions such as saving energy and increasing distance.
ad hoc: select this mode if the connection will be established with another wireless device without using an access point or wireless router.
You can then select one of the following values for the parameter Transfer Rate(Transmission speed): Automatic(Automatically), 6 Mbps (11G)(6 Mbps - 11G), 9 Mbps (11G)(9 Mbps - 11G), 12Mbps (11G)(12 Mbps - 11G), 18 Mbps (11G)(18 Mbps - 11G), 24 Mbps (11G)(24 Mbps - 11G), 36 Mbps (11G)(36 Mbps - 11G), 48 Mbps(11G)(48 Mbps - 11G), 54 Mbps (11G)(54 Mbps - 11G) or 54g+ (Xpress).
54g+ (Xpress) is a technology that uses standards based frame enhancement to achieve higher throughput.
When 54g+ is enabled, total throughput (the sum of the throughput rates of each client on the network) can increase by up to 25% on networks with a single 802.11g device, and up to 75% on networks of 802.11g and 802.11b devices.
When choosing a value Automatic(Automatic) The speed of the 802.11g Wireless USB Adapter will match the fastest wireless network speed that is connected. This means that the 802.11g Wireless USB Adapter will not reach its maximum speed if the wireless network does not support the same maximum speed.
If the Network type field is set to Infrastructure(Infrastructure), click Next(Next) to go to the next screen.
If the Network type field is set to ad hoc, then you need to choose Channel(Channel).
Users in North America can select channels from 1 to 11. Users in Europe can select channels from 1 to 13. When finished, press the button Next(Next) to go to the next screen.
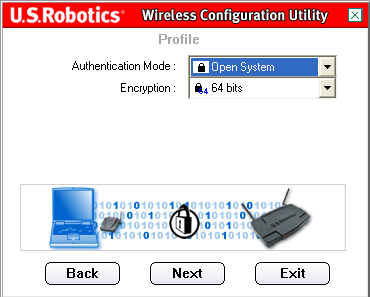
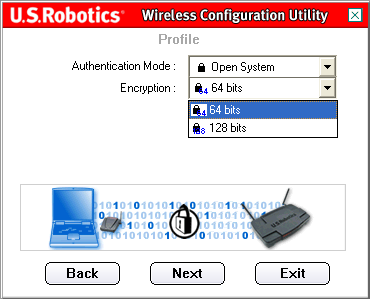
On the next screen, you can choose Authentication Mode open system(Open system).
Encryption(Encryption). You can choose one of two values: either 64 bit (64 bits) or 128 bit (128 bits). This encryption is known as WEP.
Next(Further).
Data Encryption(Data encryption).
Alphanumeric(Alphanumeric), Hexadecimal (0-9, A-F) Passphrase Alphanumeric(alphanumeric) or Hexadecimal (0-9, A-F)
If the selected method Data Encryption key(Key).
After entering a value in the field key(Key) need to select Key Index
Next(Further).
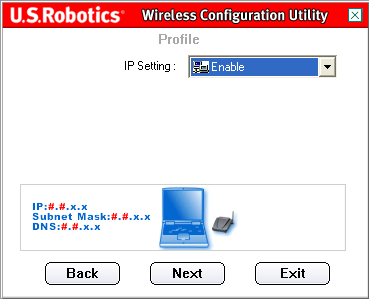
On the next screen, the IP parameter can be set to enable(Allow) or Disable(Prohibit).
Note. If you plan to connect to the Internet, select the value enable(Allow).
Note. When establishing an Ad Hoc connection, select enable(Allow).
When choosing a value Disable(Disable) click complete(Finish) to complete the profile setup.
When choosing a value enable(Allow) click Next(Next) to proceed to the next screen where you can select or specify information for the IP address.
Note. In most cases, configuring in Infrastructure mode requires Enable to be selected.
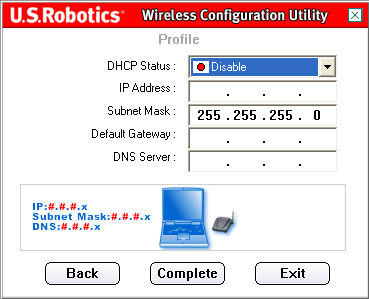
If DHCP Status is set to enable(Enable), the 802.11g Wireless USB Adapter will automatically obtain an IP address. In most configurations, DHCP should be enabled. To complete the profile setup, click the button complete(To complete).
Note. When establishing an Ad Hoc connection, select Disable(Prohibit).
If DHCP Status is set to Disable(Deny), you will need to enter the relevant information for the IP address. You will need to do this if your computer cannot automatically obtain an IP address for the 802.11g Wireless USB Adapter.
Ad Hoc Users: An example IP address to use would be 192.168.123.xxx, where xxx is a number between 1 and 255. Be sure to set all devices on your wireless network to a different IP address. Make sure all wireless devices are on the same subnet mask.
Infrastructure mode users: Be sure to set all devices on your wireless network to a different IP address. Make sure all wireless devices have the same subnet mask, default gateway, and DNS server.
After entering all the data, press the button complete(Finish) to complete the profile setup.
Profile for connecting to a wireless network using shared key encryption
When you press a button Add
Specify a name that can be used to easily identify the profile on the Profile screen. After entering the name, press the button Next(Further).
On the next screen, you must enter the name of the network with which you plan to establish a connection.
This is the SSID (Service Area ID) of the wireless device you want to connect to. This is also the name that will appear in the Site Survey list of available network devices. You must enter the correct SSID (Service Area ID) or you will not be able to connect to the wireless network. This field is case sensitive.
Then you will need to select network type(network type): Infrastructure(Infrastructure) or ad hoc.
Infrastructure (Infrastructure): select this mode if the connection will be established with an access point or wireless router. The Infrastructure mode provides additional features such as saving energy and increasing distance.
ad hoc: select this mode if the connection will be established with another wireless device without using an access point or wireless router.
You can then select one of the following values for the parameter Transfer Rate(Transmission speed): Automatic(Automatically), 6 Mbps (11G)(6 Mbps - 11G), 9 Mbps (11G)(9 Mbps - 11G), 12Mbps (11G)(12 Mbps - 11G), 18 Mbps (11G)(18 Mbps - 11G), 24 Mbps (11G)(24 Mbps - 11G), 36 Mbps (11G)(36 Mbps - 11G), 48 Mbps(11G)(48 Mbps - 11G), 54 Mbps (11G)(54 Mbps - 11G) or 54g+ (Xpress).
54g+ (Xpress) is a technology that uses standards based frame enhancement to achieve higher throughput.
When 54g+ is enabled, total throughput (the sum of the throughput rates of each client on the network) can increase by up to 25% on networks with a single 802.11g device, and up to 75% on networks of 802.11g and 802.11b devices.
When choosing a value Automatic(Automatic) The speed of the 802.11g Wireless USB Adapter will match the fastest wireless network speed that is connected. This means that the 802.11g Wireless USB Adapter will not reach its maximum speed if the wireless network does not support the same maximum speed.
If the Network type field is set to Infrastructure(Infrastructure), click Next(Next) to go to the next screen.
If the Network type field is set to ad hoc, then you need to choose Channel(Channel).
Users in North America can select channels from 1 to 11. Users in Europe can select channels from 1 to 13. When finished, press the button Next(Next) to go to the next screen.
On the next screen, you can choose Authentication Mode(Authentication mode). Choose an option Shared Key(Shared key).
You will then need to select a level for the parameter Encryption(Encryption). You can choose one of two values: either 64 bit (64 bits) or 128 bit (128 bits).
WEP is an encryption system that is used to secure wireless data transmission. WEP uses a combination of 64-bit or 128-bit keys to provide access control to your network and secure encryption for any communication. Each wireless client on the network must use the same 64-bit or 128-bit key to decrypt a data transmission.
After selecting the required value, press the button Next(Further).
You will then need to select a value for the parameter Data Encryption(Data encryption).
You can choose one of the following values: Alphanumeric(Alphanumeric), Hexadecimal (0-9, A-F)(Hexadecimal - 0 to 9, A to F) or Passphrase(passphrase). Passphrase (passphrase) is any text with a maximum length of 32 characters. Hexadecimal is text consisting of a combination of numbers ranging from 0 to 9 and letters A to F. Alphanumeric is text consisting of a combination of numbers a-z, A-Z and 0-9. The following table details the required character lengths to be entered when selecting values Alphanumeric(alphanumeric) or Hexadecimal (0-9, A-F)(Hexadecimal - 0 to 9, A to F).
If the selected method Data Encryption(Data encryption), enter the key or passphrase in the line key(Key).
After entering a value in the field key(Key) need to select Key Index(Key index). Network keys (Network Key) must match the keys of wireless routers. If you have multiple network keys, you can enter up to four keys.
The key is used to encrypt the network using the WEP algorithm. For 802.11, the wireless adapter can be configured with up to four keys, with the key index being 1, 2, 3, and 4. The message will contain the index of the key that was used to encrypt the message. The receiving access point or wireless station will be able to recover the key stored in the key index and use it to decode the message.
After completing this operation, press the button Next(Further).
On the next screen, the IP parameter can be set to enable(Allow) or Disable(Prohibit).
Note. If you plan to connect to the Internet, select the value enable(Allow).
Note. When establishing an Ad Hoc connection, select enable(Allow).
When choosing a value Disable(Disable) click complete(Finish) to complete the profile setup.
When choosing a value enable(Allow) click Next(Next) to proceed to the next screen where you can select or specify information for the IP address.
Note. In most cases, configuring in Infrastructure mode requires Enable to be selected.
If DHCP Status is set to enable(Enable), the 802.11g Wireless USB Adapter will automatically obtain an IP address. In most configurations, DHCP should be enabled. To complete the profile setup, click the button complete(To complete).
Note. When establishing an Ad Hoc connection, select Disable(Prohibit).
If DHCP Status is set to Disable(Deny), you will need to enter the relevant information for the IP address. You will need to do this if your computer cannot automatically obtain an IP address for the 802.11g Wireless USB Adapter.
Ad Hoc Users: An example IP address to use would be 192.168.123.xxx, where xxx is a number between 1 and 255. Be sure to set all devices on your wireless network to a different IP address. Make sure all wireless devices are on the same subnet mask.
Infrastructure mode users: Be sure to set all devices on your wireless network to a different IP address. Make sure all wireless devices have the same subnet mask, default gateway, and DNS server.
After entering all the data, press the button complete(Finish) to complete the profile setup.
Profile for connecting to a wireless network using WPA-PSK encryption
When you press a button Add(Add), the first screen that appears will prompt you to enter a profile name in the Profile Name field.
Specify a name that can be used to easily identify the profile on the Profile screen. After entering the name, press the button Next(Further).
On the next screen, you must enter the name of the network with which you plan to establish a connection.
This is the SSID (Service Area ID) of the wireless device you want to connect to. This is also the name that will appear in the Site Survey list of available network devices. You must enter the correct SSID (Service Area ID) or you will not be able to connect to the wireless network. This field is case sensitive.
Then you will need to select network type(Network Type): Select a value Infrastructure(Infrastructure).
Infrastructure (Infrastructure): select this mode if the connection will be established with an access point or wireless router. The Infrastructure mode provides additional features such as WEP security, power savings, and distance extension.
ad hoc: if you select this type of encryption, the WPA-PSK option will not be available. For information, see one of the other profile settings options.
You can then select one of the following values for the parameter Transfer Rate(Transmission speed): Automatic(Automatically), 6 Mbps (11G)(6 Mbps - 11G), 9 Mbps (11G)(9 Mbps - 11G), 12Mbps (11G)(12 Mbps - 11G), 18 Mbps (11G)(18 Mbps - 11G), 24 Mbps (11G)(24 Mbps - 11G), 36 Mbps (11G)(36 Mbps - 11G), 48 Mbps(11G)(48 Mbps - 11G), 54 Mbps (11G)(54 Mbps - 11G) or 54g+ (Xpress).
54g+ (Xpress) is a technology that uses standards based frame enhancement to achieve higher throughput. When 54g+ is enabled, total throughput (the sum of the throughput rates of each client on the network) can increase by up to 25% on networks with a single 802.11g device, and up to 75% on networks of 802.11g and 802.11b devices.
When choosing a value Automatic(Automatic) The speed of the 802.11g Wireless USB Adapter will match the fastest wireless network speed that is connected. This means that the 802.11g Wireless USB Adapter will not reach its maximum speed if the wireless network does not support the same maximum speed.
After completing this operation, press the button Next(Further).
On the next screen, you can choose Authentication Mode(Authentication mode). Choose a value WPA-PSK.
You will then need to select a level for the parameter Data Encryption(Data encryption). You can choose either TKIP, or AES.
TKIP is a temporary key integrity protocol. TKIP uses a more sophisticated encryption method and includes a Message Integrity Code (MIC) to provide protection against hackers. AES is an additional encryption system that uses data encryption with symmetric 128-bit synchronization.
Note. You can use WPA-PSK if the wireless network you plan to connect to supports WPA-PSK as the authentication mode. Possibly a large number of obsolete wireless devices will not be able to use WPA-PSK, so this must be checked before selecting WPA-PSK. If the authentication modes do not match, you will not be able to connect to the wireless network.
After selecting the required value, press the button Next(Further).
Then you need to enter key(Key). Key length must be between 8 and 63 characters .
Using WPA keys is very similar to using WEP, but the key is used only once to start the process. After the connection is established, the key will change randomly. It is recommended to use the most secure mechanism that can be used on the 802.11g Wireless USB Adapte, and USRobotics recommends using WPA-PSK for the most secure data hiding.
After completing this operation, press the button Next(Further).
On the next screen, the IP parameter can be set to enable(Allow) or Disable(Prohibit).
Note. If you plan to connect to the Internet, select the value enable(Allow).
When choosing a value Disable(Disable) click complete(Finish) to complete the profile setup.
When choosing a value enable(Allow) click Next(Next) to proceed to the next screen where you can select or specify information for the IP address.
Note. In most cases, configuring in Infrastructure mode requires Enable to be selected.
If DHCP Status is set to enable(Enable), the 802.11g Wireless USB Adapter will automatically obtain an IP address. In most configurations, DHCP should be enabled. To complete the profile setup, click the button complete(To complete).
If DHCP Status is set to Disable(Deny), you will need to enter the relevant information for the IP address. You will need to do this if your computer cannot automatically obtain an IP address for the 802.11g Wireless USB Adapter. After entering all the data, press the button complete(Finish) to complete the profile setup.
About(About the program):
This section provides information about the 802.11g Wireless USB Adapter.
Have you ever tried to create a network between two laptops and you didn't have a network cable? As it turned out, you can create a peer-to-peer network using a wireless network card. You can use this network to transfer any files between two laptops as if they were on a normal network. If you are curious to know how it works and how it can be done in Windows 7, feel free to read this tutorial. The guide will be divided into three parts: creating an ad hoc wireless network, connecting other computers to it, and sharing files and folders on the newly created network.
Note: Before performing any of these steps, make sure that the wireless adapter is enabled on the computers between which you are going to create an ad-hoc network.
Step 1: Create an Ad Hoc Wireless Network
You will see a new window that describes what you can do with your wireless ad hoc network. Read the contents of the window and click the button Further.
Now it's time to set up the network. First, enter a network name and then select the type of security you want to use. For more security, I recommend that you select WPA2-Personal. This provides better encryption and is much harder to crack than WEP. Then enter the password you want to use and, in case you want to use this network in other cases, check the box "Save network settings". When you're done, click Further.
The wizard will start creating the network. This activity should take no more than a few seconds.
When the wizard finishes installing the network, you will be notified that the network has been created and is ready to be used. Make sure you remember your password, then click on close.
Your laptop will now be on the air on this newly created network and it will wait for other computers to connect to it.
Step 2: Connecting other computers to the network
Now it's time to connect other computers to this newly created network. On the client computer, click the network icon in the notification area and you will see a list of available networks. Select the ad hoc network you just created and click on Connection.
You will be prompted to enter a password. When finished, click on OK.
Windows 7 will now take a few seconds to connect to the network.
When everything is ready, the window shown above will appear, and thus the connection will be finished and you can now start using the network.
Step 3: Share files and folders over the network
After setting up an ad hoc computer to a computer network and connecting all client computers, you would assume that features such as file sharing, network discovery, and more will work and you can start sharing the content you need. Unfortunately, this is not the case. Once the client is connected, it will spend a few seconds identifying the network. When this happens, the window will look like the screenshot below.
This means that you must manually change the network name and sharing settings for the public profile network. Make sure you have enabled all the features you need for the public network profile on all computers that are part of your network.
SECURITY WARNING: when disconnecting from an ad hoc network, make sure you reset network settings public profile network. If left unchanged, the next time you connect to another public network, your computer may be at risk, allowing access to your files and folders. So be sure to make sure you reset these settings to their defaults.
Conclusion
The bad part about this is that it seems impossible to easily change the network profile assigned to this type of connection. In most cases, you will be stuck on public networks and will need to manually change your network profile's network sharing settings. This, as discussed above, can lead to security issues if you connect to other truly public networks.
 uptostart.ru News. Games. Instructions. Internet. Office.


